his post explains how to monitor ultrasonic sensor value remotely using Arduino, ioShield-A & Xively Server.
Arduino Uno board is used for controlling whole system and measuring the sensor value.
We are using ioShield-A (which is based of W5500) for processing the TCP/IP connection.
Part & Program
– Arduino Uno (MCU)
– Ethernet Shield (ioShield-A / WIZnet)
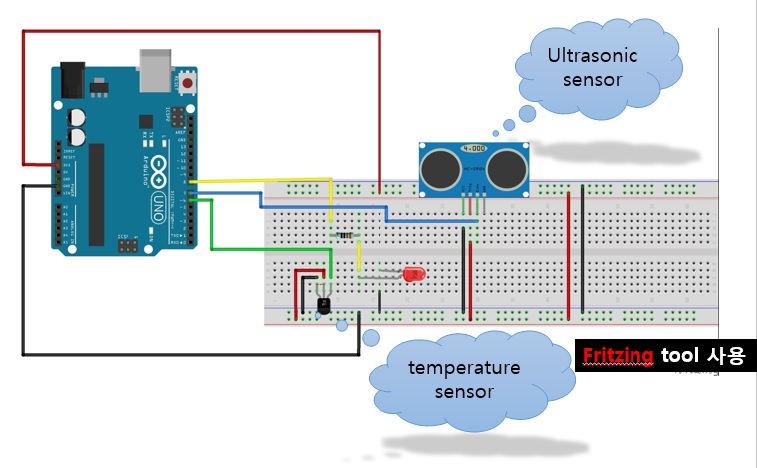
– Ultrasonic seonsor (NT-TS601, OEM)
– Temperature (DHT11, DFRobot)
– LED, Resistor
– Jumpers
– Fritzing
– Arduino Sketch
We drew the schematic at the Fritzing.

Each node and part operate and communicate as shown in below block diagram.

Set the initial IP first. If you are going to use DHCP, the IP address will be assigned by DHCP server. If not, you will use the default IP.
#define APIKEY “YfqMfUI4h9QIZ0dL8JQTpqfhIfaeXwGOc7qrpPeoFHecVPEI” // replace your Xively api key here
#define FEEDID 863324820 // replace your feed ID
#define USERAGENT “make fair” // user agent is the project name
#define ledPin 8
#define sonicPin 7
#define tempPin 6 // assign a MAC address for the ethernet controller.
// fill in your address here:
byte mac[] = { 0xDE, 0xAD, 0xBE, 0xEF, 0xFE, 0xED };
// fill in an available IP address on your network here,
// for manual configuration:
IPAddress ip(192, 168, 122, 5);
// initialize the library instance:
EthernetClient client;
// if you don’t want to use DNS (and reduce your sketch size) // use the numeric IP instead of the name for the server:
//IPAddress server(216,52,233,121);
// numeric IP for api.xively.com
char server[] = “api.xively.com”; // name address for xively API
Below function changes the sensor value in the unit of ‘cm’ or ‘inch’
long cmtomicro(long a){
return a/29/2;
}
long inchtomicro(long b){
return b/74/2;
}
Below code is to turn on the LED if the sensor value is under 10cm.
In case of String dataString = “Ultra,” and dataString += “\nTemperature, “, they must be same with the channel name that you made at the Xively

int ultra_sensorReading= cmtomicro(sonicval); // calculating the distance (cm)
if(ultra_sensorReading<=10){
digitalWrite(ledPin, HIGH);
}
String dataString = “Ultra,”;
dataString += ultra_sensorReading;
int sensor_val = DHT.read(tempPin);
int temp_SensorReading= DHT.temperature;
dataString += “\nTemperature, “;
dataString += temp_SensorReading;
sendData(dataString);
Now, we will connect to Xively, one of the most popular cloud service in the world.
1. Connect to http://xively.com

2. After log-in, go to “Development Devices”

3. Input the “User Agent”, “Feed ID” & “APIKEY” in the Arduino Sketch

4. Now, you can remotely monitor the change of the sensor value.

COMMENTS