Methods for setting up WizFi250 with a smartphone can be roughly divided into 2 ways.
A. Using a Web browser to access WizFi250 internal web server
B. An external MCU utilizing the AT Command to control WizFi250 and directly communicate with a smartphone app
Pros and cons of those two methods will be discussed below.
A. Using a Web browser to access WizFi250 internal web server
<Pros>
1. No concerns with problems that could occur from using an external MCU to set-up WizFi250 (SSID, Key, etc.)
2. Uses a Web browser in HTTP format so all equipment with a Web browser can be set-up easily
<Cons>
- Provides a general and very basic set-up menu that is not optimum for users
- Inconvenience of having to access WizFi250, enter in the password, and pass through other set-up processes
B. An external MCU utilizing the AT Command to control WizFi250 and directly communicate with a smartphone app
<Pros>
- Screen composition and other controls can be optimized (Ex: Automate WizFi250 AP to access and input common information on its own and only require necessary items to be input manually)
- Not only the WizFi250 but also the MCU can be set up the same way
<Cons>
- A separate Application needs to be developed for each system used for the WizFi250 set-up (Android, IOS, Windows, etc.)
Now, we will delve deeper into the details of the process.
Of course, the directions below are simply a reenacted example so there may be some necessary changes.
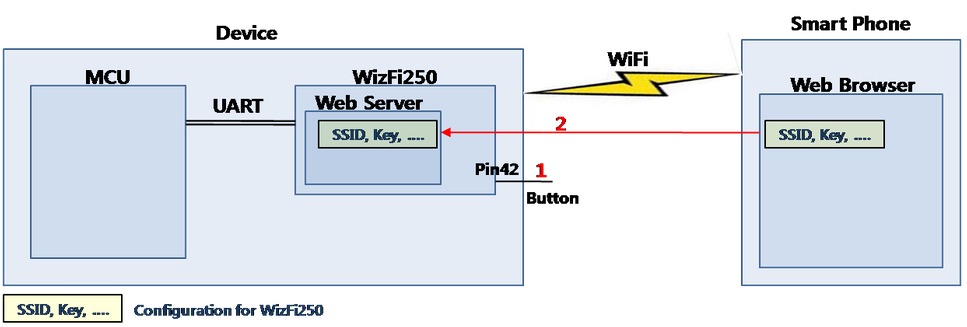
A. Using a Web browser to access WizFi250 internal web server

(1) To set-up WizFi250, click <Pin 42, Function Button> and <WizFi250 Set-up Mode> will initiate.
Here, WizFi250 will switch to Soft AP Mode and run the internal Web Server
Set AP Mode & Web Server Launch
 [OK]
WizFi250 Version 1.0.1.8 (WIZnet Co.Ltd)
 [Link-Up Event]
IP Addr : 192.168.12.1
 Gateway : 192.168.12.1
(2) After accessing WizFi250 Soft AP through the smartphone and WizFi250 Web Server through a Web browser, set up the SSID, Key, etc.
A more detailed explanation for setting up through a Web browser is provided in the link below.
http://wizwiki.net/wiki/doku.php?id=products:wizfi250:wizfi250pg:web_config
B. An external MCU utilizing the AT Command to control WizFi250 and directly communicate with a smartphone app

(1) To set-up the Device, click the Button and <WizFi250 & MCU Set-up Mode> will initiate.
(2) Here, use the MCU to do the AT Command and set-up WizFi 250 to <Soft AP & TCP Server Mode>.
 AT+WSET=1,My_WizFi250_AP_Mode
 [OK]
AT+WSEC=1,WPA2,12345678
 [OK]
AT+WNET=0,192.168.12.105,255.255.255.0,192.168.12.1
 [OK]
AT+WJOIN
 [Link-Up Event]
IP Addr : 192.168.12.105
 Gateway : 192.168.12.1
 [OK]
AT+SCON=O,TSN,,,5000,0
 [OK]
(3) Access the promised SSID with the smartphone app, and the set up TCP Server from above. Then, the input <WizFi250 and MCU Set Point> from the smartphone app will be delivered through WizFi250 to the MCU.
TCP Client Base composed smartphone app’s TCP communication data can be assumed as below.
 (TX) "Get-WiFi"
 (RX) "OldSSID,OldKey,....."
 (TX) "Set-WiFi NewSSID,NewKey,....."
 (RX) "OK"
 (TX) "Set-MCU option1,option2,....."
 (RX) "OK"
(4) The MCU will save the necessary set points (option1, …), and apply the WizFi250-related set points (SSID, Key, …) through the AT Command to WizFi250.
COMMENTS