Build a cloud-ready temperature sensor with the Arduino Uno and the IBM IoT Foundation

In the design, the Arduino board, connected to a temperature sensor, sends temperature (Fahrenheit and Celsius) and humidity information on a regular schedule to the IoT Foundation via the MQTT protocol and is graphed, using capabilities in Bluemix.
ORIGINAL POST
By Unknown
details

IBM0

In the design, the Arduino board, connected to a temperature sensor, sends temperature (Fahrenheit and Celsius) and humidity information on a regular schedule to the IoT Foundation via the MQTT protocol and is graphed, using capabilities in Bluemix. The IoT Foundation enables this data to be plotted on a realtime graph. You’ll complete this entire project over the course of this four-part series.
The neat thing about these boards is that one plugs into another — so a project might have an Arduino on the bottom, an Ethernet or WiFi shield in the middle, and perhaps a motor shield (for Robot control) or an additional extension shield for special sensors on the top. You can get a sense of what the boards look like when stacked from the photo

IBM1

you have all the physical pieces, it’s time to wire together your project. The wiring diagram in Figure shows all the connections that you need to make.

IBM2

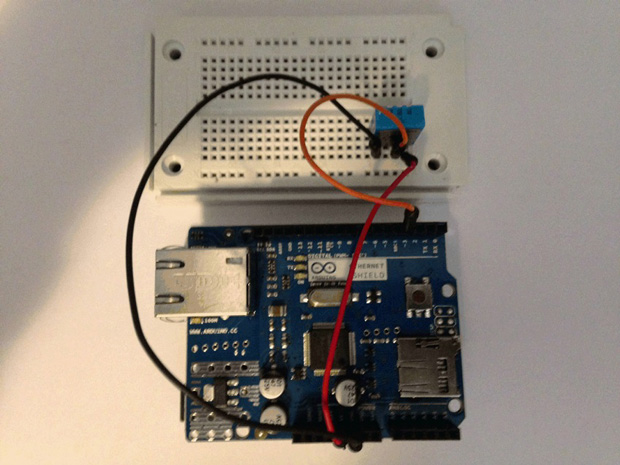
Let’s review the wiring of these parts. The Arduino is placed on the bottom, while the Ethernet shield is placed on top of it. I simply plugged the DHT11 into an unused column of pins on the breadboard. Note that the front of the DHT11 with the waffle grille — not the side with the label — is facing forward. The ground pin on the DHT11 (which is the one on the far right side with the waffle grille facing forward) is connected via the black wire to the GND pin on the Arduino. The VDD pin on the DHT11 (the one on the farthest left) is connected via the red wire to the 5V power-supply pin on the Arduino. Finally, the DTA pin (second from the left) is connected to Digital pin 3 on the Arduino. Remember that pin number —pin 3— because that becomes important when you write the software that references the DHT11.

Your final configuration should look something like next Figure.

IBM3

Source : http://www.ibm.com/developerworks/cloud/library/cl-bluemix-arduino-iot1/index.html

COMMENTS

Please Login to comment
  Subscribe  
Notify of