details
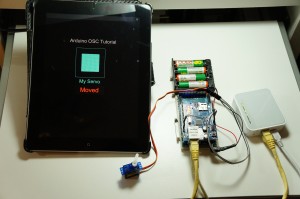
This tutorial provide step by step that help you to setup a OSC ready Arduino which allows you to send instruction to your Arduino wirelessly from your iOS/Android device by using TouchOSC
You need the following component to construct your setup
1. Arduino board (Mega 2560, UNO…etc)
2. Arduino compatible Ethernet Shield
3. Low power consumption servo unit, recommend a mini or micro sized servo.
4. Power supply, for example 5v, 2A
5. Wireless AP/Router, DHCP enabled.

Software :
// Receive from iOSC http://recotana.com/iphone/iosc/en/index.html and apply to arduino pins via OSC .
// Credits to Jerome Dupraz & Retocama
// Colorsound 011
// you can download arduino z-osc library from here https://github.com/djiamnot/Z_OSC
// you can download arduino code and vvvv patch from here: http://vvvv.org/contribution/arduinoosc

/*

This is a sample code for controlling servo via TouchOSC

*/

#include
#include
#include
#include

byte myMac[] = { 0xDE, 0xAD, 0xBE, 0xEF, 0xFE, 0xED };
byte myIp[]  = { 192, 168, 0, 178 }; // Specify your arduino  IP here
int  serverPort  = 8000; // and listening port as well

byte destIp[] =  { 192, 168, 0, 12 }; // Your iPad/Android IP here
int  destPort = 9000;

float val;// delcare a variable for reading values

// create servo object to control a servo, remember to attach them in setup()
Servo myservo1;

Z_OSCClient client;
Z_OSCServer server;
Z_OSCMessage *rcvMes;
Z_OSCMessage message;

void setup(){
 myservo1.attach(13); // attaches the servo on pin 13 to the servo object
 Serial.begin(19200);
 Ethernet.begin(myMac ,myIp);
 server.sockOpen(serverPort);
}

void loop(){
 if(server.available()){
  message.setAddress(destIp,destPort);
  rcvMes=server.getMessage();

     // myservo1
     if( !strcmp( rcvMes->getZ_OSCAddress() ,  "/1/toggle1" ) )
     {
      val = rcvMes->getFloat(0);
      myservo1.write(val);
      if ( val > 0 ) {
          message.setZ_OSCMessage( "/1/toggle1_msg" ,"s" , "Moved" );
          client.send(&message);
      } else {
          message.setZ_OSCMessage( "/1/toggle1_msg", "s" , "" );
          client.send(&message);
      }

     }

 }
}
Demo Video
Source : http://blog.mydream.com.hk/howto/arduino-osc-step-by-step-howto
COMMENTS