This Home Automation project shows us that Controlling thermostats, and the pool: there are various sensors reporting things and also some X10 devices by using Arduino Mega2560, Ethernet Shield, XBee (zigbee).
- Project Introduce
– Home Automation Project
– Control thermostats, and the pool: there are various sensors reporting things and also some X10 devices by using Arduino Mega2560, Ethernet Shield, XBee (zigbee).
– Through Ethernet Shield, real-time information can be monitored by connecting to Pachube where we collect data and has a web server that we use as an interface to control the house functions.
– Actualize Internet of Things (IoT) by applying this project to real house.
- Project Feature

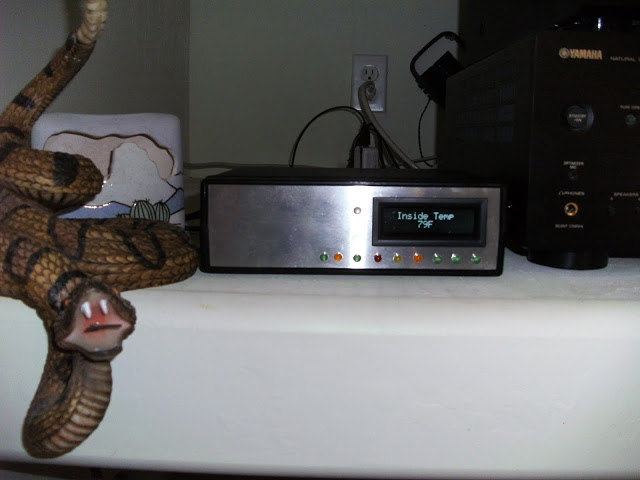
<Original Image : http://2.bp.blogspot.com/-EM9rJiPDHwU/TgDG3CJJb_I/AAAAAAAAAj4/YbC6B2hZVQs/s640/SANY0848.JPG>
– Project background
“So I automated the thermostats, and the pool; there are various sensors reporting things and also some X10 devices. That means something needs to watch over things for me and respond to my requests. I bought an Aduino Mega2560 and have it set up as my house controller. It really does very little autonomously….yet. But it will over time. Right now it handles the feed to Pachube where I collect data and has a web server that I use as an interface to control the house functions.” <http://www.desert-home.com/p/house-controller.html>
– How to use Ethernet shield
“Additionally, I use it to tell if the public IP address of my house has changed. This lets me know if I need to update the address in the DynDNS database (see directly above for more information on this). The DHCP handling is in here as well. DHCP helps me keep track of addresses that used to be hard coded. This is a nice little piece of code that is available on the Arduino web site.”
– Source code <Ethernet part>
/*
macro to compare two ip addresses using the netmask
Basically, it compares the addresses using only the zeros
in the net mask. This will tell you if the incoming
machine is local to your network.
*/
#define maskcmp(addr1, addr2, mask) \
(((((uint16_t *)addr1)[0] & ((uint16_t *)mask)[0]) == \
(((uint16_t *)addr2)[0] & ((uint16_t *)mask)[0])) && \
((((uint16_t *)addr1)[1] & ((uint16_t *)mask)[1]) == \
(((uint16_t *)addr2)[1] & ((uint16_t *)mask)[1])))
void ethernetReset(){
pinMode(rxSense, INPUT); //for stabilizing the ethernet board
pinMode(ethernetResetPin,INPUT);
while(1){
digitalWrite(ethernetResetPin, HIGH);
pinMode(ethernetResetPin, OUTPUT);
digitalWrite(ethernetResetPin, LOW); // ethernet board reset
delay(100);
digitalWrite(ethernetResetPin, HIGH);
delay(5000);
// now, after the reset, check the rx pin for constant on
if (ethernetOk())
return;
delay(100);
}
}
boolean ethernetOk(){
int cnt = 10, result;
cnt = 10;
result = 0;
while (cnt– != 0){ // simply count the number of times the light is on in the loop
result += digitalRead(rxSense);
delay(50);
}
strcpy_P(Dbuf,PSTR(“Ethernet setup result “));
Serial.print(Dbuf);
Serial.println(result,DEC);
if (result >=6) // experimentation gave me this number YMMV
return(true);
return(false);
}
boolean isLocal(Client incoming){
/*
this depends on code changes to the ethernet library
as detailed in http://arduino.cc/forum/index.php/topic,54378.0.html
*/
uint8_t clientIp[4];
uint8_t clientMac[6];
incoming.getRemoteIP_address(&clientIp[0]);
incoming.getRemoteMAC_address(&clientMac[0]);
/* This is for debugging
Serial.print(“Incoming IP is: “);
for (int n = 0; n<4; n++){
Serial.print((int)clientIp[n]);
Serial.print(“.”);
}
Serial.print(” MAC is:”);
for (int n = 0; n<6; n++){
Serial.print(clientMac[n] >> 4, HEX);
Serial.print(clientMac[n] & 0x0f, HEX);
Serial.print(“.”);
// my router has two mac addresses
//00.1F.B3.79.B3.69 seen inside
//00.1F.B3.79.B3.68 seen outside
//So, if you’re coming from outside, the .69 address will
//be seen. Coming from inside you will see the actual
//mac address. That kinda sucks for using the mac address to
//identify machines, but the ip address can still be used.
}
Serial.println();
*/
return(maskcmp(clientIp,ip,subnet_mask));
}
boolean ipEqual(uint8_t * addr1, uint8_t * addr2){
return (memcmp(addr1,addr2,4)==0);
}
boolean tryGetIpAddress(char* hostName, byte* ipAddr){
Serial.print(“Resolving “);
Serial.print(hostName);
Serial.println(“…”);
// Resolve the host name and block until a result has been obtained.
DNSError err = EthernetDNS.resolveHostName(hostName, ipAddr);
// Finally, we have a result.
if (DNSSuccess == err) {
// Serial.print(“The IP address is “);
// Serial.print(ip_to_str(ipAddr));
} else if (DNSTimedOut == err) {
strcpy_P(Dbuf,PSTR(“Timed out”));
Serial.println(Dbuf);
} else if (DNSNotFound == err) {
strcpy_P(Dbuf,PSTR(“Does not exist”));
Serial.println(Dbuf);
} else {
strcpy_P(Dbuf,PSTR(“Failed with error code “));
Serial.print(Dbuf);
Serial.println((int)err, DEC);
}
return(err == DNSSuccess);
}
void getIpAddress(char* name, byte* ipPtr){
int attempt = 0;
while (!tryGetIpAddress(name, ipPtr)){
if (attempt++ >=2)
resetMe();
if(!ethernetOk())
resetMe();
}
}
// format an IP address. (I stole this)
const char* ip_to_str(const uint8_t* ipAddr)
{
strcpy_P(Dbuf2,PSTR(“%d.%d.%d.%d\0”));
sprintf(Dbuf, Dbuf2, ipAddr[0], ipAddr[1], ipAddr[2], ipAddr[3]);
return (Dbuf);
}
– Video : Arduino Home Controller
COMMENTS