The Super Simple Arduino Weather Web Server

details

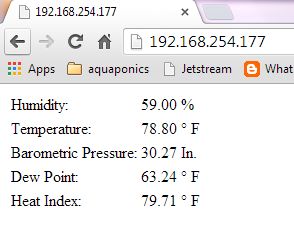
He wants to set up a home web server that could monitor indoor and outdoor temperature, humidity levels, and even monitor for indoor freezing or flooding conditions (and other security, appliance or environmental alerts). The approach He took consists of a Arduino and a Ethernet shield, running a tiny web server sketch, and for this example, He is using the popular DHT-11 Temperature / Humidity module. You can interface this to smoke / heat sensors, CO and other gas sensors, and a whole lot more.
FDGKFSPHREI6PXF_MEDIUM
For this example you will need:

Arduino
Ethernet Shield (this could be done with wifi as well with some code changes)
DHT-11 Temp/Humidity Module
10k Ohm Resistor

FC7XQ2LHM8DLW6H_MEDIUM

He has adapted the sample Web Server app included with the Arduino, by merging the DHTxx code and library from Lady Ada. This basically changes Serial.print statements to client.print, and He has massaged the html a bit to make it display nicer. You can download the code at

http://arduinotronics.blogspot.com/2013/09/arduino-temp-humidity-web-server.html

#include <DHT.h>

#define DHTPIN 2     // what pin we're connected to

// Uncomment whatever type you're using!
#define DHTTYPE DHT11   // DHT 11
//#define DHTTYPE DHT22   // DHT 22  (AM2302)
//#define DHTTYPE DHT21   // DHT 21 (AM2301)

// Connect pin 1 (on the left) of the sensor to +5V
// Connect pin 2 of the sensor to whatever your DHTPIN is
// Connect pin 4 (on the right) of the sensor to GROUND
// Connect a 10K resistor from pin 2 (data) to pin 1 (power) of the sensor

DHT dht(DHTPIN, DHTTYPE);

#include <SPI.h>
#include <Ethernet.h>

// Enter a MAC address and IP address for your controller below.
// The IP address will be dependent on your local network:
byte mac[] = {
  0x90, 0xA2, 0xDA, 0x00, 0x23, 0x36 }; //MAC address found on the back of your ethernet shield.
IPAddress ip(192,168,254,177); // IP address dependent upon your network addresses.

// Initialize the Ethernet server library
// with the IP address and port you want to use
// (port 80 is default for HTTP):
EthernetServer server(80);

void setup() {
// Open serial communications and wait for port to open:
  Serial.begin(9600);
   while (!Serial) {
    ; // wait for serial port to connect. Needed for Leonardo only
  }

  dht.begin();

  // start the Ethernet connection and the server:
  Ethernet.begin(mac, ip);
  server.begin();
  Serial.print("server is at ");
  Serial.println(Ethernet.localIP());
}


void loop() {
 
  // Reading temperature or humidity takes about 250 milliseconds!
  // Sensor readings may also be up to 2 seconds 'old' (its a very slow sensor)
  float h = dht.readHumidity();
  float t = dht.readTemperature();

  // check if returns are valid, if they are NaN (not a number) then something went wrong!
  if (isnan(t) || isnan(h)) {
    Serial.println("Failed to read from DHT");
  } else {
    Serial.print("Humidity: ");
    Serial.print(h);
    Serial.print(" %\t");
    Serial.print("Temperature: ");
    Serial.print(t);
    Serial.println(" *C");
  }
 
  // listen for incoming clients
  EthernetClient client = server.available();
  if (client) {
    Serial.println("new client");
    // an http request ends with a blank line
    boolean currentLineIsBlank = true;
    while (client.connected()) {
      if (client.available()) {
        char c = client.read();
        Serial.write(c);
        // if you've gotten to the end of the line (received a newline
        // character) and the line is blank, the http request has ended,
        // so you can send a reply
        if (c == '\n' && currentLineIsBlank) {
          // send a standard http response header
          client.println("HTTP/1.1 200 OK");
          client.println("Content-Type: text/html");
          client.println("Connection: close");  // the connection will be closed after completion of the response
   client.println("Refresh: 5");  // refresh the page automatically every 5 sec
          client.println();
          client.println("<!DOCTYPE HTML>");
          client.println("<html>");
        
          // output the value of the DHT-11
         client.println("<H2>");
            client.print("Humidity: ");
            client.println("</H2>");
            client.println("<p />");
            client.println("<H1>");
            client.print(h);
            client.print(" %\t");
            client.println("</H1>");
            client.println("<p />"); 
            client.println("<H2>");
            client.print("Temperature: ");
            client.println("</H2>");
            client.println("<H1>");
            client.print(t*1.8+32);
            client.println(" &#176;");
            client.println("F");
            client.println("</H1>");


          client.println("</html>");
          break;
        }
        if (c == '\n') {
          // you're starting a new line
          currentLineIsBlank = true;
        }
        else if (c != '\r') {
          // you've gotten a character on the current line
          currentLineIsBlank = false;
        }
      }
    }
    // give the web browser time to receive the data
    delay(1);
    // close the connection:
    client.stop();
    Serial.println("client disonnected");
  }
}

Modifying the setup on your home router to allow access from the outside world is a bit beyond the focus of this instructable, but there are many tutorials on the web. What you need to do is set up Network Address Translation (NAT), so someone accessing your public IP address gets forwarded (and translated) to the private IP on your Arduino. The other step is configuring Dynamic DNS (DDNS) so that when your ISP flips your IP address, the world can still access your Arduino by name, instead of a set of changing numbers.

Source : http://www.instructables.com/id/The-Super-Simple-Arduino-Weather-Web-Server/?ALLSTEPS

COMMENTS

Please Login to comment
  Subscribe  
Notify of