Overview
Tools: PC W5500EVB Net-SNMP package build environment: Keil4 & IAR
Features: LED control via simple network management protocol SNMP and basic control commands
1. W5500 Introduction
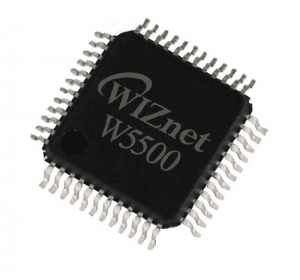
The W5500 chip is a Hardwired TCP/IP embedded Ethernet controller that enables easier internet connection for embedded systems using SPI (Serial Peripheral Interface). W5500 suits users in need of stable internet connectivity best, using a single chip to implement TCP/IP Stack, 10/100 Ethernet MAC and PHY. Hardwired TCP/IP stack supports TCP, UDP, IPv4, ICMP, ARP, IGMP, and PPPoE, …, which has been proven through various applications over many years. W5500 uses a 32Kbytes internal buffer as its data communication memory. By using W5500, users can implement the Ethernet application they need by using a simple socket program instead of handling a complex Ethernet Controller. It is possible to use 8 independent hardware sockets simultaneously. SPI (Serial Peripheral Interface) is provided for easy integration with the external MCU. The W5500 SPI supports 80 MHz speed …and the new efficient SPI protocol, so users can implement high speed network communication. In order to reduce power consumption of the system, W5500 provides WOL (Wake on LAN) and a power down mode.
Features
- Supports following Hardwired TCP/IP Protocols : TCP, UDP, ICMP, IPv4, ARP, IGMP, PPPoE
- Supports 8 independent sockets simultaneously
- Supports Power down mode
- Supports Wake on LAN over UDP
- Supports High Speed Serial Peripheral Interface(SPI MODE 0, 3)
- Internal 32Kbytes Memory for Tx/Rx Buffers
- 10BaseT/100BaseTX Ethernet PHY embedded
- Support Auto Negotiation (Full and half duplex, 10 and 100-based)
- Not support IP Fragmentation
- 3.3V operation with 5V I/O signal tolerance
- LED outputs (Full/Half duplex, Link, Speed, Active)
- 48 Pin LQFP Lead-Free Package (7x7mm, 0.5mm pitch)
2. SNMP protocol Introduction
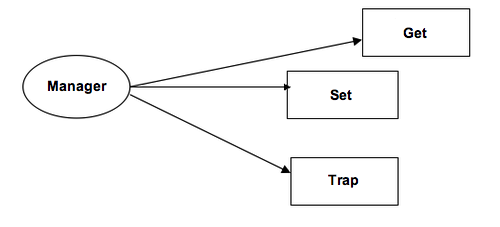
Simple Network Management Protocol (SNMP) is an “Internet-standard protocol for managing devices on IP networks”. SNMP support 5 basic core protocol data units (PDUs), they are GetRequest, GetNextRequest, SetRequest, GetResponse and Trap. SNMP is using one request and one reply protocol except Trap as Trap does not need to reply.
In actual field, SNMP Manager provide a Network management station (NMS). A network management station (NMS) executes applications that monitor and control managed devices. NMSs provide the bulk of the processing and memory resources required for network management. One or more NMSs may exist on any managed network. An agent is a network-management software module that resides on a managed device. An agent has local knowledge of management information and translates that information to or from an SNMP-specific form.
SNMP itself does not define which information (which variables) a managed system should offer. Rather, SNMP uses an extensible design, where the available information is defined by management information bases (MIBs).
The SNMP agent receives requests on UDP port 161. The manager may send requests from any available source port to port 161 in the agent. The agent response will be sent back to the source port on the manager. The manager receives notifications (Traps and InformRequests) on port 162.
GetRequest
A manager-to-agent request to retrieve the value of a variable or list of variables. Desired variables are specified in variable bindings (values are not used). Retrieval of the specified variable values is to be done as an atomic operation by the agent. A Response with current values is returned.
SetRequest
A manager-to-agent request to change the value of a variable or list of variables. Variable bindings are specified in the body of the request. Changes to all specified variables are to be made as an atomic operation by the agent. A Response with (current) new values for the variables is returned.
Trap
Asynchronous notification from agent to manager. SNMP traps enable an agent to notify the management station of significant events by way of an unsolicited SNMP message. Includes current sysUpTime value, an OID identifying the type of trap and optional variable bindings. Destination addressing for traps is determined in an application-specific manner typically through trap configuration variables in the MIB. The format of the trap message was changed in SNMPv2 and the PDU was renamed SNMPv2-Trap. While in classic communication the client always actively requests information from the server, SNMP allows the additional use of so-called “traps”. These are data packages that are sent from the SNMP client to the server without being explicitly requested.

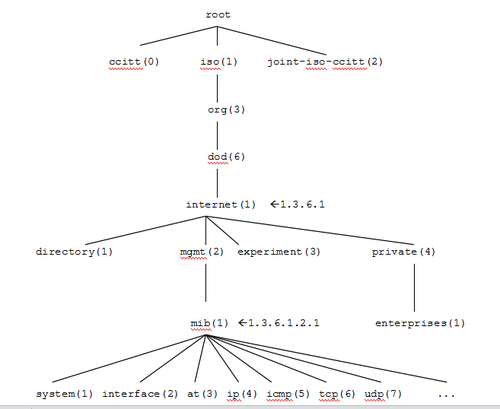
Below is the object identification of the manager
Object naming tree has 3 object on the top: ISO, ITU-T (Formerly CCITT) and one joint organization of these 2 organizations. Internet (tag is 1) is under the object dod, it is identifier code is {1.3.6.1}. The node below the node of Internet is mgmt (management) tagged 2. It’s identifier code is {1.3.6.1.2.1} or {Internet(1).2.1}. The object identifier or OID is an identifier used to name an object. Structurally, an OID consists of a node in a hierarchically-assigned namespace. For the MIB of the object {1.3.3.1.4.1} which is the enterprise, the number has been over 3,000. e.g. {1.3.6.1.4.1.2} is IBM, {1.3.6.1.4.1.9} is Cisco, etc… This mean any company and school send a email to iana-mib@isi.edu can get a named node. Therefore, each manufacture can naming their own product object identifier for the management of SNMP.
3. Net-SNMP application suite
There is many choice of SNMP application suite like SNMP++, AGENT++, Net-SNMP etc. I have chose the New-SNMP. It is an open source software and base on C language and easy to be ported.
Net-SNMP was previously developed under the UNIX platform and now can ported to Linux, Windows and other platforms. Net-SNMP is a proxy client software, but also provide the management query tool. There are two methods of installation: First, the direct installation of binary packages, the second is the need to compile the source code. We install binary packages on windows platform. Install the binary package on the windows is very simple, just follow the instruction can complete the installation easily. Source code and binaries can be downloaded from www.net-snmp.org website. We are using net-snmp5.2.1.2 version. The reason for installation of an operating system is net-snmp will follow the environment setting of the operating system. It will use the default installation path for the search; Also, you can use the configuration tool to generate the configuration file, use query tool provided for testing. Environment settings should be configured before running net-snmp, otherwise there will be no results for the query.
4.
i. Hardware Design
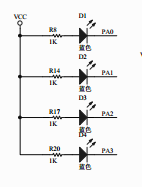
Below is the read photo and the schematic of the LEDs. MCU is Cortex M3 STM32F103. Ethernet chip is W5500 from WIZnet. The program use the control D3 as an example for the SNMP protocol. D3 is connected to the PA3 of the MCU, active low.

ii. Program Design
Before going into the details of the code, we first look at the main function. First finish the initialization of the W5500EVB and adding simple LED lights flashing alert in the main function.Also to start to prepare for the SNMP protocol, then enter the SNMP protocol operational processes. SNMP protocol and procedures are mainly the two subroutines snmplib and snmpdemo. The following is the basic system workflow.
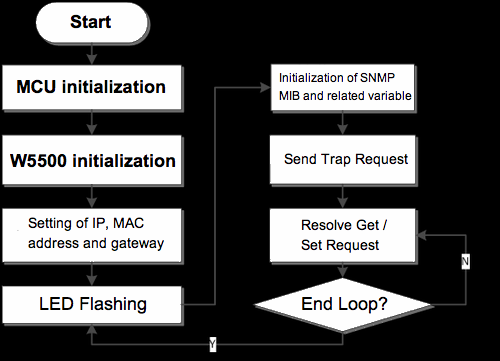
snmplib program has described the detail of the SNMP protocol workflow. The following mainly process simple analysis for the alert messages. NMS network management platform open 162 port to listen Trap came in UDP mode. Will close SOCK_SNMP after the getting the Trap request.
int32 SnmpXTrapSend(… …)
{
………………
// Send Packet
{
uint8 svr_addr[6];
//UDPOpen(SOCK_SNMP, 162);
socket(SOCK_SNMP,Sn_MR_UDP,162,0);
ipToByteArray(managerIP, svr_addr);
sendto(SOCK_SNMP, packet_trap, packet_index, svr_addr, 162);
close(SOCK_SNMP);
return 0;
}
}
Agent working in UDP mode, listen to port 161 for monitoring GetRequest, GetNextRequest and SetRequest. After creating the port, first use the register getSn_RX_RSR to determine whether there is any received data. If the data has been received, then use recvfrom() to read it from a specific port and address. Check whether the data is correct. If not, return and read again. If the data is correct, then execute the command is sent to the network. . Finally close SOCK_SNMP and perform the next operation.
int32 SnmpXDaemon()
{
int32 snmpfd = 0;
int32 fromlen = 0;
int32 retStatus = 0;
int32 len = 0;
uint8 loopsnmpd = 1;
uint8 svr_addr[6];
uint16 svr_port;
UNUSED(snmpfd);
UNUSED(fromlen);
UNUSED(retStatus);
// UDPOpen(SOCK_SNMP, 161);
socket(SOCK_SNMP,Sn_MR_UDP,161,0);
WDEBUG(“Start SNMP Daemon(Agent) “);
while(loopsnmpd)
{
if ( (len = getSn_RX_RSR(SOCK_SNMP))>0 )
{
request_msg.len= recvfrom(SOCK_SNMP, (uint8 *)&request_msg.buffer[0], len, svr_addr, &svr_port);
}
else
{
request_msg.len = 0;
continue;
}
if (request_msg.len > 0)
{
dumpCode(“rn[Request]rn”,”rn”,request_msg.buffer,request_msg.len);
request_msg.index = 0;
response_msg.index = 0;
errorStatus = errorIndex = 0;
if (parseSNMPMessage() != -1)
{
sendto(SOCK_SNMP, response_msg.buffer, response_msg.index, svr_addr, svr_port);
} dumpCode(“rn[Response]rn”,”rn”,response_msg.buffer,response_msg.index);
}
}
close(SOCK_SNMP);
return(0);
}
In snmpdemo Functions have two functions, first define a large array to put difference MIB object into it, then we can get the information in a specific location.
In this experiment, the control operation of the LED MIB objects are defined as:
{8, {0x2b, 6, 1, 4, 1, 0, 2, 0}, SNMPDTYPE_INTEGER, 4, {“”}, NULL, setWIZnetLed}
Eight is the OID length, 0x2b is acronym of “1.3” in ASN.1 i.e. 1*40+3 = 0x2b. In fact, the entire OID is 1.3.6.1.4.1.0.2.0, setfuction function is setWIZnetLed:
void setWIZnetLed (int32 val)
{
wiznetLedStatus = val;
if (wiznetLedStatus == 0)
GPIO_SetBits (GPIOA, LED3); // LED in the W5500-EVB
else
GPIO_ResetBits (GPIOA, LED3);
}
This is the function name, but also for the pointer function, there is a code in the SET function analytic process: snmpData[id].setfunction(snmpData[id].u.intval);
If proceeding this function, which snmpData[id].u.intval to resolve them from the set Request for the related variable values. The following query the MIB objects of the LED status:
{8, {0x2b, 6, 1, 4, 1, 0, 1, 0}, SNMPDTYPE_OCTET_STRING, 30, {""}, getWIZnetLed, NULL
}
Wherein getWIZnetLed is defined as:
void getWIZnetLed(void *ptr, uint8 *len)
{
if (wiznetLedStatus==0)
*len = sprintf((int8 *)ptr, "LED Off");
else
*len = sprintf((int8 *)ptr, "LED On");
}
5. Test results and notice
i. Test results
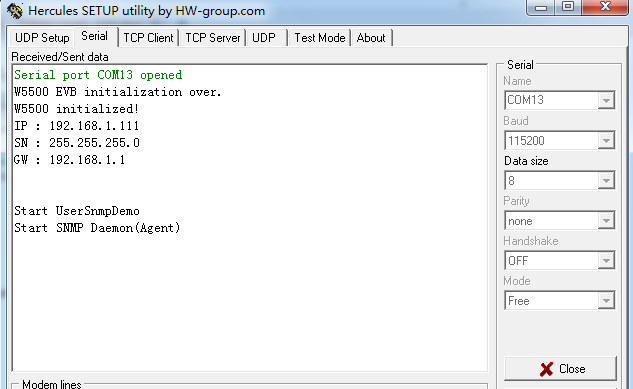
First, start Network Connections, click Local Area Connection and select Properties, set the PC to a static IP (in the same network segment with W5500) click OK after finish. With a network cable to connect the PC and W5500EVB, open the serial port software, select the correct COM port and open the serial port, for debugging information. Click Reset to see LED2 flashing, and then entering the SNMP Agent mode, the following is the normal serial print information after entering the system.
Then open the Run -> “CMD”, enter “cd usrbin”, then enter the SNMP commands.
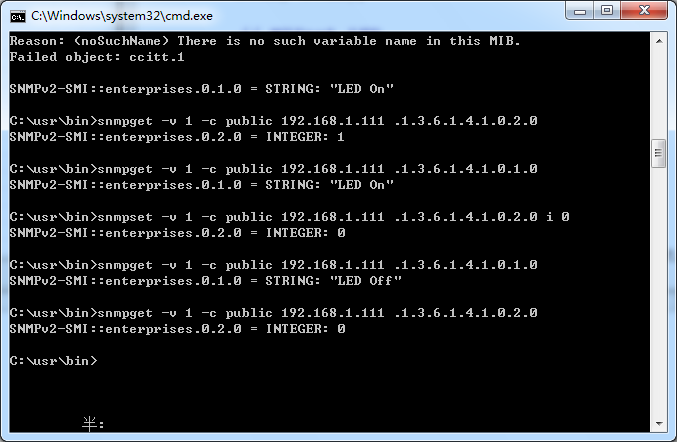
In the figure, input “snmpget -v 1 -c public 192.168.1.111 .1.3.6.1.4.1.0.2.0r”, get value 1 by a Get command.
Enter “snmpget -v 1 -c public 192.168.1.111 .1.3.6.1.4.1.0.1.0r”, as shown above, LED status becomes “LED ON”.
Enter “snmpset -v 1 -c public 192.168.1.111 .1.3.6.1.4.1.0.2.0 i 0r” as shown above, set the variable to 0.
Enter “snmpget -v 1 -c public 192.168.1.111 .1.3.6.1.4.1.0.2.0r”, as shown, get the variable 0.
Enter “snmpget -v 1 -c public 192.168.1.111 .1.3.6.1.4.1.0..0r”, as shown above, obtain LED status “LED OFF”.
From the 5 steps above, it is clear that snmpset command can easily and quickly set the LED status; LED status can be obtain even when status is unknown, you can also use the snmpget command, to achieve fast and effective control.
We can get the figure below by Request and Response packet through the serial assistant.

ii. Notice
- Remind to keep the same serial baud rate of the program tools with the serial port; otherwise information cannot be displayed properly and may cause misleading.
- Remember if the EVB is connected with the computer with Ethernet cable directly, static IP should be setup. Both computer and the EVB should be configured in the same network segment, otherwise the test results can not be achieved. If you testing using a router, not need to modify the the IP setting.
- If you need to debug it on your own board, you need to modified for all LED lights according to your own board in order to avoid errors.
- When entering the testing command, beware of the space and dot in the command. The IP address after the Public is to set the IP address of your board in the program; OID information is corresponding to array of information with the snmpdemo Functions and it can help to understand.
- Net-SNMP software must be installed, which is not limited to which drive, but is best to be installed in the C drive, as it is more convenient to start the SNMP protocol.
Please login to amobbs.com to download the source code.
Via: Blog.WIZnet.HK | iwiznet.cn
Source: amobbs.com (Chinese)
COMMENTS