Sending SMS with IOT-644 Board, ThingSpeak and Chikka API

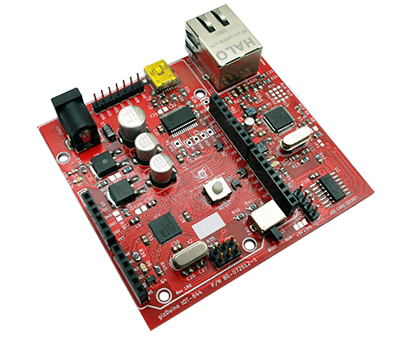
This article will show you how to add SMS capabilities to your IOT based projects. This article is based on gizDuino IOT-644 arduino compatible board based on ATmega644 and Wiznet W5500 Ethernet chip, ThingSpeak and chikka API.
ORIGINAL POST
By philrobotics
details

URL

PSOC I

This article will show you how to add SMS capabilities to your IOT based projects. This article is based on gizDuino IOT-644 arduino compatible board based on ATmega644 and Wiznet W5500 Ethernet chip, ThingSpeak and chikka API.

gizDuino IOT-644

+chikaka API +ThingSpeak.com

Arduino do not have native support for HTTPS protocol so we will use Thingspeak to trigger the Chikka API. The Chikka API entitles you to send 25 SMS for the free account.

Lets Get Started!

1. Sign up for a free trial at https://api.chikka.com/. After signing up, verify your number. Chikka allows you to send SMS only to the verified number using your free account. Take note of your chikka short code.

2. Signup for an account at Thingspeak. Register at https://thingspeak.com/users/sign_up.

Now that you have your accounts, we configure Thingspeak

1. Go to thingspeak.com sign in using your account then click on apps.

2. Click on ThingHTTP followerd by New Thing HTTP. This will take you to the setup page.

3. Name it ChikkaSendSMS,

4. URL is https://post.chikka.com/smsapi/request

5. HTTP AuthUsername is your chikka Client ID, and the AuthPassword is your Chikka Secret Key

6. Set the Method to POST

7. Leave the Content Type as Blank.

8. Click on remove header and leave the host blank

9. Put the following in the body, change the shortcode, clientid and secret key as per your chikka account.

message_type=SEND&mobile_number=%%number%%&shortcode=YOUR_SHORT_CODE&
message_id=RANDOM_USER_GENERATED_32_Characters&message=%%message%%&
client_id=YOUR_CLIENT_ID&secret_key=YOUR_SECRET_KEY

10. The message_id is a unique ID needed to be generated as per the instruction from CHIKKA.

11. Save the ThingHTTP.

Gizduino Side

1. Make sure that your Arduino IDE is patched with the latest E-Gizmo Patch for the gizDuino IOT644 board

2. Upload the following Code to your IOT Board. Don’t forget to change your apiKey and sendNumber

#include <SPI.h>
#include <Ethernet.h>

byte mac[] = {0xDE, 0xAD, 0xBE, 0xEF, 0xFE, 0xED};
char server[] = “api.thingspeak.com”;
IPAddress ip(192,168,1,200); // Change this to your ip range
// if no DHCP is present

EthernetClient client;
const String apiKey = “Your ThingHTTP Api Key”;
const String sendNumber = “DESTINATION_NUMBER”; //start with
//country code
void setup()
{
Serial.begin(9600);

Serial.println(“Gizduino Initialization”);
if (Ethernet.begin(mac) == 0) {
Serial.println(F(“Failed to configure Ethernet using DHCP”));
Ethernet.begin(mac, ip);
}
Serial.print(“DHCP Assigned IP:”);
Serial.println(Ethernet.localIP());
delay(1000);

Serial.println(“Sending SMS”);

//this function will send the sms
sendSMS(sendNumber, URLEncode(“IOT Pa More”));

}

void loop()
{

}

void sendSMS(String number,String message)
{

if (client.connect(server, 80))
{
//make TCP connection to ThingSpeak

client.print(“GET /apps/thinghttp/send_request?api_key=”);
client.print(apiKey);
client.print(“&number=”);
client.print(number);
client.print(“&message=”);
client.print(message);
client.println(” HTTP/1.1″);
client.print(“Host: “);
client.println(server);
client.println(“Connection: close”);
client.println();
}
else
{
Serial.println(F(“Connection failed”));
}

while (client.connected())
{
if ( client.available() )
{
char c = client.read();
Serial.print(c);
}
}
Serial.println();
client.stop();
}
//Encode spaces to HTML tags
String URLEncode(const char* msg)
{
const char *hex = “0123456789abcdef”;
String encodedMsg = “”;

while (*msg!=”){
if( (‘a’ <= *msg && *msg <= ‘z’)
|| (‘A’ <= *msg && *msg <= ‘Z’)
|| (‘0′ <= *msg && *msg <= ‘9’) ) { encodedMsg += *msg; } else { encodedMsg += ‘%'; encodedMsg += hex[*msg >> 4];
encodedMsg += hex[*msg & 15];
}
msg++;
}
return encodedMsg;
}

3. One Uploaded, you will get a response similar to the image below from your serial terminal

Source: http://www.philrobotics.com/sending-sms-with-iot-644-board-thingspeak-and-chikka-api

COMMENTS

Please Login to comment
  Subscribe  
Notify of
POSTED BY
Reusable S/W