Recently people have been using Arduino in their projects with increasing frequency, since it contains e.g. Ethernet or Wi-Fi shield. An entire computer is usually altogether superfluous in this context. In this article I will show how you can use Wi-Fi in your project without Arduino. We will make a clock with Wi-Fi and monochromatic matrix, which will also show weather in relevant locality.

List of components.
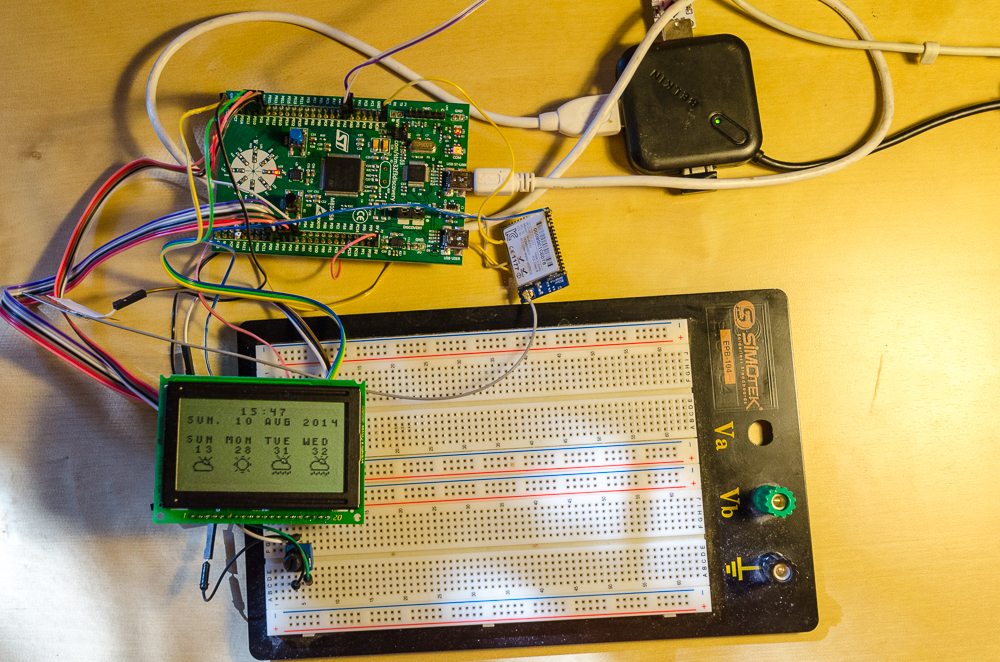
- Debug board STM32F3DISCOVERY.
- KS0108 controller based screen (MT-12864A)
- WizFi220 Wi-Fi module.
There are 3 steps to display the weather forecast.
- Sending GET request and receiving an answer for gathering the weather information from OpenWeatherMap.
- Initializing and adjusting Wi-Fi and display.
- Displaying current time, date and several day forecasts.
Step 1.
To receive a forecast, a GET request is sent to a dedicated address, which for Moscow looks like:
http://api.openweathermap.org/data/2.5/forecast/daily?q=Moscow,ru&units=metric&cnt=7
q=Moscow,ru from API OpenWeatherMap in the metric system units=metric for seven days cnt=7. If we need an answer in JSON, one more parameter should be added: mode=json. But XML is more convenient for us.{“cod”:”200″,”message”:0.2284,”city”:{“id”:524901,”name”:”Moscow”,”coord”:{“lon”:
37.615555,”lat”:55.75222},”country”:”RU”,”population”:0,”sys”:{“population”:0}},”cnt”:7,
“list”:[{“dt”:1407142800,
“temp”:{“day”:28.06,”min”:23.9,”max”:28.06,”night”:23.9,”eve”:28.06,”morn”:28.06},
“pressure”:1011.4,
“humidity”:38,
“weather”:[{“id”:803,”main”:”Clouds”,”description”:”broken clouds”,”icon”:”04d”}],
“speed”:4.61,”deg”:38,”clouds”:64},…]}

To initialize this module properly, it is necessary to send the sequence of instructions (each instruction should end with carriage return char CR, 0x0D) thereto:
AT— this instruction is needed for check of the module correct operation. After first turning on, the module shall returnAT\r\r\n[OK]\r\n.
ATE0disables instruction echo. The module does not return a newly received instruction any more, and only sends in the answer.
AT+WDmakes module disconnect from all Wi-Fi networks. Needed in case if WizFi220 should be reinitialized due to whatever reason without reset.
AT+NDHCP=1turning on DHCP client. I think there is no need to explain what is that.
AT+WPAPSK=SSID,passphraserequests WizFi220 to calculate PSK (Pre-Shared Key) for network and key.
AT+WA=SSIDstarts the process of association with network.
AT+NCLOSEALLcloses all connections.
AT+NCTCP=144.76.102.166,80connects the TCP client to IP address and TCP server port. In this case, it is the address of openweathermap.org.
Step 3.
Drawing all symbols output to the screen. For this purpose, He used a wonderful program from Pyotr Vysochanskyi KS0108_4_0_1


Tags: 201409, openweathermap, weather forecast, stm32, WIZnet, wizfi220
COMMENTS