
Datura 6 home automation – 2015 improvements
This project could use it as a complete irrigation system for garden, or use it to control aquarium, or just to control any kind of devices at home.
you need some basic soldering skills to build the project and you’ll have to have a bit of arduino knowledge.

Feature
- Arduino Programmed
- Sensor control
- Password protected
- Web controlled
Parts
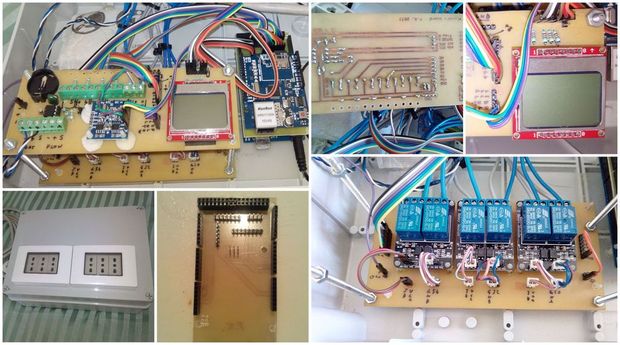
- Arduino Mega 2560
- Ehernet shield w5100
- DHT22 temperature/humidity sensor
- DS1307 real time clock
- 3 x 20x10cm 1 side copper pcb (see drawings for size specifications)
- 6 x relays 5v 10A-250V
- lcd nokia lhp7366 (nokia 5110 o 3110) – warning! it need 3v. 10k resistances needed on all pins to limit current.
- 30x20x10cm plastic box6 wall power outlets
- Electric wires for relays
- SD(temp, humidity, analog sensor of each relay and switch on/off states
WebServer


Try to connect to 192.168.1.99 (password paol) from your browser
Try to switch between manual and auto mode, and switch on/off the relays.
He used the sensors to check humidity in a pot, so in the picture it should still see the label humidity.
Relay Connections
Before connecting 220v to relays, try relays with lower voltage devices , like 9v lamps, and check that everything works fine. Then box the project.
!!Safety is the first thing.
Reference Data
Reference Code
- datura_mega_v18.ino is the code
- dht22.zip – the humidity temperature sensor library
- adafriut_pcd8544.zip – display chars library
- adafruit_gfx.zip – display graphic library
- ehernet.zip – ethernet library
- realtimeclock ds1307.zip – clock library
- sd.zip – microsd library
- datura eeprom init.ino
For more information, refer to this URL.
http://www.instructables.com/id/Datura-6-home-automation-2015-improvements/
tags : 2015.06.07, Ethernet Shield, homeautomation, webserver, relay, W5100, Arduino
COMMENTS