This project is an example of Ethernet shield.
User can manage his house easily by using Arduino platform through Web.
This project would be included in Web category of WIZnet Museum.
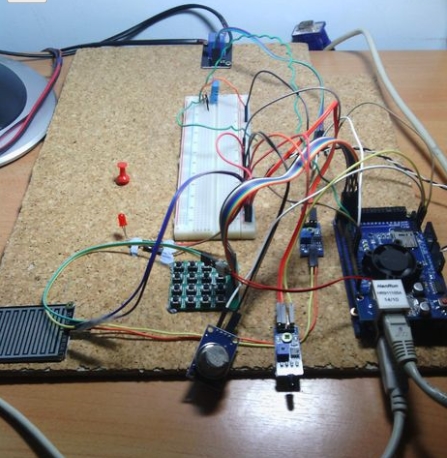
Arduino Web Server with sensors

I made it to learn how to use the sensors.
And i want to turns on/off my ventilator when i’m not home.
So i can watch my room status when i’m not home.
Later i wanted to make E-mail notification.
If you access your Arduino’s ip in router forwarding (port:80) then you can connect to your Website no matter where you are.
If you want to made it, you need:
•Arduino Microcontroller
•Ethernet Shield
•DHT11 sensor
•4×4 matrix keypad
•Raindrop sensor
•Relay
•Gas sensor
•IR Flame sensor


Relay. How to Work?

How to connect my lamp to Relay?
You can see the picture, its easy.
Relay connect to Arduino?
Relay -> Arduino
VCC -> 5V
GND -> GND
IN1 -> Choose a Digital Input
Arduino Program code:
#define RELAY1  6                       // Relay in Digital input 6
void setup()
{
pinMode(RELAY1, OUTPUT);
}
 void loop()
{
digitalWrite(RELAY1,LOW);          // Relay turns on
delay(2000);                                   // Wait 2 seconds
digitalWrite(RELAY1,HIGH);          // Relay turns off
delay(2000);                                   // Wait 2 seconds
}
4×4 Matrix Keypad. How to Work?

How to connect 4×4 Matrix KeyPad to Arduino?
First 4 pin: ( Connect to Digital inputs )
Its return back with the column number when you press a button.
The last 4 pin: ( Connect to Digital inputs )
Returns back with the row number.
byte colPin[4]={22,24,26,28};   // Column Pins
byte rowPin[4]={23,25,27,29};  // Rows Pins
Example:
You have a 4×4 matrix keypad.
char keys[4][4]=
{'1','2','3','A'},
{'4','5','6','B'},
{'7','8','9','C'},
{'*','0','#','D'}};
If you press the 2nd column and 2nd row button.
The program is write out the ‘5’ in the serial port.
For Example:
#include
 char keys[4][4]={
  {'1','2','3','A'},
  {'4','5','6','B'},
  {'7','8','9','C'},
  {'*','0','#','D'}};
byte colPin[4]={22,24,26,28};
byte rowPin[4]={23,25,27,29};

Keypad keypad=Keypad(makeKeymap(keys),rowPin,colPin,4,4);

void setup()
{
     Serial.begin(9600);
     pinMode(8, OUTPUT);
}
void loop()
{
     char pressed=keypad.getKey();
     if(pressed) {
          Serial.println(pressed);
     }
}
DHT11 Sensor. How to Use?

How to read templature and humidity?
For Example:
#include

dht11 DHT11;
#define DHT11PIN 3

void setup()
{
    Serial.begin(9600);
}

void loop()
{
      DHT11.read(DHT11PIN);  // This method is reading new humidity and temperature.
      Serial.print(DHT11.humidity, 1);
      Serial.println(DHT11.temperature, 1);
      delay(1000);
}
Raindrop Sensor. How to Work?

How to connect the sensor with your Arduino?
OV -> Analog input
GND -> GND
VCC -> 5V
The Sensor Value:
The sensor is returns back with a value.
More than 1000: Its Dry
If less than 1000: its Wet
For Example:
void setup()
{
Serial.begin(9600);
}
void loop() {
int sensorValue = analogRead(A0); // Its read a value.
Serial.println(sensorValue);
delay(100);
}
IR Flame Sensor. How to Work?

How to connect the sensor with your Arduino?
OV -> Analog input
GND -> GND
VCC -> 5V
The Sensor Value:
The sensor is returns back with a value.
About 900: Normal
If less: Detected Fire
For Example:
void setup()
{
Serial.begin(9600);
}
void loop() {
int sensorValue = analogRead(A0); // Its read a value.
Serial.println(sensorValue);
delay(100);
}
MQ-2 Gas Sensor. How to Work?

How to connect the sensor with your Arduino?
OV -> Analog input
GND -> GND
VCC -> 5V
The Sensor Value:
The sensor is returns back with a value.
About 100: Normal
If more: Detected Gas
For Example:
void setup()
{
Serial.begin(9600);
}
void loop() {
int sensorValue = analogRead(A0); // Its read a value.
Serial.println(sensorValue);
delay(100);
}
If you want to know more in detail, refer to
Source : http://www.instructables.com/id/Arduino-Web-Server-with-sensors/
COMMENTS