This project is an example of Ethernet shield.
User can monitor sensing data of device easily by using Arduino platform through Web.
This project would be included in Sensing & Gathering category of WIZnet Museum.
Real-time room temperature on your Website (no javascript or server side coding)

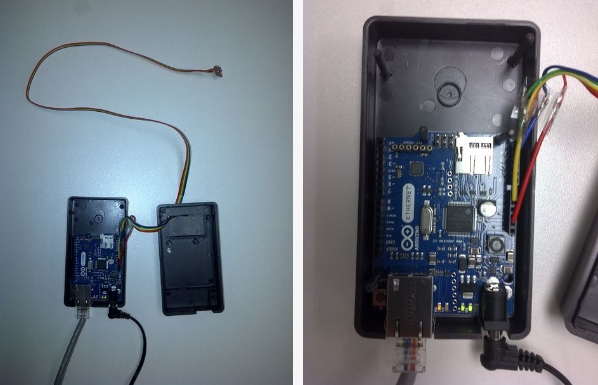
Connect the Sensor As Shown on the Picture.

Connect the sensor as shown on the picture.
Image is taken from incredibly good blog http://bildr.org
I often use it as a reference
Register on Partcl.com

Register on Partcl.com.
After registration you will get a publishing key and a web key. You will need them for the next steps.
Upload the Arduino Code

Upload the Arduino code
Substitute Bold fields with the following information:
-Mac address of your board
-IP of the board in your network. If you have DHCP and can not specify a fixed IP address, you will need another library and slightly different code. I will be more then happy to provide any additional instructions if needed.
#include <SPI.h>
#include <Ethernet.h>
#include <Wire.h>

// Enter a MAC address and IP address for your controller below.
// The IP address will be dependent on your local network:
byte mac[] = {0x??, 0x??, 0x??, 0x??, 0x??, 0x??}; //Mac Address of Arduino Ethernet Shield or Ethernet Board
byte ip[] = {???,???,???, ???};  // IP address of the Arduino
byte server[] = {67, 202, 35, 165}; // Partcl.com

int tmp102Address = 0x48;

// Initialize the Ethernet client library
// with the IP address and port of the server
// that you want to connect to (port 80 is default for HTTP):

Client client(server, 80);

void setup() {
// start the Ethernet connection:
Ethernet.begin(mac, ip);
// start the serial library:
Serial.begin(9600);
SPI.begin();
Wire.begin();

// give the Ethernet shield a second to initialize:
delay(1000);

}

void loop()
{
Wire.requestFrom(tmp102Address,2);
byte MSB = Wire.receive();
byte LSB = Wire.receive();
int TemperatureSum = ((MSB << 8) | LSB) >> 4; //it's a 12bit int,
using two's compliment for negative
float celsius = TemperatureSum*0.0625;


Serial.println(celsius,2);
if (client.connect()) {
   client.print("GET
/publish?publish_key=ENTER_YOUR_PUBLISHING_KEY_HERE&id=temp_test&value=");
   client.print(celsius, 2);
   client.print(" HTTP/1.1\r\n");
   client.print("Host: partcl.com\r\n");
   client.print("User-Agent: Arduino For Teh Win!\r\n");
   client.print("Accept: text/html\r\n");
   client.println("Connection: close\r\n");
   client.println();
   delay(300);
}
client.stop();
}
Create the Web Page

Create the following html page:
(DO NOT FORGET to substitute “ENTER_YOUR_WEB_KEY_HERE” with a real WEB KEY from your partcl.com home page)
———————————————————–
<!DOCTYPE html>
<html>
    <head>
        <script id="partcl_client_script" web_key="ENTER_YOUR_WEB_KEY_HERE" src="http://partcl.com/partcl.full.js"></script>
    </head>
    <body>
        <partcl cell_id="temp_test"></partcl>
        <pchart cell_id="temp_test"></pchart>
    </body>
</html>
———————————————————–
DO NOT FORGET to substitute “ENTER_YOUR_WEB_KEY_HERE” with a real WEB KEY from your partcl.com home page.
Later, instead of cell_id=”temp_test” you may want to use any other name, just make sure you substituted the cell id in your controller code as well (it is located after the publishing key).
Both <partcl> and <pchart> tags have plenty of properties for “fine tuning”. Please do not hesitate to ask if you are interested.
A number of functions, properties and methods in partcl API is growing so rapidly, that we just have no time to update the documentation in time ))
Instead of Arduino you may use a different connection technology. The main trick is to create a sensor system that will send HTTP GET requests to partcl.com.
If you want to know more in detail, refer to
Source : http://www.instructables.com/id/Real-time-room-temperature-on-your-Website-no-jav/
COMMENTS