This product is an example of IoT device.
This project would be included in IoT category of WIZnet Museum.
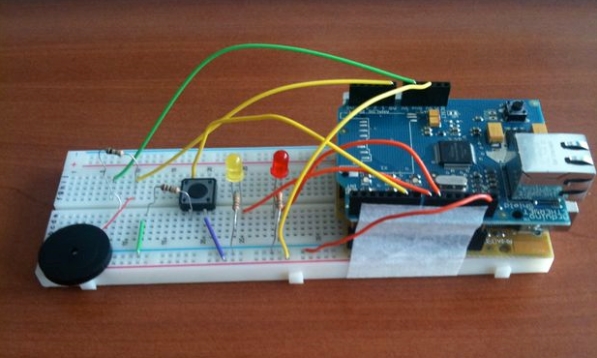
Tweet’n’knock – Tweeting the knock

What it does is very simple: it allows Arduino to tweet based on either a given level of sound by a piezo-electric sensor (a “knock”) or a button. Practically speaking, your device will connect to Twitter using NeoCat’s Twitter library and then tweet different sentences based on the reading of the sensors. In order to avoid Twitter to delete some tweets, there are some seconds of delay between a tweet and the following one, plus sentences (in case of sound detection) are randomly generated. Sound detection is simply based on a threshold; a straightforward extension would be to use it to detect the level of noise nearby – but right now I have some troubles in building the amplifier for the piezo… 🙁
You can find a working example here . This account was generated for testing the platform.
To build the project, you’ll need the following items:
– Arduino 2009 (but it should work with any Arduino)
– Arduino Ethernet shield (it should work also using the WiFi shield with limited changes, but didn’t test it yet)
– a breadboard
– two LEDs
– some resistors (see pdf )
– a piezo-electric sensor (I used the one by Nerdkits)
– a button
The instructions are extremely easy:
1) you need to connect the Ethernet shield on top of Arduino
2) connect the other components to the breadboard (see pdf schematics )
3) register a new account on Twitter and obtain the token by NeoCat’s website (follow instructions here )
4) upload the Arduino .pde file, by configuring the correct IP address of your tweeting device and gateway (see comments inside the .pde file ) and inserting the correct token
5) connect the Ethernet shield to your home router
6) connect power/battery to Arduino
7) knock on the breadboard or push the button
8) enjoy!
A suggestion for testing the architecture: if you leave Arduino connected via USB to the PC, you can monitor the behaviour of your tweeting device and understand whether there’s something wrong.
If you want to know more in detail, refer to
Source : http://www.instructables.com/id/Tweetnknock-Tweeting-the-knock/
COMMENTS