details
This project was started as an idea of remotely monitoring author’s dog to know its real time position. Due to some problem, the author decided to start the prototype first, and come up with perfectly implemented type for his dog.
For this project, he will implement web server on his arudino and apply the DDNS service.
Below simple diagram shows the scheme of this project
 The list of materials are as below.
- 2x Arduino Uno R3.
- Arduino Ethernet Shield REV 3 with microSD card.
- GPS Module + 3v3 power supply (used in my GPS tracking project)
- 2x 10K resistor.
- LDR sensor.
- Temperature sensor (Thermistor)
- Buzzer
Below picture is the prototype hardware that he assembled.

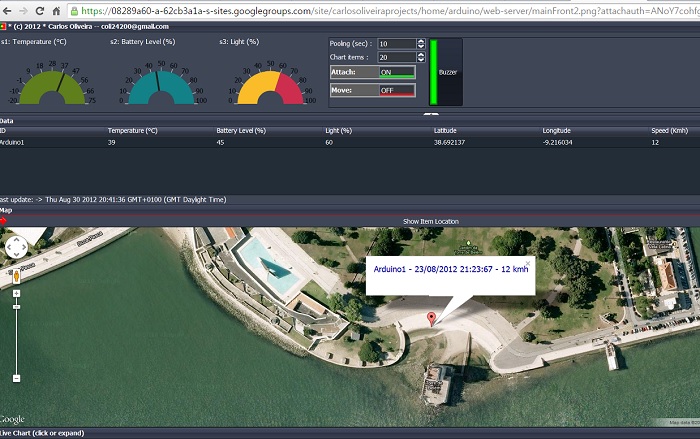
Below is the web page shows the position of the device

Code
/**********************************************************************************
 *
 * (c) 2012 Carlos Oliveira   < coli24200@gmail.com >
 *
/**********************************************************************************
    Remote device with sensors and switches that are controlled by server


    Copyright (C) 2012  Carlos Oliveira  -- coli24200@gmail.com --

    This program is free software: you can redistribute it and/or modify
    it under the terms of the GNU General Public License as published by
    the Free Software Foundation, either version 3 of the License, or
    (at your option) any later version.

    This program is distributed in the hope that it will be useful,
    but WITHOUT ANY WARRANTY; without even the implied warranty of
    MERCHANTABILITY or FITNESS FOR A PARTICULAR PURPOSE.  See the
    GNU General Public License for more details.

    You should have received a copy of the GNU General Public License
    along with this program.  If not, see <http://www.gnu.org/licenses/>.


 * Author: Carlos Oliveira
 * Creation date: 26/08/2012
 *********************************************************************************/

#include <SoftwareSerial.h>
#include <TinyGPS.h>

//#include <SD.h>

// Define which pins you will use on the Arduino to communicate with GPS
#define RXPIN_GPS 6
#define TXPIN_GPS 7

// Define which pins you will use on the Arduino to communicate with RF
#define RXPIN_RF 4
#define TXPIN_RF 5

//Set this value equal to the baud rate of your GPS and RF module
#define BAUD 9600

#define S1 8
#define S2 9
#define BUZ 13 // ligado ao 2 no buzzer

// Create an instance of the TinyGPS object
TinyGPS gps;
SoftwareSerial gpsCom(RXPIN_GPS, TXPIN_GPS);
SoftwareSerial rf(RXPIN_RF, TXPIN_RF);


//data init
const char* name= "Arduino1";
int light = 0;
int temp = 0;
int bat = 0;
float lat=0;
float lon=0;
float vel=0;
String dates="***********";
char inByte = 'a';
boolean sw1=0;
boolean sw2=0;
boolean buzzer=0;


//PROTOTYPEs
void establishContact();
void readSat();
void getLat(float val, float invalid);
void getLon(float val, float invalid);
void getVel(float val, float invalid);
void getDate();
boolean feedgps();

void setup()
{
  rf.begin(BAUD);
  gpsCom.begin(BAUD);
  //buzzer
  pinMode(BUZ, OUTPUT);
  digitalWrite(BUZ, LOW);
  // two monitor ports
  pinMode(S1, INPUT);
  pinMode(S2, INPUT);
}

void loop()
{

  rf.listen(); //waiting for data comand from arduino server
  if (rf.available() > 0) {

    inByte = rf.read();

    switch (inByte){
 case '0': // Buzzer OFF
     digitalWrite(BUZ, LOW);
     buzzer=0;
     rf.print('K');
            rf.flush();
 break;
 case '1': // Buzzer ON
     digitalWrite(BUZ, HIGH);
     buzzer=1;
            rf.print('K');
            rf.flush();
        break;
 case 'b': // Buzzer Status
     rf.println(buzzer);
            rf.flush();
        break;
 default: // JSON request

 gpsCom.listen(); // Change to GPS
 readSat();
 light = map(analogRead(A0),0,1023,0,100);
 // read second analog input:
 temp = map(analogRead(A1),0,1023,70.00,-20.00); // not calibrated
 // read  switch, map it to 0 or 255L
 bat = map(analogRead(A0),0,1023,0,100);
 // send sensor values:

     sw1 = digitalRead(S1);
     sw2 = digitalRead(S2);
 rf.listen();// Change to RF
 rf.print("[{ \"id\": '");
 rf.print(name);
 rf.print("',\"a1\": ");
 rf.print(temp);
 rf.print(",\"a2\": ");
 rf.print(bat);
 rf.print(",\"a3\":");
 rf.print(light);
 rf.print(",\"lat\": ");
 rf.print(lat,10);
 rf.print(",\"lon\": ");
 rf.print(lon,10);
 rf.print(",\"vel\": ");
 rf.print(vel,2);
 rf.print(",\"date\": '");
 rf.print(dates);
 rf.print("',\"s1\": ");
 rf.print(sw1);
 rf.print(",\"s2\": ");
 rf.print(sw2);
 rf.println("}]");//END JSON
 rf.flush();
 break;

 }//end of switch
  }//end of IF available char
}

void readSat(){
  float flat, flon;
  unsigned long age;
  unsigned long start = millis();
  // Every ~second, print an update
  while (millis() - start < 1200)
  {
    feedgps();
  }
  gps.f_get_position(&flat, &flon, &age);
  getLat(flat, TinyGPS::GPS_INVALID_F_ANGLE);
  getLon(flon, TinyGPS::GPS_INVALID_F_ANGLE);
  getVel(gps.f_speed_kmph(),TinyGPS::GPS_INVALID_F_SPEED);
  getDate();
}


/// GET LAT
void getLat(float val, float invalid)
{
  if (val == invalid)
  {
   lat=0.0;
  }
  else
  {
   lat=val;
  }
  feedgps();
}

/// GET LON
void getLon(float val, float invalid)
{
  if (val == invalid)
  {
   lon=0.0;
  }
  else
  {
   lon=val;
  }
  feedgps();
}
// GET SPPED
void getVel(float val, float invalid)
  {
  if (val == invalid)
  {
   vel=0.0;
  }
  else
  {
   vel=val;
  }
  feedgps();
}

// print date
void getDate()
{
  int year;
  byte month, day, hour, minute, second, hundredths;
  unsigned long age;
  gps.crack_datetime(&year, &month, &day, &hour, &minute, &second, &hundredths, &age);
  if (age == TinyGPS::GPS_INVALID_AGE)
    dates="*******  *******";
  else
  {
    digitalWrite(2, HIGH); // just used as heart beat , can be removed
    delay(1);
    digitalWrite(2, LOW);
    char sz[32];

    sprintf(sz, "%02d/%02d/%02d %02d:%02d:%02d GMT+0",
       day, month, year, hour, minute, second);
    dates=sz;
  }
  feedgps();
}


boolean feedgps()
{
  while (gpsCom.available())
  {
 char c=gpsCom.read();
 if (gps.encode(c))
      return true;

  }
  return false;
}
If you want to to know more about this project and get the source, visit below link.
https://sites.google.com/site/carlosoliveiraprojects/home/arduino/web-server
COMMENTS