This product is an example of Ethernet shield.
User can connect to Internet on Arduino Platform easily.
This would be included in SNS category of WIZnet Museum.
Aquaponics: Arduino Email & Text Messaging

Hardware
1 x Arduino Uno R3
1 x Arduino Ethernet Shield R3
2 x Momentary button or switch
2 x 10k ohm resistor
1 x Small breadboard
Breadboard jumper wires
Create a New Application on App Engine
Our web application runs on Google App Engine. Our previous instructable, Online Temperature and Humidity explained how to create an application on App Engine or you can use a standalone tutorial we made on our blog: Creating a New Application on App Engine.
Configure App.yaml

The email alerts reside in a file called alerts.py. We need to add that file to our app.yaml file
App Engine: Models.py

The model of the data resides in ‘models.py’.
The only class is ‘UserPrefs’ which has three properties
1. Time zone offset – unused for this project
2. Email address – saves the email address as a string property
3. Text address – saves the text message address as a string property
App Engine: Main.py and Templates


‘main.py’ has two classes, ‘MainPage’ and ‘SaveAddress’.
To begin add the import statements to the top of ‘main.py’ – Fig 1.
The first three imports are common to request handlers. The users API captures your admin email which is used as the key name for querying the UserPrefs entity. models is the file from Step 2 and contains the data model.
Next comes the first class, which loads the template for the client – Fig 2. You can see how the title is passed to the template and in Fig 3, you can see where it has been passed. The JavaScript files are shown in Fig 3 – more on them in a bit.
In order to send emails and texts you’ll need to provide addresses, so we add a simple form below the header. There are two text boxes and two buttons with onclickhandler references.
App Engine: JavaScript and Form Processing


With the templates and form in place we’ll add the two JavaScript files to send asynchronous requests to the webapp to process the form inputs. You could easily combine both JavaScript files into one, but I keep a utils file separate and listed first (see Fig 4 in Step 4).
The utils.js file is shown in Fig 1. It contains one function to create a request.
Main.js contains the two functions referenced by the onclickhandlers in the form.
The request handler to process the JavaScript requests is the second class in main.py – SaveAddress, Fig 3. After parsing the request for the Address and the Type of address, the users API is used to get your email address. You email address is used as the key name in fetching the UserPrefs entity. If the entity doesn’t exist, a new one is created with the key name. Depending on the type of address you sent, the emailAddress or textAddress property is amended/inserted. Finally, the entity is put in the datastore and a reponse made.
Finally, Fig 4 shows the end of main.py
Sending Text Messaging From Email
Most major carriers have public addresses for sending texts through email clients such as Gmail. You can see a list here of how to format the addresses to send SMS and MMS. I have only confirmed Sprint’s format, so I will use that as an example.
SMS format for Sprint is:
<your phone number>@messaging.sprintpcs.com
So, an example would be:
1234567890@messaging.sprintpcs.com
This is the format a Sprint user would put into the text message box in the client.
A last note is to keep your SMS short. Some carriers will split long messages into multiple SMS messages, while others will outright deny an SMS exceeding 160 characters. You’ll have to test your carrier to see.
App Engine: Alerts.py


alerts.py has one class and one function. The class, Alert, is a request handler for the Arduino requests. The function, SendAlert, is a generic function to send either a text or email alert.
Again, we’ll start off with the imports – Fig 1. Even though the users API is listed again, it’s not used here.
Fig 2 shows the request handler for the Arduino requests. The Arduino will request a type of alert and the SendAlert will be called, passing in the alerty type and a message. The nice part of passing these in is the SendAlert function stays generic and can be reused by other functions (if you expand the application).
The SendAlert function is seen in Fig 3 and requires a few special notes. First, App Engine cannot tell who you are when the Arduino makes its request, so our previous method of using the users API to get your email address and use it to query for the UserPrefs entity won’t work here. As such, I’ve hard coded the user email. You could pass it in with the Arduino request, but for brevity, I’ve chosen not to do that.
Second is the mail API. The sender email address must be listed as one of the administrators of the webapp. You created the webapp with one email address, but you can add others with Administrative privileges in you Admin control panel. If you try to use an address that isn’t registered you will get an unauthorized sender error.
Finally, in Fig 4, you can see the bottom of alerts.py
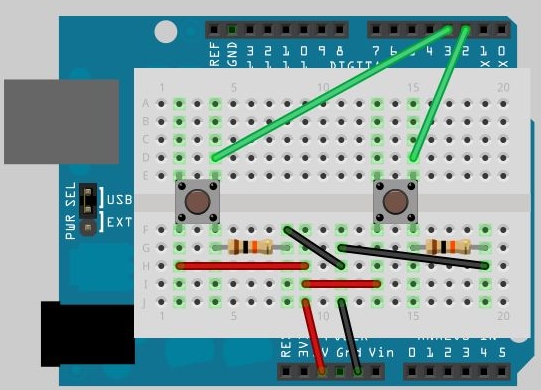
Arduino – Fritzing Diagram

The circuit for this instructable consists of two pushbuttons; one creates a request for an email and the other a text message.
The Fritzing diagram shows a tiny breadboard sitting on an Arduino Uno R3. In reality, the breadboard should reside on a proto shield on an Ethernet Shield on the Arduino, but I always seem to forget that part.
Arduino – Code


The Arduino code starts with the assignments in Fig 1. There are push buttons in pins 2 and 3. Then we set up the Ethernet Shield and select the webapp server. You’ll need to change this to the app identifier you made.
The setup function starts the Ethernet shield and sets the pin mode for the push buttons. Finally, it notifies you over serial the setup is complete.
Fig 3 shows the main loop and simply looks for a high value in either pin 2 or 3.
A high value causes the sendAlert function to be called with the the string of the alert type you want. You’ll get notified over serial which button you pressed and what alert you are requesting.
The response from App Engine is parsed and displayed.
Final Thoughts
And that’s it – two buttons to send either a text or email. While the button format may not seem useful, you’ve probably already realized simple conditionals analyzing sensor values can prompt alert requests.
When we created the Arduino Data Acquisition and Control System for our upcoming book, Automating Aquaponics with Arduino, we jammed a lot of programming into the Arduino. Instead of applying data analysis in the ~32Kb of space we have, we simply uploaded the values to the webapp and put the conditionals in App Engine. This freed up quite a bit of valuable programming space.
Finally, note that App Engine only allows 100 free emails a day. It’s a penny for each email after that.
If you want to know more in detail, refer to
Source : http://www.instructables.com/id/Aquaponics-Arduino-Email-Text-Messaging/
COMMENTS