This project is an example of Ethernet shield.
User can manage a device easily by using Arduino platform through Web.
This project would be included in Remote control category of WIZnet Museum.
Aquaponics: Online Relay Control

Parts List
1 x Arduino Uno R3
1 x Arduino Ethernet Shield, R3
1 x Powerswitch Tail II
2 x breadboard male/male jumper wires
1 x Arduino wall wart (optional, for better power)
Software Versions
Arduino IDE 1.0.3
Google App Engine, Python SDK 1.7.4
Ubuntu 12.04
Python 2.7
Prerequisite
The web application runs on Google App Engine. Our previous Instructable, https://www.instructables.com/id/Aquaponics-Online-Temperature-and-Humidity/, discusses how to create an application.
This project is a part of the Arduino Data Acquisition and Control System described in more detail in our upcoming eBook, Automating Aquaponics with Arduino.
Web Application Code

0. Create a new application on Google App Engine. We have a separate tutorial on our blog on how to do this so we don’t have to repeat the same steps for every webapp project.
1. The project code can be downloaded here.
2. Extract the tar file in whatever directory you like. I’ll assume it’s in your home directory. If it’s not, amend the instructions where necessary.
3. The extracted folder is called ‘IAquaponics_Relay’ and inside are two folders, ‘myapsystem’ and ‘arduino’.
4. In ‘myapsystem’, open ‘app.yaml’ and amend the first line with the project identity you created in Step 0.
Test Webapp in SDK


1. Open a terminal and launch the AppEngine Python SDK with your project
python2.7 AppEngine/dev_appserver.py IAquaponics_Relay/myapsystem
2. Open a web browser and point it to localhost
http://localhost:8080/
3. The app.yaml file shows the app is restricted to admin (you), so check the sign in box to Sign in as Administrator.
4. At this point you will see the On/Off button. With your terminal still open, click the button. It will change to green and in the terminal you will see a GET request to the server with the updated state.
5. In your browser, open a new tab and go to
http://localhost:8080/_ah/admin
This is the admin console for the SDK. The default page is the datastore view. Click the ‘List Entities’ button and you will see the Relay entity and the state property is set to ‘on’.
Upload Webapp to App Engine
1. If everything has worked so far, open a terminal and change directories into the AppEngine SDK. Then upload the application.
cd AppEngine/
./appcfg.py update ~/IAquaponics_Relay/myapsystem
2. You will be prompted for the Google credentials you used to make the application in Step 1, 0.
3. When the update is done, point your web browser to the live webapp
http://myapsystem.appspot.com
4. Open another tab in your browser and point it to the admin console
http://appengine.google.com
5. Repeat the process of clicking the button to change the state, and view the datastore in the admin console to make sure everything worked.
Wire Up the Arduino


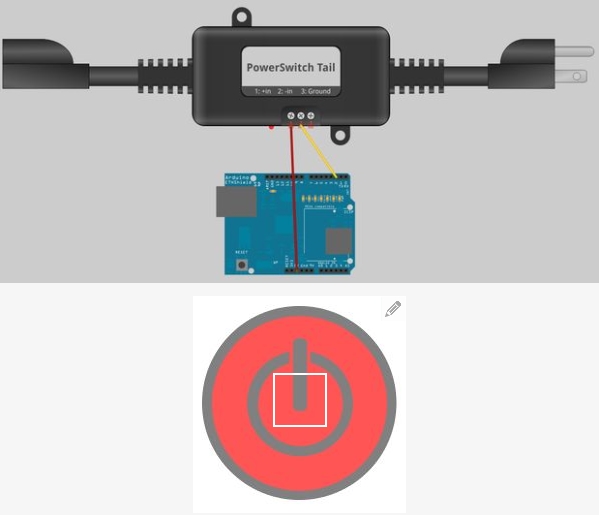
1. Using the Fritzing diagram, wire the Powerswitch Tail II to your Ethernet shield (and plug the Ethernet shield into your Arduino).
2. To test the relay, plug an appliance into the PSTII, like a lamp.
3. Load the Arduino sketch from the project directory: Relay.ino
4. You need to amend the Arduino code in two places to point to your application. See the two images. You only need to replace the highlighted code with your project name.
5. Save and upload your Arduino code to your board
6. Open the serial monitor
7. In your webapp, toggle the button to ‘On’.
Notes
1. Since working with AppEngine and Arduino Ethernet we have encountered one consistent error. The Arduino will fail to make the third request. The first two are fine. Every request after the third connects and works, but for some reason the third one will fail, every time.
2. The Arduino creates a GET request and then pauses for ten seconds before parsing the response. Toggling the power button in the webapp will not immediately toggle the light.
3. The rate of the GET requests is quite high, for demonstration purposes. If you are going to implement this, you may want to double the delayed time interval in order to keep extra instances from spawning and reducing the read/write operations. The idea is to stay within the free daily quota provided by AppEngine.
The point of this tutorial is to show the polling technique using the Arduino and to manualyl control a relay. You can take the next step to implement some automation and create a timer for your aquaponics pump, or grow light. An example of extending this further, sensor data from a light dependent resistor or photodiode, and uploaded to AppEngine, can trigger a grow light based on current light levels.
If you want to know more in detail, refer to
Source : http://www.instructables.com/id/Aquaponics-Online-Relay-Control/
COMMENTS