details
This product is an example of Ethernet shield. A user can connect to Internet on Arduino Platform easily.
Twitter arduino security system

Materials
•An Arduino uno or similar.
•An Arduino Ethernet Shield
•A breadboard
•A computer with Arduino IDE
•An Ethernet cable connected to internet
•Two momentary switches (can be replaced by sensor)
•Two 1K resistors
•A bunch of wires
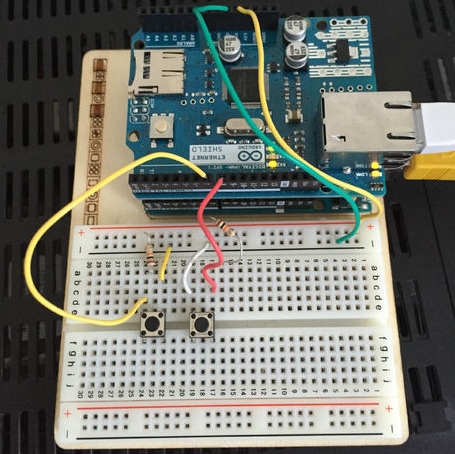
Wirring Up

- Put the shield on to the Arduino
- Wire it up as on the image.
Configure the Sketch
- Go to Arduino tweet and get your token
- Open your sketch
- Change” token” to your personal token
- If needed change the ip adress so that it fits your network(Tips: “192, 186, 1, 20” is equal to “192.186.1.20”)
- Change the text at the end of these to personalise your tweets
char msg0[] = “starting”;
char msg1[] = “something moved”;
char msg2[] = “door open”;
Upload and TWEET
- UPLOAD the sketch
- OPEN your serial monitor
- Send tweet by pressing the switches
TROUBLESHOOT
- If you get error 403 THEN delete all your messages from your TWITTER account and wait a minute
- If you get error 503 THEN re upload and it will get away
- If you get connection failed THEN connect to an other ethernet output or change ip adress
To know more in detail, refer to
Source : http://www.instructables.com/id/twitter-arduino-security-system/
COMMENTS