Arduino Aquaponics is an example of Ethernet shield application where a user can easily monitor dissolved oxygen level and pH level under water.

Parts
1 x Arduino Mega R3
1 x Ethernet Shield R3
1 x pH Kit: Probe, Circuit and BNC
1 x DO Kit: Probe, Circuit and BNC
1 x EnvDAQ Shield Kit -or-
1 x Breadboard
1 x DHT-22
1 x 4.7k resistor
1 x LDR
1 x 10k resistor
1 x Bi-Color (Red/Green) 5mm LED
6 x 3-Pin Female Headers (We didn’t have that so we used 3 x 10-Pin Female Headers)
8 x Male-Male jumper wires
Wiring


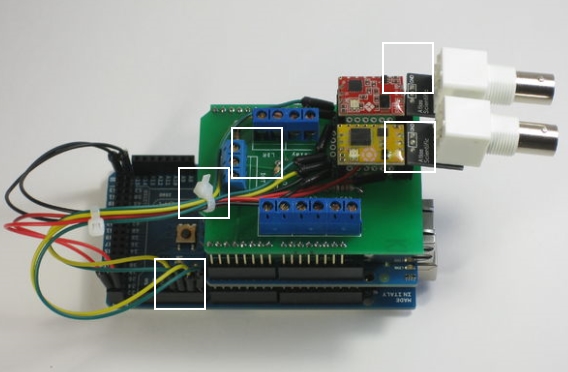
Starting with a standard EnvDAQ Shield, insert the female headers in the prototyping area. The BNC header goes in the first row (Image 2: Right to left). Insert another female header in second row, again right to left. This one is used for the bottom of the probe circuit – VCC, PRB, GND. Finally, place a female header in the next to last row; the last row remains open for the jumper wire.
Solder the headers in place. Next, you need to solder the four adjacent pins on the header to connect the bottom of the circuits to the probes circuit header PRB(C) to the BNC and from the bottom circuit GND(C) to the probe GND(BNC).
Insert the jumper wire into the appropriate holes and bend the tip to hold them in place. Make sure to bend the tips towards the header pin they connect to.
As an optional step you can use cable ties to keep everything nice and neat.
Finally, connect the other end of the jumper wires in the Arduino Mega pins.
Arduino Code
Arduino IDE: 1.0.3
Before we amend the code, lets discuss how it works. The Arduino communicates with the probe circuits over serial, with the circuits handling the grunt work making sense of the probes. On a 60 second interval, we call each function to get the sensor data. The pH and DO functions read from serial until a specific sequence is found, building on the preceding characters, formats a return string suitable to a GET request and returns the string. Finally, a request is made to the webapp.
To start, declare two input strings
// In the declarations, define two input strings
String phsensorstring = "";
String dosensorstring = "";
Next, we need to set two more Serial connections, but at a 38400 baud rate. To finish the setup we will reserve space for the input and sensor strings from the circuit.
// In setup(), start the serial outputs
Serial.begin(9600);                 // Standard Serial
Serial2.begin(38400);            // pH Serial
Serial3.begin(38400);            // DO Serial

// Still in setup(), reserve space for the sensor data
phsensorstring.reserve(30);
dosensorstring.reserve(30);
Just as we get the DHT and LDR values, two new functions are created to get the pH and dissolved oxygen values. They read from Serial to get the respective values, create a return string formatted as a chunk of the GET request and then reset the sensor string.
// Get pH
String getPH() {
  char phchar;
  while (phchar != '\r') {
    phchar = (char)Serial2.read();
    phsensorstring += phchar;
  }

  String ph_reading = "&pH=" + phsensorstring;
  phsensorstring = "";
  return(ph_reading);
}

// Get DO
String getDO() {
  char dochar;
  while (dochar != '\r') {
    dochar = (char)Serial3.read();
    dosensorstring += dochar;
  }

  String do_reading = "&DO=" + dosensorstring;
  dosensorstring = "";
  return(do_reading);
}
The main loop calls each function on a 60 second interval and then sends a request to the webapp
void loop() {

  // Get Temperature and Humidity
  String DHTSensor = "";
  DHTSensor = getDHT();
  Serial.println("DHT: " + DHTSensor);

  // Get LDR Reading
  String LDR = "";
  LDR = getLDR();
  Serial.println("LDR: " + LDR);

  // PH
  String PHSensorValue = "";
  PHSensorValue = getPH();
  Serial.println("pH: " + PHSensorValue);

  // DO
  String DOSensorValue = "";
  DOSensorValue = getDO();
  Serial.println("DO: " + DOSensorValue);

  // Send Data to Webapp
  GAE(webapp + "adacs/arduino?" + DHTSensor + LDR + PHSensorValue + DOSensorValue);

  Serial.println("");

  delay(60000);

}
The full Arduino sketch:
/*
  The Environment DAQ (V2) Shield with pH and Dissolved Oxygen Probes.
*/

#include <SPI.h>
#include <Ethernet.h>          // Ethernet Shield
#include <DHT.h>               // DHT.  Credit: Adafruit Industries

// Ethernet Shield
byte mac[] = {  0x90, 0xA2, 0xDA, 0x00, 0xA1, 0x90 };
//byte myIP[] = { 192, 168, 1, 15 };
//byte gateway[] = { 192, 168, 1, 1 };

char server[] = "http://www.myapsystem.appspot.com";
EthernetClient client;

// Makes it easy to change app names
String webapp = "http://www.myapsystem.appspot.com/";

// DHT-22
#define DHTPIN 3
#define DHTTYPE DHT22
DHT dht(DHTPIN, DHTTYPE);

// Probe input strings
String phsensorstring = "";
String dosensorstring = "";

// DIGITAL PINS
int connectedOn = 6;
int connectedOff = 7;

// ANALOG PINS
int AmbientLDR = A0;          // Light Dependent Resistor

// Sending DHT data
char temp_str[10];            // Temperature string
char rh_str[10];              // Relative Humidity String

void setup() {
  // Start Serial Output
  Serial.begin(9600);          // Standard serial
  Serial2.begin(38400);        // pH serial
  Serial3.begin(38400);        // DO serial
  delay(1000);

  // Disable SD card if one in the slot
  pinMode(4,OUTPUT);
  digitalWrite(4,HIGH);

  // Start Ethernet
  Ethernet.begin(mac);
  //Ethernet.begin(mac, myIP);
  //Ethernet.begin(mac, myIP, gateway);
  delay(1000);        // Give Ethernet a second to initialize
  Serial.println(Ethernet.localIP());

  // Reserve space for the sensor data
  phsensorstring.reserve(30);
  dosensorstring.reserve(30);


  // Start DHT
  dht.begin();

  // Set Pin Modes
  pinMode(connectedOn, OUTPUT);
  pinMode(connectedOff, OUTPUT);

  Serial.println("Setup Complete");
}

void loop() {

  // Get Temperature and Humidity
  String DHTSensor = "";
  DHTSensor = getDHT();
  Serial.println("DHT: " + DHTSensor);

  // Get LDR Reading
  String LDR = "";
  LDR = getLDR();
  Serial.println("LDR: " + LDR);

  // PH
  String PHSensorValue = "";
  PHSensorValue = getPH();
  Serial.println("pH: " + PHSensorValue);

  // DO
  String DOSensorValue = "";
  DOSensorValue = getDO();
  Serial.println("DO: " + DOSensorValue);

  // Send Data to Webapp
  GAE(webapp + "adacs/arduino?" + DHTSensor + LDR + PHSensorValue + DOSensorValue);

  Serial.println("");

  delay(60000);

}

String getDHT() {
  float h = dht.readHumidity();
  float t = dht.readTemperature();

  if (isnan(t) || isnan(h)) {
    Serial.println("Failed to read from DHT22");
  } else {
    float ftemp = (((9.0/5.0) * t) + 32.0);
    String temp = dtostrf(ftemp, 3, 1, temp_str);
    String rh = dtostrf(h, 3, 1, rh_str);

    String dhtUrl = "Temp=" + temp + "&Humidity=" + rh;
    return(dhtUrl);
  }
}

String getLDR() {
  int ambientLDR = analogRead(AmbientLDR);
  String lightUrl = "&AmbientLDR=" + String(ambientLDR);
  return(lightUrl);
}

// Returns the current pH value
String getPH() {
  char phchar;
  while (phchar != '\r') {
    phchar = (char)Serial2.read();
    phsensorstring += phchar;
  }

  String ph_reading = "&pH=" + phsensorstring;
  phsensorstring = "";
  return(ph_reading);
}

// Returns the current Dissolved Oxygen value
String getDO() {
  char dochar;
  while (dochar != '\r') {
    dochar = (char)Serial3.read();
    dosensorstring += dochar;
  }

  String do_reading = "&DO=" + dosensorstring;
  dosensorstring = "";
  return(do_reading);
}

void GAE(String link) {
  boolean success = httpRequest(link);
  if (success == true) {
    delay(5000);

    boolean currentLineIsBlank = true;

    String readString = "";
    char newString[100];

    while (client.connected()) {
      if (client.available()) {
        char c = client.read();
        //Serial.write(c);

        if (c == '\n' && currentLineIsBlank) {
          //Serial.println("Reached end of request");
          while(client.connected()) {
            char f = client.read();
            readString += f;
          }
        }

        if (c == '\n') {
          currentLineIsBlank = true;
        } else if (c != '\r') {
          currentLineIsBlank = false;
        }
      }
    }

    client.stop();

    Serial.println(readString);
  } else {
    Serial.println("Not connected.");
  }
}


boolean httpRequest(String link) {
  // if there is a successful connection
  if (client.connect(server, 80)) {
    Serial.println("GET " + link + " HTTP/1.0");    // For dev mode
    client.println("GET " + link + " HTTP/1.0");
    client.println();

    // Turn connected LED on
    digitalWrite(connectedOff, LOW);
    digitalWrite(connectedOn, HIGH);

    return true;
  } else {
    // You couldn't make the connection
    Serial.println("Connection Failed");
    //errors += 1;
    client.stop();

    // Turn connected LED on
    digitalWrite(connectedOn, LOW);
    digitalWrite(connectedOff, HIGH);

    return false;
  }
}
If you want to know more in detail, refer to
Source : http://www.instructables.com/id/Arduino-Aquaponics-EnvDAQ-Upgrade-with-pH-and-Diss/
Hello there, I would like to ask if where can I but that DO probe and around how much? thanks. urgent po sana, need lang sa thesis