This product is an example of Ethernet shield where it twits garage door status over internet.
Twitter garage door using the GE Choice ALERT system & Arduino

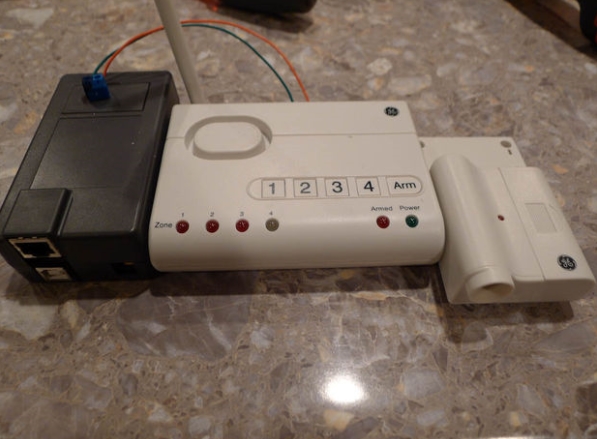
Materials
1. Project Enclosure for the Arduino + Ethernet shield from amazon.
2. Arduino, in my case the old Diecimila. You all know and love the arduino, found online about 23$
3. Arduino Ethernet shield ~ 40$
4. GE Choice Alert wireless-control center
5. GE Choice-Alert wireless garage door sensor
6. Screw Terminal
Step 0: Sync the garage door monitor to the base station. Unplug everything then.
Step 1:
The first thing to do is unscrew the two screws in the back and the one under the battery cover. Then you can pry the back off (Be careful as getting the battery contacts out is reallyyyy sorta a pain.
Step 2:
Flip over and find the LED for zone 1 (labeled 1!). Then turn it back to the PCB side and find the contacts. I soldered one wire for where I found the ground was (Green) and another red wire for the -. I found which was which by trial and error using my arduino.
NOTE: Soldering there’s wires are hard, i dunno if it was my crappy soldering iron or what but it was hard to heat up the metal already on the PCB and get my wires soldered to it on a solid way. If you are enterprising enough you can solder two wires to each of the zone alarms and have this tweet you when say someone is detected by their wireless motion sensor, or the door sensor goes off etc…
Step 3. I used a dremel to edge out some of the plastic on the battery cover so the wires could come out from the PCB into the battery area. This is where I also attached a (superficial perhaps) board to connect more wires to that ultimately lead to the screw terminals attached to the arduino. The idea of the board was make sure there was slack in the system so the wires don’t get yanked out of the delicate soldering on the LED pins on the PCB of the alarm base station.
Step 4: Drilling out the battery cover. This is simple drill I used and made the holes so the wires could pop out of it…
Step 5: Mark where the screw terminal should go in the project box and drill the holes, then on the other side solder in the screw terminal with the wires that will goto the arduino/ethernet controller.
Step 6: Finally put in the arduino and ethernet controller shield into the project box and connect the wires to ground respectively and analog 0. Then close the box up.
Step 7: Screw the two wires from the choice alert base station to the arduino and you are done!
So I have the code for the arduino. It basically sets up the Ethernet controllers, it uses the twitter library (The one that passes through a proxy service) and it sends its tweets that way. One thing I had to was set the Ethernet to a good internal address… that was the only real hiccup. The code sorta is ugly but the idea is it listens to the analog port and if it goes above some threshold, it sets a state to be in alarm mode, and if a certain amount otf time goes by it sends a twitter with a random value attached to it (Cause twitter does not like tweets with the same text so this changes it up. I would of used a timer library and make a time stamp but this was made as a Christmas gift for someone so I didn’t have time to implement that). So every minute or so it sends a tweet and always checks to see if the door is done so it stops. It sends its first tweet after the first minute too.
#if defined(ARDUINO) && ARDUINO > 18   // Arduino 0019 or later
#include
#endif
#include
//#include   Only needed in Arduino 0022 or earlier
#include

byte mac[] = { 0xDE, 0xAD, 0xBE, 0xEF, 0xFE, 0xED };
byte ip[] = { 192, 168, 0, 23 };
Twitter twitter("read on how to set this");
char msg[] = "Garage Door is OPEN";
char msgStartup[] = "Garage door monitor is online!";
boolean failed=false;
boolean blinkTime=false;


boolean doorOpen=false;
int alertcounter=0;
int resetcounter=0;
int diodePin=0;
int val;

int randomValue;
void setup()
{
  delay(1000);
  Ethernet.begin(mac, ip);
  Serial.begin(9600);
  pinMode(13, OUTPUT);
  Serial.println("connecting ...");

  sendStartupTweet();


}

void sendStartupTweet()
{
  if (twitter.post(msgStartup)) {
    int status = twitter.wait();
    if (status == 200) {
      Serial.println("OK.");

    } else {
      Serial.print("failed : code ");
      Serial.println(status);
      failed=true;
    }
  } else {
    Serial.println("connection failed. Startup");
    failed=true;
  }

}

void sendTweet(int ts)
{
//convert the ts to a string and append to MSG
//char msg2[] = msg + ts;
// String theMsg = msg;

//theMsg.concat("time:" + ts);
//char msg2[theMsg.length()];
//theMsg.toCharArray(msg2, theMsg.length());


  char S[50];                          //Define twitter message as "S"
  randomValue = random(HEX);           //Produce random value

  /**********
   *  SprintF "stitches" together a string(msg) and a variable(randomVariable) into
   *  another string, "S".
   **********/

  sprintf(S, "Garage door is open (%i)tweets", randomValue);  //

  Serial.println(S);


if (twitter.post(S)) {
    int status = twitter.wait();
    if (status == 200) {
      Serial.println("OK.");

    } else {
      Serial.print("failed : code ");
      Serial.println(status);
      failed=true;
    }
  } else {
    Serial.println("connection failed.");
    failed=true;
  }
}

int millisRollover() {
  // get the current millis() value for how long the microcontroller has been running
  //
  // To avoid any possiblity of missing the rollover, we use a boolean toggle that gets flipped
  //   off any time during the first half of the total millis period and
  //   then on during the second half of the total millis period.
  // This would work even if the function were only run once every 4.5 hours, though typically,
  //   the function should be called as frequently as possible to capture the actual moment of rollover.
  // The rollover counter is good for over 35 years of runtime. --Rob Faludi http://rob.faludi.com
  //
  static int numRollovers=0; // variable that permanently holds the number of rollovers since startup
  static boolean readyToRoll = false; // tracks whether we've made it halfway to rollover
  unsigned long now = millis(); // the time right now
  unsigned long halfwayMillis = 17179868; // this is halfway to the max millis value (17179868)

  if (now > halfwayMillis) { // as long as the value is greater than halfway to the max
    readyToRoll = true; // you are ready to roll over
  }

  if (readyToRoll == true && now < halfwayMillis) {
    // if we've previously made it to halfway
    // and the current millis() value is now _less_ than the halfway mark
    // then we have rolled over
    numRollovers = numRollovers++; // add one to the count the number of rollovers
    readyToRoll = false; // we're no longer past halfway
  }
  return numRollovers;
}


void loop()
{

  int rollovers = millisRollover(); // get the number of rollovers so far
  //Serial.println(rollovers,DEC); //
  checkDoor(rollovers);
  delay(100);
}

void checkDoor(int ts)
{
     val = analogRead(diodePin);
     if(val>300)
     {
       doorOpen=true;
       alertcounter=0;
       resetcounter=0;
     }
      if(doorOpen==true)
      {
        alertcounter+=1;
        Serial.println(alertcounter);
        if(alertcounter>600)
        {
          alertcounter=0;

          Serial.println("  SENDING DOOR TWEET");
          sendTweet(ts);
        }
        resetcounter+=1;
        if(resetcounter>100)
        {
           resetcounter=0;
           if(val<250)
          {
             doorOpen=false;
             Serial.println("DOOR CLOSED");
          }
        }
      }
}
If you want to know more in detail, refer to
Source : http://www.instructables.com/id/Twitter-garage-door-using-the-GE-Choice-ALERT-syst/где оформить карту рассрочки
COMMENTS