Have you ever heard about PiKon 3D Printed Telescope? It is the Raspberry Pi based telescope made by a physicist in England, and got £5,850 funding at the crowd funding site Indiegogo.
For more detail, refer to below
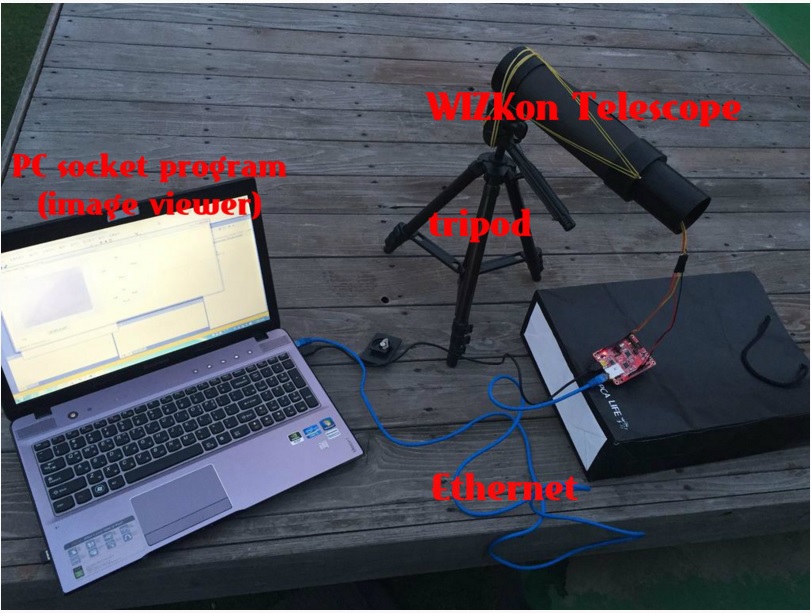
One day, a WIZnet engineer decided to make the similar one, WIZKon – an Internet Telescope that its platform is WIZwiki-W7500. Let’s see how he made it. It is very simple and easy to follow.
Hardware
The following board and electronic parts are required.

- 3D CAD File : The main body of the telescope will be made by 3D printer. You download the CAD file from the link.
- WIZwiki-W7500 : This is the mbed-enabled ARM cortex-M0 platform board. For more detail, click Here
- Serial Camera : LJ-DSC02
- LENS : SSG-B51
- ETC : Rubber bands, 2mm x 10, 20 screw bolt, wire, black thick paper, plastic support, pin header socket and etc
3D Printed Bodies
If you use above CAD file, you could get the below bodies that printed by the 3D printer.

Serial Camera Wiring
As shown below images, connect the wires to the main board of the serial camera. We are going to use this board to compress the image data from telescope into JPEG format and transmit it to the main platform board, WIZwiki-W7500.
- Prepare the serial camera, Wires and Pin headers.
-

- Take off the screws from the back panel of the camera PCB
- Connect the wires by soldering to the PCB as below.
- Connect the pin headers to the end of the wires as below.


Mounting the Camera Module
Mount the above camera module in the middle of the telescope.


Assembling the bodies
As shown in below images, we assemble the bodies of the telescope and lenses. For the exterior body of the telescope, we used the black paper to save the cost.


Assembling Everything

WIZwiki-W7500
Connect the camera module in the body of the telescope, to the WIZwiki-W7500 as below.

Firmware
You can download the mbed code about processing the camera image and Ethernet connectivity from below link.
Test

Below is the screen capture of the PC viewer. The PC viewer has been made with C#. If you need the source code, contact to ricky@wiznet.co.kr

COMMENTS