Home automation and sensing using Arduino, OpenHAB, and MQTT. With emphasis on low cost (less than $20) wireless sensor nodes. Here’s an example using Arduino to monitor the position of a garage door, and wirelessly report the position to OpenHAB, to be displayed the web interface.
To establish my requirements for a home automation system, I’ll list the components first:
1) Gateway
The gateway is where all the field device data gets sent. It is also the backend to the user interface. The gateway provides the basic functionality of the home automation system.
2) Field device (node and sensor / actuator)
The field device is the node to which sensors or actuators are directly attached.
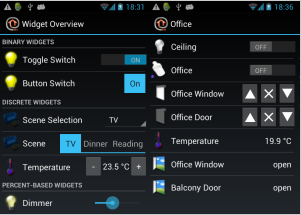
3) User Interface
Tying it all together
I’ll put together wiring diagrams and sketches for the Arduinos in the resource section at the bottom. The key to tying together Arduino with OpenHAB is the MQTT binding. OpenHAB has multiple bindings (plugins) to allow it to talk different protocols, and one such is this MQTT. It’s an open protocol for passing simple messages over ethernet, and is often used by IoT devices for communication. It just so happens that there is also an Arduino library that implements MQTT.

project & source
https://electronichamsters.wordpress.com/2014/06/09/home-automation-with-arduino-and-openhab/
COMMENTS