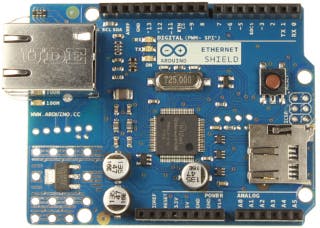
This project is an example of IoT device. In general, users can easily connect to Internet using Arduino Ethernet Platform.
This project would be included in the category of cloud in WIZnet Museum website.
Connect your Arduino Ethernet to the cloud

Requirements
-. Arduino UNO
-. Arduino Ethernet Shield
-. Arduino IDE 1.6.5 or higher
-. UbidotsEthernet Ethernet library
Story

Ubidots-Ethernet is an Arduino library for interacting with Ubidots through its API with arduino ethernet shield. The library also contains the code to connect to your Ethernet network.
Requirements
Setup
- Download the UbidotsEthernet library here
- Go to the Arduino IDE, click on Sketch -> Include Library -> Add .ZIP Library
- Select the .ZIP file of UbidotsEthernet and then “Accept” or “Choose”
- Close the Arduino IDE and open it again.
To use this library, put your Ubidots token and variable ID where indicated, as well as the Ethernet settings like MAC address and IP. After uploading each example to your Arduino, open the Serial monitor to check the results. If no response is seen, try unplugging your Arduino and then plugging it again. Make sure the baud rate of the Serial monitor is set to the same one specified in your code.
Send one value to Ubidots
To send a value to Ubidots, go to Sketch -> Examples -> UbidotsEthernet library and select the “saveValue” example.
#include
#include
#include
#define ID  "Your_variable_ID_here"  // Put here your Ubidots variable ID
#define TOKEN  "Your_token_here"  // Put here your Ubidots TOKEN
// Enter a MAC address for your controller below.
// Newer Ethernet shields have a MAC address printed on a sticker on the shield
byte mac[] = { 0xDE, 0xAD, 0xBE, 0xEF, 0xFE, 0xED };
// Set the static IP address to use if the DHCP fails to assign
IPAddress ip(192, 168, 0, 177);
Ubidots client(TOKEN);
void setup(){
  Serial.begin(9600);
  // start the Ethernet connection:
  if (Ethernet.begin(mac) == 0) {
    Serial.println("Failed to configure Ethernet using DHCP");
    // try to congifure using IP address instead of DHCP:
    Ethernet.begin(mac, ip);
  }
  // give the Ethernet shield a second to initialize:
  delay(1000);
}
void loop(){
  float value = analogRead(A0);
  client.add(ID, value);
  client.sendAll();
}
Get One Value from Ubidots
To get the last value of a variable from Ubidots, go to Sketch -> Examples -> UbidotsEthernet library and select the “getValue” example.
#include
#include
#include
#define ID  "Your_variable_ID_here"  // Put here your Ubidots variable ID
#define TOKEN  "Your_token_here"  // Put here your Ubidots TOKEN
// Enter a MAC address for your controller below.
// Newer Ethernet shields have a MAC address printed on a sticker on the shield
byte mac[] = { 0xDE, 0xAD, 0xBE, 0xEF, 0xFE, 0xED };
// Set the static IP address to use if the DHCP fails to assign
IPAddress ip(192, 168, 0, 177);
Ubidots client(TOKEN);
void setup(){
  Serial.begin(9600);
  // start the Ethernet connection:
  if (Ethernet.begin(mac) == 0) {
    Serial.println("Failed to configure Ethernet using DHCP");
    // try to congifure using IP address instead of DHCP:
    Ethernet.begin(mac, ip);
  }
  // give the Ethernet shield a second to initialize:
  delay(1000);
}
void loop(){
  float value = client.getValue(ID);
}
Send multiple values to Ubidots
To send multiple values to Ubidots, go to Sketch -> Examples -> UbidotsEthernet library and select the “saveValues” example.
#include
#include
#include
#define ID  "Your_variable_ID_here"  // Put here your Ubidots variable ID
#define ID2 "Your_variable_ID2_here"
#define ID3 "Your_variable_ID3_here"
#define ID4 "Your_variable_ID4_here"
#define TOKEN  "Your_token_here"  // Put here your Ubidots TOKEN
// Enter a MAC address for your controller below.
// Newer Ethernet shields have a MAC address printed on a sticker on the shield
byte mac[] = { 0xDE, 0xAD, 0xBE, 0xEF, 0xFE, 0xED };
// Set the static IP address to use if the DHCP fails to assign
IPAddress ip(192, 168, 0, 177);
Ubidots client(TOKEN);
void setup(){
  Serial.begin(9600);
  // start the Ethernet connection:
  if (Ethernet.begin(mac) == 0) {
    Serial.println("Failed to configure Ethernet using DHCP");
    // try to congifure using IP address instead of DHCP:
    Ethernet.begin(mac, ip);
  }
  // give the Ethernet shield a second to initialize:
  delay(1000);
}
void loop(){
  float value = analogRead(A0);
  float value2 = analogRead(A1);
  float value3 = analogRead(A2);
  float value4 = analogRead(A3);
  client.add(ID, value);
  client.add(ID2, value2);
  client.add(ID3, value3);
  client.add(ID4, value4);
  client.sendAll();
}
For more information, please refer to the following link;
Source : https://www.hackster.io/AgustinP/connect-your-arduino-ethernet-to-the-cloud-0879ea?ref=search&ref_id=ethernet shield&offset=1оформить онлайн займ на банковскую

COMMENTS