Lunar Lander on your phone, Jedi controls on the Arduino

Written in javascript & Arduino wiring, this project lets you control a smartphone with your mind (and an UNO), runs on both Android and iOS
Hardware components:
Arduino UNO & Genuino UNO
Arduino Ethernet shield
Rotary potentionmeter(generic)
Tactile Button Swith (6mm) Single
Software apps and online services:
Evothings Studio
Story
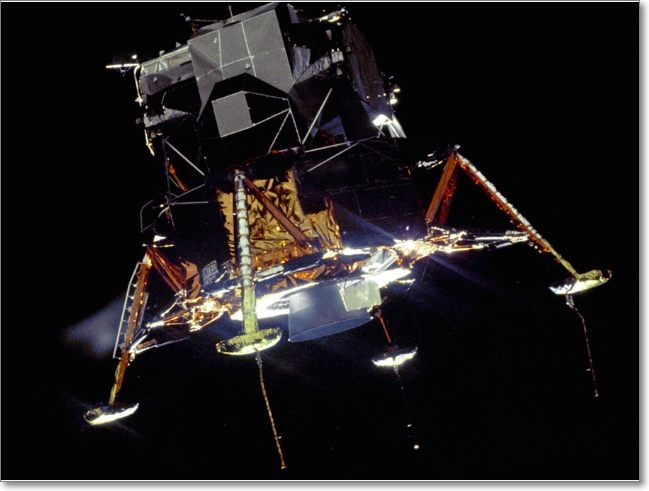
Learn how to connect an Arduino with Ethernet connectivity to your smartphone in this developer’s article. You’ll find how to use events from a physical pushbutton and a variable resistor to control the gaming action. Remember Lunar Lander? Lucky for us so did Seb Lee-Delisle, an award-winning digital artist who has put together a strictly non-commercial tribute clone of that original program, partly for our enjoyment as part of his project Lunar Trails, and also because that javascript is so much fun. You can find the “original clone” on the web right here:
During one of our offside Fridays at Evothings, we decided to contribute a bit to this open project by running the Lunar Lander run on either an iOS or Android device, while controlling it over the house network using an arduino UNO with Ethernet shield attached to the router. And rather than running a fat server on the microcontroller or the phone, we wanted to use raw TCP communication, i.e. the Chrome sockets, to thereby minimise the network overhead and with that reduce the latency so we don’t unnecessarily crash our lunar lander. I wrote this walk-through as I thought you’d like it too. And Fredrik did most of the real work.
Here is a sketchy video of what to expect once you’re done, with Fredrik’s narration:
Let’s get to it
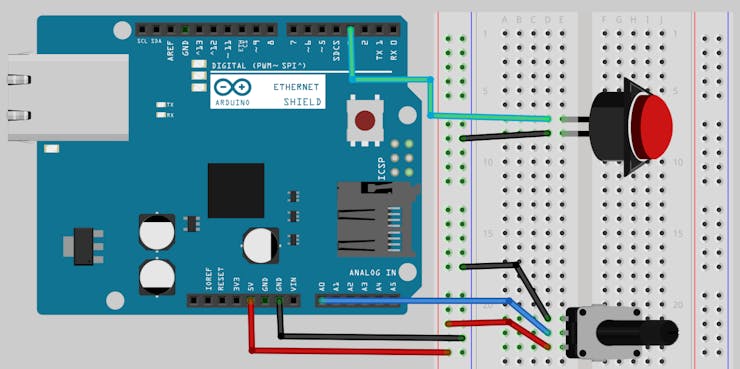
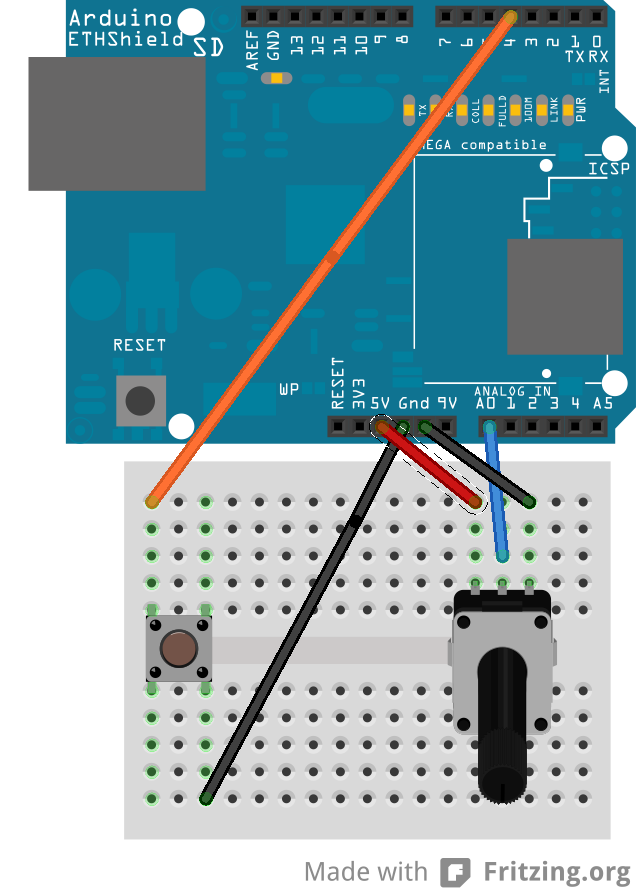
To get started, you need an Arduino UNO or compatible, a pushbutton, a variable resistor (our potentiometer is standard 10kΩ, same as in the Arduino starter kits), some patch cables and a breadboard. For connectivity we’ve chosen an Arduino Ethernet shield as they are relatively common and reliable. See the Fritzing sketch below, connecting the potentiometer to analog pin 0 and the pushbutton to digital pin 3.
After finishing your hardware set-up, you’ll want to download both the Arduino sketch (.ino file) and the mobile app from our contributers’ demo repo on Github. If you’re unfamiliar with cloning using git, you can instead download the demos folder as a single zip file, and after unzipping open up the Lunar Lander demo folder. Inside of it, you’ll find one subfolder for the app and its sibling folder with the Arduino code. Note; All code for this example is released as is, sans commercial or other proprietary intent, copylefted on our contributor’s Github repository.
Now we have all the parts, time to get to work with the software!
Upload to the Arduino microcontroller
Take the arduinoeth.ino file of the project and run it from the Arduino SDK on your desktop computer, remember to select the correct profile under “Tools>Board”, and the right USB port under “Tools>Port” before uploading, if you see errors during the upload process.
Inside the Arduino SDK, open the “Tools>Serial Monitor” to see what’s going on and how the Ethernet shield is doing in terms of picking up an IP address. If you don’t have a network that gives you an address (DHCP), you’ll need to uncomment and alter lines 48-50 in the arduinoeth.ino file. Make a note of the IP address of the Arduino from the monitor window, as it’s going into the app code shortly.
Setting up Evothings Studio
Download the Evothings Studio components
- Evothings Workbench to your computer at https://evothings.com/download
- Evothings Viewer for your phone (Google play or iTunes, search for “
Evothings Viewer“)
Configuring your app
Like most Evothings examples, there is a index.html file containing the layout and container tag for the game. You can fill in the IP address of the Arduino here on line 128 with the id=”ArduinoIpAddress”, so you won’t have to add it via the phone with chubby fingers. You also need to fill in this address in theapp.js file (in this current version at least) to start the Socket chrome.sockets.tcp.connect function, on line 26. That’s it, you should be ready to go! Make sure the phone is on the same network as the Arduino device (turn Wifi on) so they can find each other.
Run Luke, run
All you need to do to run the example, is to drag-n-drop the index.html file from your Lunar Lander project into the Workbench project window and press “RUN”. This app will now load in the Evothings Viewer, press connect and then press your pushbutton on the breadboard to make your first landing attempt. A small step for one developer, a giant leap for the kids when they see how fun video games were in 1979.
Joking aside, you should really use the ideas from this project, adapt to something useful and perhaps even develop further to meet you own requirements for sending data from a connected device. There are tons of other examples and tutorials on our developer site evothings.com/developer, for your Arduino and other hardware, APIs and cloud services. Feel free to join the action. We also have a forum on evothings.com/forum for any idea or question you might have.
Schematics
For more information, please refer to the following link;
Source : https://www.hackster.io/evo/lunar-lander-on-your-phone-jedi-controls-on-the-arduino-f5e247?ref=search&ref_id=ethernet shield&offset=5займ ночью на карту
COMMENTS