Record your weather to Data sites on the web
This project is an example of Ethernet shield.
Users can easily monitor sensors by using Arduino platform through Web.
This project is included in Sensing & Gathering category of WIZnet Museum.

Component
-. Arduino board
-. Ethernet shield
-. Power supply
-. Cat5 cable
-. Software : Arduino IDE
-. Sensors : BMP180, RHT03
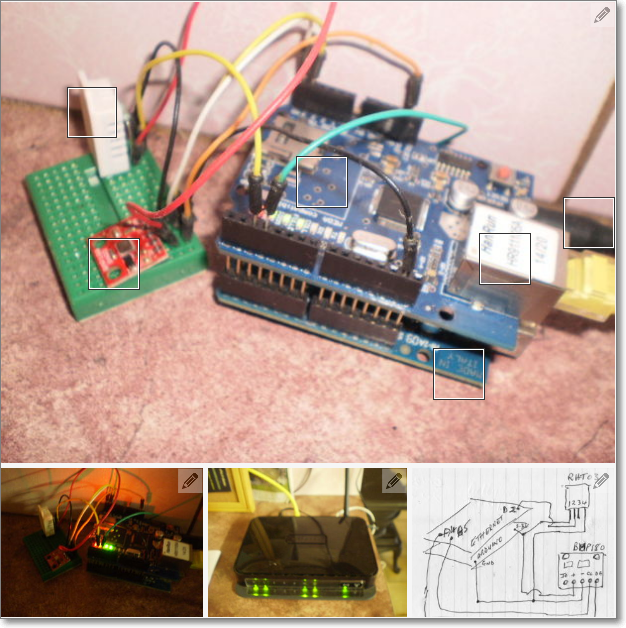
Place the Ethernet shield on the arduino board and connect the sensors .connect the ethernet shield to the modem and power up the Arduino.
Using it exactly as I have it set up results in data being recorded every half hour .
There is also a site http://imp.guru/ ” Imp Guru” that takes your data ,which anybody has access to , and pumps it into a continuous graph form . They simply put mine on and told me about it so how they choose I don’t know but you can email them on their home page contact email page.EDIT Now gone so follow their new site .
Below is the code to put on the Arduino. Download the zip and extract it. It extracts into its own folder . In the arduino IDE (Integrated Development Environment) open the folder then the “Phant_EthernetwithPressure_temp.ino” file and all the others should be there as tabs in the IDE. Expand your page sideways if you don’t see them all
You will have to go through the code to adjust the private and public keys to those you are given by https://data.sparkfun.com/ when you set up your personal data site. You will also have to change the Mac address to one from your Ethernet device. If your sensors are different you may have to mess about a bit to get the readings properly. Your modem may be different , mine is a Netgear DGN1000 wireless router.The required addresses may be different but mine sets up on 192.168.0.0 through to .256 or so so I chose 192.168.0.178 and used that . You can use whatever you want.
Recent Arduino IDE’s seem to have all the libraries needed but you may have to download those and install them in your libraries folder for this to compile. SPI, DHT Ethernet are all needed so if it does not immediately compile on download look in the libraries folder of the Arduino installation and check in the import menu of the IDE to see if DHT or whatever is available . If not Google the library say “Arduino DHT library download” and follow the prompts and install notes. If you don’t have all the libraries installed it won’t compile.
Check back for comments and updates I will make accordingly .
Ignore the green wire above it was used to trigger a send whenever I wanted to test the setup. The code is left with lots of tests still in for debugging . If anyone is good with interupts there could be a saving of power by powering down between pushes to the server. Please post your code in the comments if you do so.
I’m working on putting this on the ESP8266 ESP12 board now which gets rid of the Arduino $30 and Ethernet shield $12 and uses ESP8266 instead $4. Data going up now but trouble with BMP180 atm
For more information, please refer to the following link;
Source : http://www.instructables.com/id/Record-your-weather-to-the-cloud-access-it-anytime/взять займ с 21 года без отказа.
COMMENTS