This is a simple example of creating a web server using Arduino board and ethernet shield in order to see a temperature and atmospheric pressure measured by the atmospheric pressure sensor via Web page. I used BMP180 atmospheric pressure sensor instead of the SCP1000 used in arduino example. It is also possible to configure a WoT (Web of Things) by using other sensors.
1. What is needed and the circuit configuration
Supplies
=====
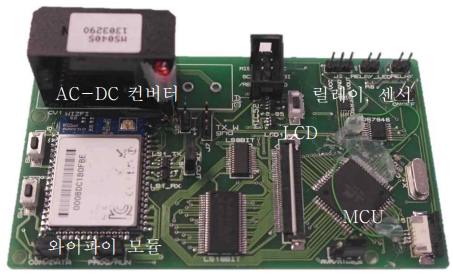
- Arduino board(Uno or Mega)
- Ethernet shield board
- BPM180 atmospheric pressure sensor module
- 4 M/F jumper wire
- Router and Internet connection lines for the Internet connection

2. sketch description
I turned example in “file->example->Ethernet ->BarometricPressureWebServer” in arduino IDE to something for BPM180 atm sensor and modified local IP address of my home router.
Should be install library for BMP180 atm sensor in order to measure the temperature and pressure using BMP180 atm sensor, Please refer to the blog http://blog.naver.com/msyang59/220093767813
sktech
=====
1 2 3 4 5 6 7 8 9 10 11 12 13 14 15 16 17 18 19 20 21 22 23 24 25 26 27 28 29 30 31 32 33 34 35 36 37 38 39 40 41 42 43 44 45 46 47 48 49 50 51 52 53 54 55 56 57 58 59 60 61 62 63 64 65 66 67 68 69 70 71 72 73 74 75 76 77 78 79 80 81 82 83 84 85 86 87 88 89 90 91 92 93 94 95 96 97 98 99 100 101 102 103 104 105 106 107 108 109 110 111 112 113 114 115 116 117 118 119 120 121 122 123 124 125 126 127 128 129 130 131 132 133 134 135 136 137 138 139 140 141 142 143 144 145 146 | /* BMP180 Barometric Pressure Sensor Display This is example to represent measured value of BMP180 atm sensor via Web page Connect the two signal line and power supply to arduino boardBMP180. Because atm sensor use I2C bus. Circuit: Arduino BMP180 ————- —— SCL(A5) SCL SDA(A4) SDA +5V VIN GND GND It has been created by the 2010 07 May 31, Tom Igoe It has been fixed by the 2014 October 09 days WayFarer This sample code is a shared work */ #include <Wire.h> #include <Adafruit_BMP085.h> #include <SPI.h> #include <Ethernet.h> // MAC address to be assigned to the Ethernet controller byte mac[] = { 0xDE, 0xAD, 0xBE, 0xEF, 0xFE, 0xED }; // IP address to be assigned to the Ethernet controller: IPAddress ip(192, 168, 0, 100); IPAddress gateway(192, 168, 0, 1); IPAddress subnet(255, 255, 255, 0); // Generate Ethernet server object by the default HTTP port 80. EthernetServer server(80); Adafruit_BMP085 bmp; bool isBMP180Ready = false; float temperature = 0.0; long pressure = 0; long lastReadingTime = 0; void setup() { Serial.begin(9600); // Set the BMP180 sensor to the most accurate measurement mode: if(bmp.begin(BMP085_ULTRAHIGHRES)) { // If // setting is completed successfully, // Save flag meaning BMP180 sensor is available isBMP180Ready = true; } else { Serial.println(“BMP180 could not find the sensor.”); Serial.println(“Please check the connection!!”); } // Assign the IP address, and then start the Web server services: Ethernet.begin(mac, ip); server.begin(); } void loop() { // Compares the current time and the time measured before reading to measure once per second. if (millis() – lastReadingTime > 1000) { getData(); // Record the measurement time: lastReadingTime = millis(); } // Make sure that there is an Ethernet connection request: listenForEthernetClients(); } void getData() { Serial.println(“measure atm sensor :”); // Measure the temperature: temperature = bmp.readTemperature(); // measure atm: pressure = bmp.readPressure(); Serial.print(“temperature: “); Serial.print(temperature); Serial.println(” ℃”); Serial.print(“atm: “ + String(pressure)); Serial.println(” Pa”); } void listenForEthernetClients() { // It will have to confirm whether the user (client) requests a connection EthernetClient client = server.available(); if (client) { Serial.println(“user connections”); // Check whether the received string is an empty line // to check end of HTTP request. boolean currentLineIsBlank = true; while (client.connected()) { if (client.available()) { char c = client.read(); // After accepting the HTTP request to completion, // it sends an HTTP response. // If the string contains only newline characters, it has read all HTTP requests. if (c == ‘\n’ && currentLineIsBlank) { // Send a standard HTTP response header client.println(“HTTP/1.1 200 OK”); client.println(“Content-Type: text/html”); client.println(); // Output the temperature and pressure in HTML format: client.print(“temperature: “); client.print(temperature); client.print(” ℃”); client.println(“<br />”); client.print(“atm: “ + String(pressure)); client.print(” Pa”); client.println(“<br />”); break; } if (c == ‘\n’) { // New string is started currentLineIsBlank = true; } else if (c != ‘\r’) { // When characters is received, it is not new line characters, // Mark as non-blank. currentLineIsBlank = false; } } } // In order to give the time that the Web browser receives the data, wait for a while delay(1); // Disconnect the Internet connection: client.stop(); } } |
Colored by WayFarer™ | |
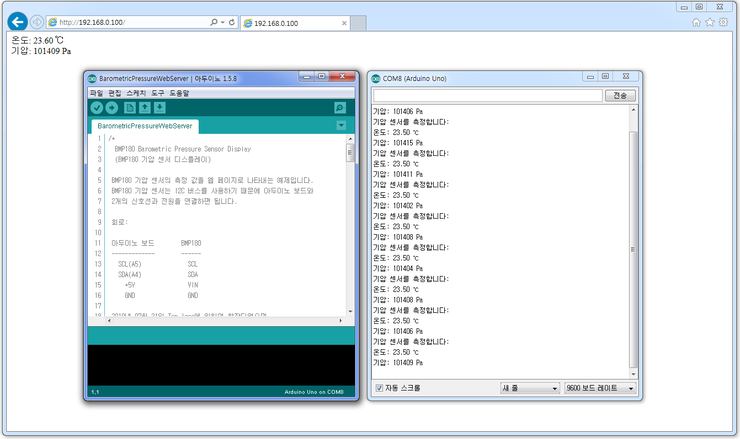
3. execution result
After upload the sketch and open the serial monitor for a while, it begins to be output temperature and atmospheric pressure, which is measured along with the message “Measure the atm pressure sensor”. Because I open a Web browser and connect to the IP address 192.168.0.100 the Ethernet shield is assigned, that temperature and atm pressure be displayed in the browser.
4. finish
I used the sketch I created before and the example sketch provided by Arduino, so I could easily create a web server service.
The web browser connects to the server in pull method and receives temperature and pressure. It would be a good idea to switch push method that a web server periodically load up the web browser.
Date : Oct 09, 2014
Author : 과객
COMMENTS