Simply I tried to output an IP address assigned from the Internet router via serial monitor, using the DHCP(Dynamic Hosting Configuration Protocol) to check that the Ethernet shield is running.
1. What is needed and the circuit configuration
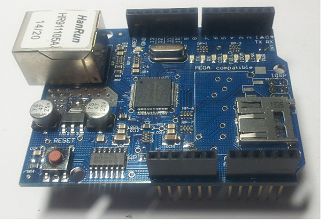
You will need Arduino Unoboard or Megaboard Since Ethernet shield board has adapted to use by inserting directly on top of the Arduino Unoboard or Megaboard. In order to receive an assignment of the IP address, the Internet router (which can be a router or DHCP server) is required.
Supplies
=====
Arduino Uno board
Internet router
Internet connections
Circuit configuration
=======
Unnecessary Circuit configuration, but you should wire the Ethernet shield to Arduino Uno board and connect to the Internet.

2. sketch description
Get static IP address by using “File -> Example -> Ethernet -> DhcpAddressPrinter” in arduino IDE
sketch
=====
1 2 3 4 5 6 7 8 9 10 11 12 13 14 15 16 17 18 19 20 21 22 23 24 25 26 27 28 29 30 31 32 33 34 35 36 37 38 39 40 41 42 43 44 45 46 47 48 49 50 51 52 53 54 55 56 57 58 59 60 | /* DHCP (Dynamic Host Configuration Protocol) -based IP printer This sketch connects arduino board and WIZnet Ethernet shield, obtain an IP address using the DHCP extension functions of the Ethernet library, and then output the address obtained in the serial monitor. * Ethernet shield uses 11, 12, 13 pin in order to use the SPI bus interface and 10 pin for selecting the Ethernet shield. In addition to using a 4-pin for selection SD card. It has been created in the 04 May 12, 2011 Was fixed by Tom Igoe on 04 May 09, 2012 */ #include <SPI.h> #include <Ethernet.h> // MAC address for Ethernet controller. // In case of New Ethernet shield, MAC address is printed on sticker. byte mac[] = { 0x00, 0xAA, 0xBB, 0xCC, 0xDE, 0x02 }; void setup() { // initialization for serial communication, and wait for the communication port is opened: Serial.begin(9600); //This check only required in the Leonardo board: while (!Serial) { ; // Wait until the serial port is connected. Leonardo board only needs } // Start the Ethernet connection: if (Ethernet.begin(mac) == 0) { Serial.println(“failed to configure the Ethernet using DHCP”); // endless loop: for (;;) ; } // Output the local IP address: Serial.print(“IP address assigned : “); for (byte thisByte = 0; thisByte < 4; thisByte++) { // Prints the value of each byte of the IP address: Serial.print(Ethernet.localIP()[thisByte], DEC); Serial.print(“.”); } Serial.println(); } void loop() { } |
Colored by WayFarer™ | |
3. Execution result
Upload the sketch, open the serial monitor, and are waiting for a while, the assigned IP address will be displayed. It stop to output only once. So press the reset button on the Ethernet shield board in order to receive it again and outputs it to the screen.


4. Finish
The pins used on the ethernet shield were too long, so I got bent on the courier. Because of bent pins, it was a little hard to plug into the Arduino board.
I felt that the purpose of sending the post header pins separately was to prevent the pins from bending during transportation.
In addition, the Ethernet library that was downloaded from WizNet was used as a user library, but it conflicts with the W5100 library and does not work. Therefore, the library registered in the user library is deleted. As described in https://github.com/Wiznet/WIZ_Ethernet_Library, i copied it in the Arduino IDE libraries folder and uncommented the #define W5100_ETHERNET_SHIELD in the w5100.h file. I also felt that the installation instructions should be read carefully.
I thought that it would be more convenient for users to use #define in sketch rather than modify the header file of the library.
Date : Oct 08, 2014
Author : 과객
COMMENTS