Getting hands on Arduino Ethernet Shield
Description (Curation) :
Probably everyone knows Arduino and probably using it. Actually this development platform is worth its popularity. Probably the best thing about it is open-source ideology. Indeed it is great development platform that includes software and hardware solutions where even non electronics guru can master great projects very quickly. In a few years Arduino has grown in a great community around the world. And that is great – this means that you have access to endless resources, endless project ideas and lots of members that are willing to help if you are stuck with something. All basic information you can always find in http://www.arduino.cc/.
OK enough of talkies. Lets see what we have here. Thanks to SparkFun electronics, Arduino Duemilanove stands on my table fully assembled and ready to work.

I decided to give a try on Arduino Ethernet shield based on Wiznet W5100 chip. It has a library so you don’t need to think of details how Ethernet chip is controlled. Few lines and you have some info in your favorite browser.
Of course if you are using Arduino Pro minimal design, you may also need FTDI Basic Breakout – 5V board.
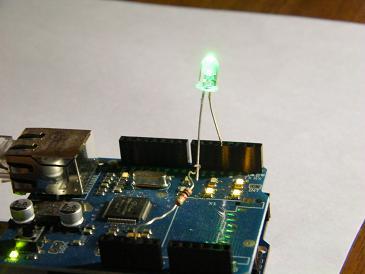
Now lets grab the newest stable Arduino software release from http://arduino.cc/en/Main/Software. And lets get ready for a simple test. To make things more interesting I decided to make a simple LED control in order to feel client-server and server-client communications. I hooked led to digital pin 4 while other end to GND via current limiting resistor. I have connected Ethernet shield to WRT54G router. As I used standard port 80 there were no need for additional configuration.
While programming you will ideally need one library
#include <Ethernet.h>
Of course you can also use additional like WString.h which I used for fetching data from HTTP request.
First thing is to assign MAC and IP addresses so the board was accepted to local network:
byte mac[] = { 0xDE, 0xAD, 0xBE, 0xEF, 0xFE, 0xED }; //physical mac address
byte ip[] = { 192, 168, 1, 110 }; // ip in lan
byte gateway[] = { 192, 168, 1, 1 }; // internet access via router
byte subnet[] = { 255, 255, 255, 0 }; //subnet mask
Wiznet type Ethernet shield doesn’t support dynamic address assign (dhcp)– so you have to do this manually. You may want to check out for DHCP library which is early alpha stage.
Printing simple text, drawing tables is really easy task as it ends with multiple lines of print functions like
client.println();
with HTML formatted lines inside. Different task is when you need to send some data to Arduino server itself. One of common methods is reading HTTP request by characters. Simply when sending address with additional parameters like /?L=1 Arduino can capture this line character by character with line
char c = client.read();
And then analyze it. In your selected way. In this case it is very convenient to use string functions like append and contains (refer to TextString )

Result :
Test result on Firefox browser:

If any questions or comments regarding this – don’t hesitate to drop a comment.
Download project file here: ethtest
Source : http://www.scienceprog.com/getting-hands-on-arduino-ethernet-shield/
Tags : 201104, W5100, Ethernet Shield, Arduino
Author : ScienceProg
COMMENTS