
Feel the heat with Arduino and Cayenne

This project is an example of Ethernet shield.
User can manage his house easily by using Arduino platform through Web.
This project would be included in Remote control category of WIZnet Museum.
Hardware components:
-. Arduino UNO & Genuino UNO
-. Arduino Ethernet Shield
-. 4-Channel 5V Relay Module
-. Step Down Adjustable Power Supply
-.Relay(generic)
-. AC-DC industrial DIN rail power supply
-. Miniature Circuit Breaker
Software apps and online services:
-. Arduino IDE
-. Cayenne
Story
In my house there are several types of heat sources and they are independent from each other and none of them are regulated, so it’s really difficult to keep constant room temperature. Therefore I decided to add a regulated heat source in to existing system. I find that the easiest controllable energy is electricity, hence I end up with 2 kW power electric heater.

To control it I decided to use a “smart” connected thermostat. Nowadays there are numerous devices that are made specifically for this purpose, but they can be quite expensive and not always suit your needs. So my solution was to build one and not only the thermostat but also automated control system. This system can be expanded in the future.
Hardware

As a main board I use Arduino Uno with the Ethernet shield. As a power stage I use optically isolated relay module powered from a dedicated 5V supply. These relays are not suitable for switching high currents, this is why I use another power stage with high current relays and MCBs (Miniature Circuit Breakers). This protects the system from over current and short circuit on power lines.
All the control electronics and relays get power from 24 V DC power supply. To lower the voltage on Arduino side I use DC/DC step down switch mode voltage regulator. It reduces voltage approximately to 9 V DC, which is then fed in to Arduino’s Vin pin. The relay board is powered from similar 5 V DC 3 A voltage regulator.
The system has redundancy taking in to account safety and future upgrades. For this project you only need relay board with 2 relays or you can use other switching devices (like FETs) to control power relays.
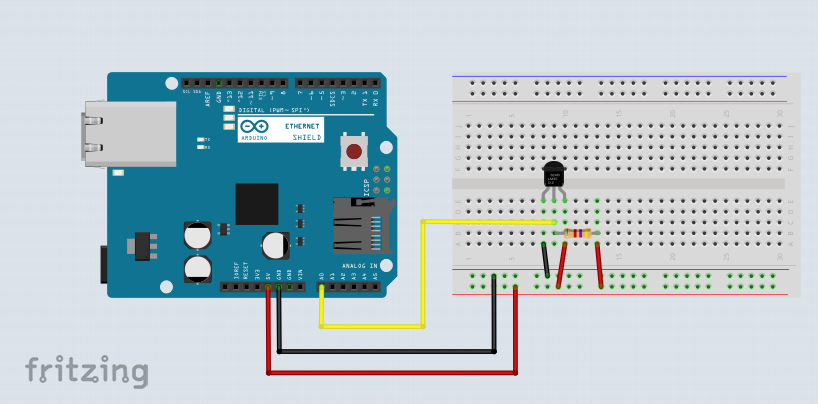
For temperature sensing I use DS18B20 temp sensor. I use it in normal power mode so it is connected with three wires. In the future I will add more sensors.

For security reasons I use wireless cloud-based camera, to check if heater still in its place, is it working properly or is there any other issue. When it’s dark in the room I use another relay to switch on the LED light remotely.

Any wiring to the mains power should only be done by a qualified electrician!
IoT platform
For this project I use Cayenne IoT platform. It is really easy to set up and you can control it from your PC or mobile device.

The code is generated by Cayenne automatically, you only need to assign pin numbers for your sensors and actuators.
Schematics
Code
#define CAYENNE_PRINT Serial  // Comment this out to disable prints and save space
#include <OneWire.h>
#include <DallasTemperature.h>

// If you're not using the Ethernet W5100 shield, change this to match your connection type. See Communications examples.
#include <CayenneEthernet.h>

// Virtual Pin of the DS18B20 widget.
#define VIRTUAL_PIN V10

// Digital pin the DS18B20 is connected to. Do not use digital pins 0 or 1 since those conflict with the use of Serial.
const int tmpPin = 14;

OneWire oneWire(tmpPin);
DallasTemperature sensors(&oneWire);

// Cayenne authentication token. This should be obtained from the Cayenne Dashboard.
char token[] = "xxxxxx";

void setup()
{
	Serial.begin(9600);
	Cayenne.begin(token);
	sensors.begin();
}

void loop()
{
	Cayenne.run();
}

// This function is called when the Cayenne widget requests data for the Virtual Pin.
CAYENNE_OUT(VIRTUAL_PIN)
{
	// Send the command to get temperatures.
	sensors.requestTemperatures();
	// This command writes the temperature in Celsius to the Virtual Pin.
	Cayenne.celsiusWrite(VIRTUAL_PIN, sensors.getTempCByIndex(0));
	// To send the temperature in Fahrenheit use the corresponding code below.
	//Cayenne.fahrenheitWrite(VIRTUAL_PIN, sensors.getTempFByIndex(0));
}
If you want to know more in detail, refer to
Source : https://www.hackster.io/user3111302/feel-the-heat-with-arduino-and-cayenne-b67a60?ref=user&ref_id=115807&offset=1расчетно кассовое обслуживание банки
Collected by Jim : jim@wiznet.io
COMMENTS