Automated Garden

This project is an example of Ethernet shield.
User can manage his garden easily by using Arduino platform through Web.
This project would be included in IoT category of WIZnet Museum.
Hardware components:
-. Arduino UNO & Genuino UNO
-. Arduino Ethernet Shield2
-. Raspberry Pi
-. Sensors
Software apps and online services:
-. Arduino IDE
-. Raspberry Pi Raspbian
-. Cayenne
Story
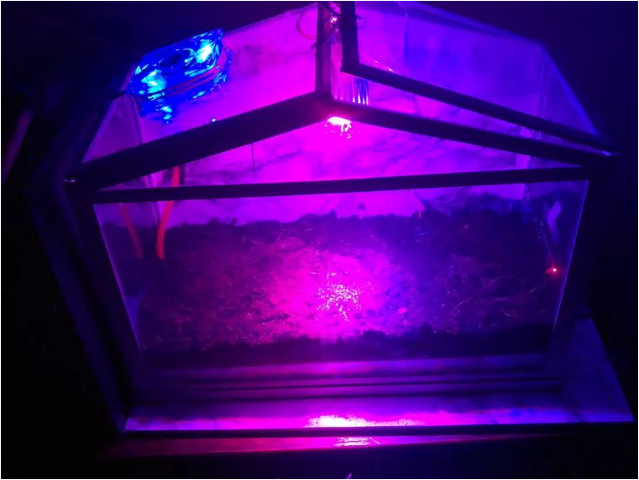
This is the second project using my automated garden, but this time everything will be controlled by Cayenne so it will be a lot easier. Also I added a Raspberry Pi in order to do a time-lapse video.
Setting up the Arduino
In order to monitor our garden, I used a few devices which can be helpful. Before starting, remember to connect the Ethernet shield to the Arduino.
Connections
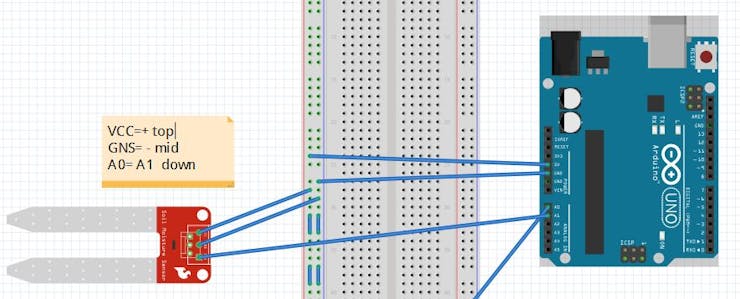
Soil moisture: To check if the plants need water.
- VCC: 5v
- GND:GND
- A0: A1
The Fan: If it’s get to hot it will activate or just to give some fresh air.
- One wire goes from the resistor to pin 3-The GND of the fan goes on the middle pin of the transistor.
- The + of the fan goes to the relay (middle pin) The last pin of the transistor goes to GND.
- The diode goes to the middle pin of the transistor and to the GND.
The water pump: It will activate with the soil moisture.
- The + goes to middle on the relay and GND to GND of the power source.
Photoresistor (optional): This part will allow us to measure if there is enough light in the room.
- One part is connected to A0 with the resistor connected to the ground.
- The other one to the 5V.
- The anode (+) goes to the relay. The other to the GND of the power supply.
Light:
- The anode (+) goes to the relay. The other to the GND of the power supply.
Humidity /temperature sensor: Some code is required for this device in order to work properly with Cayenne.
- VCC: 3.3V
- GND:GND
- DAT: digital pin 8
Water level sensor:
- VCC:5V
- GND:GND
- SIG:A2
Final mounting
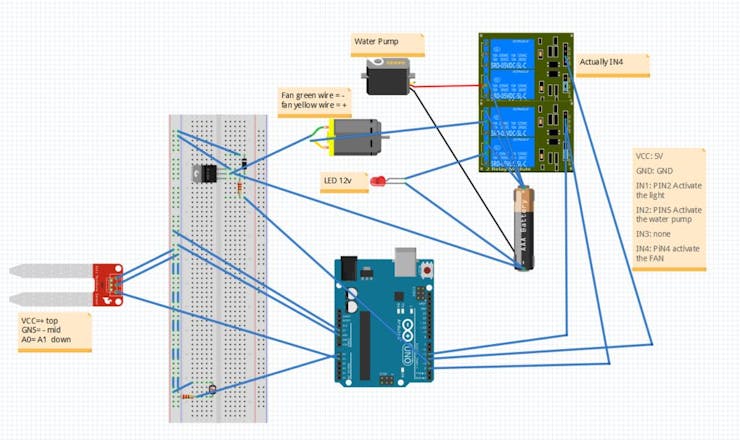
I used 2 relay in the graphic because Fritzing does not have a 4-channel relay yet. For the relay I used only one 12v power supply. I separated the positive and negative wires, and then soldered 3 wire from the positive and connect each part on the relay. One is enough as everything does not turn on at the same time.
I used a 5V power supply for the Arduino RELAY:
- VCC: 5V
- GND: GND
- IN1: PIN2 Activate the light
- IN2: PIN5 Activate the water pump
- IN3: none IN4
- PiN4: activate the FAN
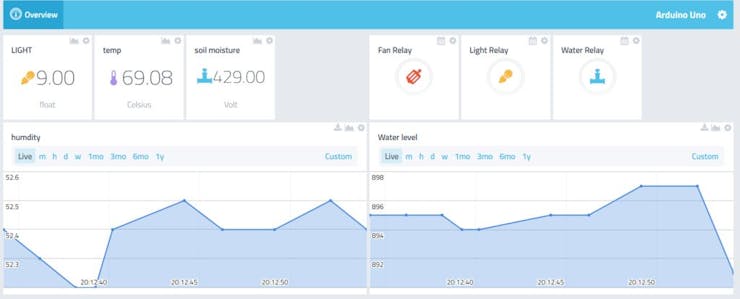
Cayenne Setup
Here we gonna see how to configure Cayenne which is very easy.
- First create an account Here.
- Then you should have your Ethernet shield with Rj45 cable connected.
- Here is the code to connect to Cayenne and also to configure the hum/temp sensor.
Code
#include "DHT.h"//#define CAYENNE_DEBUG         // Uncomment to show debug messages
#define CAYENNE_PRINT Serial  // Comment this out to disable prints and save space
#include </p><p>#define DHTPIN 8     // what digital pin we're connected to
#define DHTTYPE DHT22   // DHT 22  (AM2302), AM2321</p><p>#define VIRT_TEMP V1
#define VIRT_HUM V2</p><p>// Cayenne authentication token. This should be obtained from the Cayenne Dashboard.
char token[] = "your toker";</p><p>DHT dht(DHTPIN, DHTTYPE);
unsigned long prev_DHT_refresh, interval_DHT_refresh = 1000;</p><p>void setup()
{
  Serial.begin(9600);
  Cayenne.begin(token);</p><p>  dht.begin();
}void loop()
{
  Cayenne.run();</p><p>  getDhtValues();</p><p>}</p><p>void getDhtValues() {
    unsigned long now = millis();

  if (now - prev_DHT_refresh > interval_DHT_refresh) {
    // Reading temperature or humidity takes about 250 milliseconds!
    // Sensor readings may also be up to 2 seconds 'old' (its a very slow sensor)
    float h = dht.readHumidity();
    // Read temperature as Celsius (the default)
    float t = dht.readTemperature();   // Check if any reads failed
    if (!isnan(h) && !isnan(t)) {
      Cayenne.virtualWrite(VIRT_HUM, h);
      Cayenne.celsiusWrite(VIRT_TEMP, t);
    }
    prev_DHT_refresh = now;
  }
}
Setup the Raspberry Pi
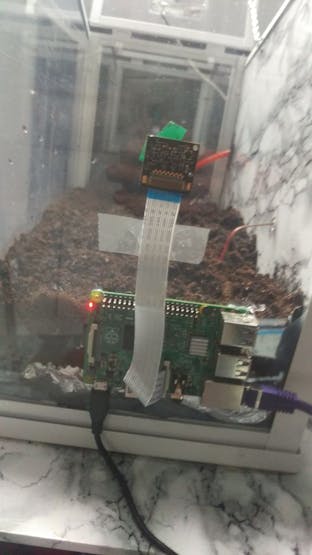
Let’s do a time lapse of the plant growing.
3 Software:
- Win32diskimager to burn the image on the SD card
- Putty to connect in remote to the Raspberry WIn32 disk imager:
After downloading, install it. Open it:
1. You will see “device”. In general, the default is good (if you only have the SD card connected)
2. Click on the blue icon folder and select the Raspbian Jessie image you have downloaded
3. Click write and it’s done. You can now insert the card to the Raspberry.
Putty: It allows us to connect via SSH, open Putty (no need to install).
- Connect internet cable to the Raspberry
- You need to find the IP of the Raspberry 2 the easy way:
- Connect to your box interface you will be able to see the device with the IP
- Connect the touchscreen and keyboard go to terminal then
ifconfig.Now in Putty enter the IP address. It will be something like 192.168.0.3 then enter.
- It will ask to trust, click yes
If you want to know more in detail, refer to
Source: https://www.hackster.io/thomas_sxt/automated-garden-77bee8?utm_source=Hackster.io+newsletter&utm_campaign=775f0495a5-2015_4_17_Top_projects4_16_2015&utm_medium=email&utm_term=0_6ff81e3e5b-775f0495a5-140538701&mc_cid=775f0495a5&mc_eid=b7d75c52a6взять микрозайм на карту
Collected by Jim: jim@wiznet.io
COMMENTS