Multifunctional RGB LED light

This project is an example of Ethernet shield.
User can manage his house easily by using Arduino platform through Web.
This project would be included in Remote control category of WIZnet Museum.
Hardware components:
-. Arduino UNO & Genuino UNO
-. Arduino Ethernet shield
-. RGB LED module
-. RGB LED Controller
-. PIR Motion Sensor(generic)
Software apps and online services:
-. Arduino IDE
-. Cayenne
Story
Introduction
Then you start working with microcontrollers, embedded systems or IoT the first tutorial usually shows how to blink the LED. When you start using Cayenne it offers the same – “Let’s add a luminosity actuator widget.” So I decided to do this, but in a slightly more complex way.
I started with Arduino Uno, three colour LED and motion detector. Connect all the components, write some simple code and here you have it – a colourful automatic LED light. Using PWM you can control its brightness and colour.
The remote control
But this is just a beginning. These days we want to control everything: TVs, doors, cars, husband. And we prefer doing it remotely. So I need to connect it to a remote control, and nowadays obviously it is my smartphone. This is where the Cayenne comes in. Cayenne (as their site claims) is the world’s first drag and drop IoT project builder that empowers developers, designers and engineers to quickly prototype and share their connected device projects.
This is exactly what I need to make it happen with minimal effort. I just need to connect my Arduino Uno to the net. For that I use W5100 Ethernet shield and Ethernet cable, but in the future I will upgrade to the WiFi enabled board like ESP8266.
All I need now is go to my Cayenne account and create a new project.
If you don’t have Cayenne Account, you can create it from your Mobile device or online. Cayenne was designed to work from iOS and Android smartphones and popular browsers. Go to the Sign Up page, enter your Name, Email, create a Password and you’re done.
Setting up Arduino
Then setup your Arduino Uno and install the Cayenne Arduino Library onto the device. All the detailed instructions are on Cayennes webpage. The code is generated by Cayenne automatically, you only need to assign pin numbers for your sensors and actuators and upload it to Arduino.
I added three Luminosity widgets to my dashboard to control LEDs colour and brightness, also motion sensor widget and button widget to turn on/off the light.

Triggers & Alerts
Now it’s time to add some triggers. I set the trigger to light up the red LED then motion is detected and another one to send me a notification SMS.
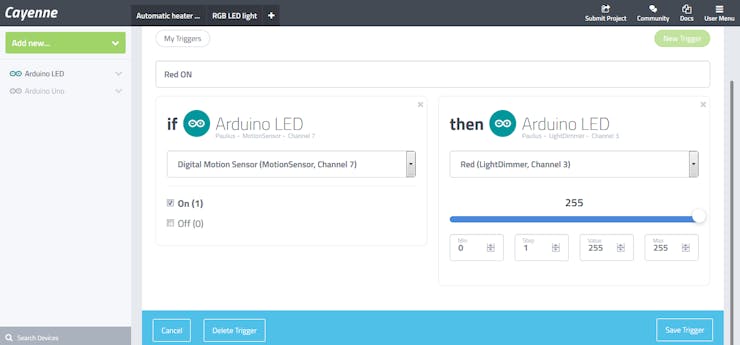
When the motion is detected the red LED is on and Cayenne sends a notification SMS. To turn off the LED we need to set up another trigger.

Another trigger is set to turn on or turn off the LED. Here we can also set the default LED colour.

Scheduling
Everything worked fine at this stage, but then I realized that Cayenne has a another useful feature – scheduling. So why not to use it?
One thing we can do with this feature is to set an alarm clock. But I already have an alarm clock, and not just one but three, and they all are annoyingly loud. So this one must be different. I will make a wake-up light which will silently fill up my room with warm light just before I need to wake up. If it doesn’t help there always is my annoying alarm clock.
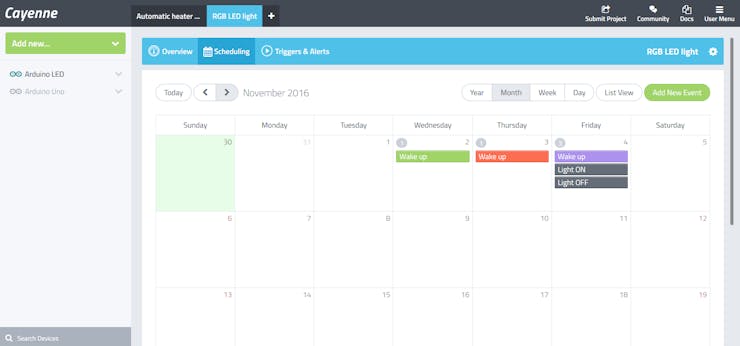
If you have enough patience you can set schedule for all week or a month, or even a year. But I don’t… Also we can use this feature to imitate activity in a house while we are away as we can turn on/off the lamp whenever we want.
Hardware
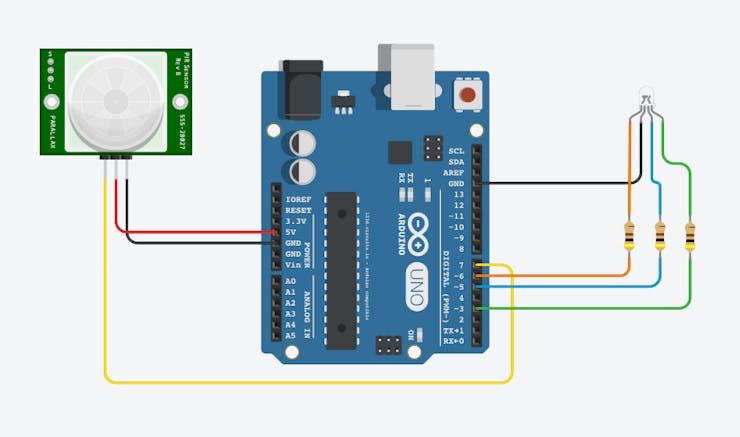
I use a RGB module with 12 LEDs mounted on a big aluminium heatsink. The LEDs are controlled from dedicated controller board with internal power supply. The board is powered from 230 VAC mains outlet and controlled via standard Ethernet cable using PWM signals. To generate these signals I use Arduino Uno with Ethernet shield and for motion detection there is a PIR sensor.
I mounted the PIR sensor on the top of the lamp. It will detect movement if someone is walking around, but it won’t disturb you while in bed or if your dog is moving around.

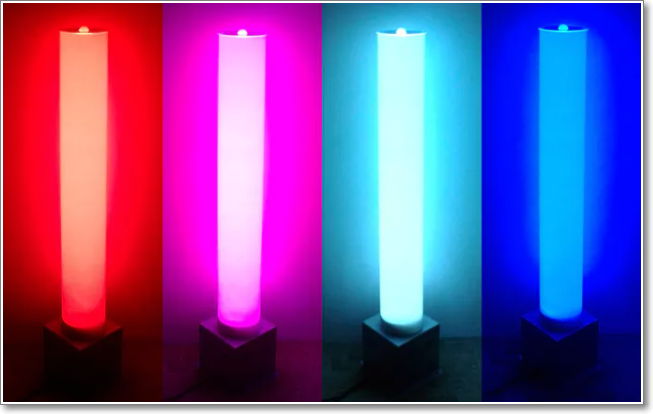
For the lampshade we can use all sorts of material like plastic, glass, paper, fabric or metal and give it any shape. The same is for the lamps stand. Here I use a metal housing of another LED light, we only need to make sure that all the component will fit inside.

And here is the final result.
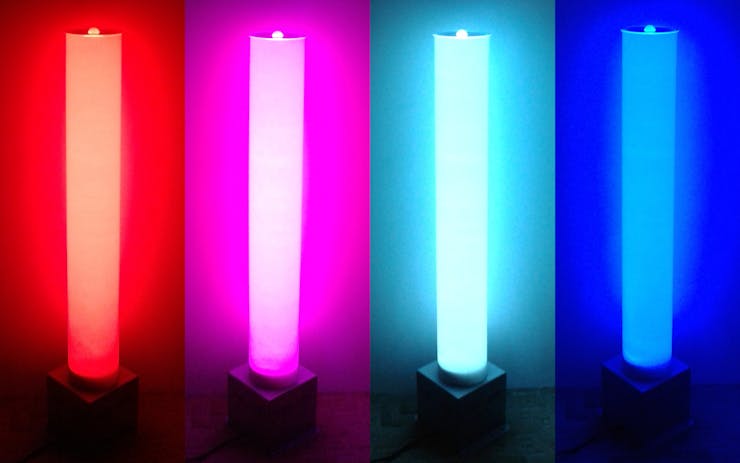
In the end I could say that this is very useful piece of hardware which can be used as a automatic light, some kind of alarm system, wake-up light or just a regular lamp with remote control for lazy people. Also, you can use it like a Mood lamp to create the perfect mood in your room or use it as a night lamp.
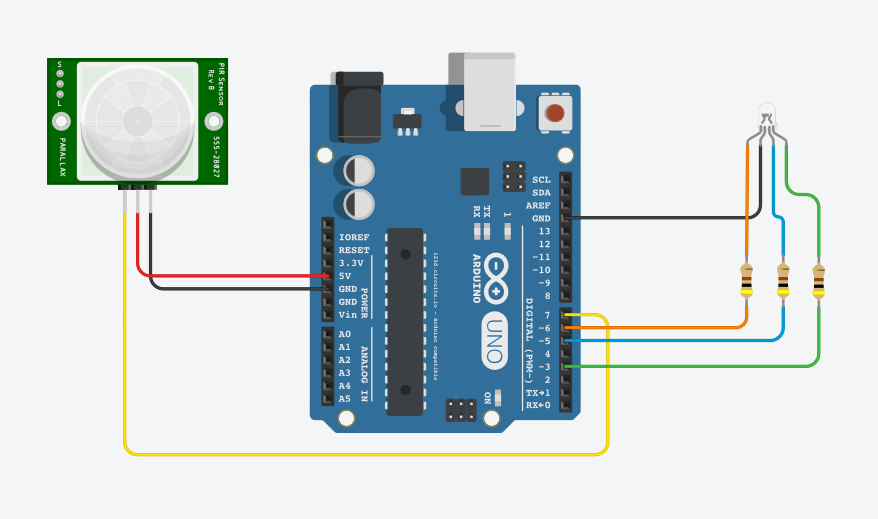
Schematics
If you want to know more in detail, refer to
Source : https://www.hackster.io/user3111302/multifunctional-rgb-led-light-fc02ac?ref=search&ref_id=W5100&offset=1срочные займы на карту без отказов круглосуточно
Collected by Jim : jim@wiznet.io
COMMENTS