Description:
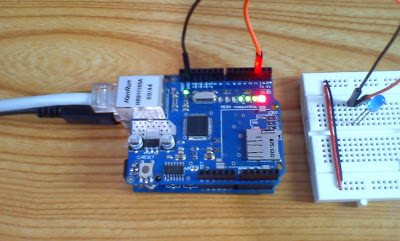
This tutorial explains how to control a LED from PC using Arduino ethernet shield. The Arduino ethernet shield is use WIZnet W5100 ethernet chip.

This shield is also has a micro SD card socket to interfacing with a micro SD card. Arduino communicates with both W5100 and micro SD card using the SPI bus. This is on digital pins 13 (SCK), 12 (MISO), 11 (MOSI), 10 (SS for the W5100), and 4 (SS for the micro SD card). To make a program using this shield is very easy, because there is a library from Arduino both for ethernet and SD.

To begin make code for control LED, we must add SPI library and Ethernet library.
#include <Spi.h>

#include <Ethernet.h>
To make a LED can be controlled from PC, we will program the Arduino as a server. The arduino server will wait for the connection from cilent. The client will sends command to the Arduino via port 23 of TCP port numbers. For making Arduino as a server we need 3 parameter: MAC address, IP address, and port number.
// Arduino server MAC address

byte mac[] = { 0xDE, 0xAD, 0xBE, 0xEF, 0xFE, 0xED };

// Arduino server IP address

IPAddress ip(192, 168, 1, 10);

// Arduino server port

const int port = 23;
we must make server object and string variable called commandStr for storing command from client.
EthernetServer server(port);

// For storing command from client

String commandStr;
we initialize digital pin 2 as an output for LED and also initialize the ethernet and the server. The serial port here is used for debugging only.
void setup() {

    // Set digital pin 2 (PD2) as output for LED

    bitSet(DDRD, 2);


    Serial.begin(9600);


    // Ethernet server initialization

    Ethernet.begin(mac, ip);

    server.begin();


    // Print Arduino server IP address to serial monitor

    Serial.print("Server is at ");

    Serial.println(Ethernet.localIP());

}
In the loop function, we monitoring the client. If there is a client connected and send command to Arduino, we read every character that the client sends and store that command in commandStr variable until new line character.
void loop() {
 EthernetClient client = server.available();

    if (client.available()) {

        // Read char until linefeed

        char c = client.read();

        if (c != '\n') {

            // Add received char to string variable

            commandStr += c;

        } else {

            // Print received command to serial monitor

            Serial.println("Command: " + commandStr);


            // Process the received command

            processCommand(commandStr);


            // Clear variable for receive next command

            commandStr = "";

        }

    }

}
If the command has received, then we need process that command. I am define 3 command that the PC will send to the Arduino: “led=0” for turn off the LED, “led=1” for turn on the LED, and led=? for querying the status of LED.
void processCommand(String cmd) {

    if (cmd == "led=1") {

        // Turn on LED

        bitSet(PORTD, 2);

    } else if (cmd == "led=0") {

        // Turn off LED

        bitClear(PORTD, 2);

    } else if (cmd == "led=?") {

        // Read LED status then send it to client

        if (bitRead(PORTD, 2)) {

            server.println("led=1");

        } else {

            server.println("led=0");

        }

    }

}
Demo:
Haloo I need help. I need a code for 2 pini can you help me