I will introduce a BT Smart Fan :)You can make Bluetooth smart fan if you follow this contents.It is very easy and simple way.Let’s start!
Prepare materials:
- WIZwiki-W7500 board
- Arduino Motor Shield
- Easy Module Shield(not absolutely necessary)
- JMOD-BT-1(HC-05) bluetooth module
- Servo motor(SG-90)
- DC motor(5V DC motor)
- Rubber eraser (just support DC motor any object)
- Some scatch tapes
- DC jack(connect Motor Shield)
- Some hexagon spacer nut/screw
- Some cables
- USB mini B type cable
- 5V DC Power Supply
They are all… for this project~!
Step 2: Hardware connection:Servo+WIZwiki-W7500

connect SG-90 Servo Motor and hex nut.
Step 3: Hardware connection:Servo+WIZwiki-W7500

Hex nut/screw connect each corner portion.
Step 4: Hardware connection:Servo+WIZwiki-W7500

the finished connect servo and WIZwiki-W7500.
Step 5: Hardware connection:DC motor + Rubber Eraser

DC motor and Rubber Eraser wrap with tape.
Step 6: Hardware connection:Arduino Motor Shield+DC Motor+DC jack

DC motor and DC jack connect Arduino Motor Shield~
Please refer to the picture.
Step 7: Hardware connection:Arduino Motor Shield+WIZwiki-W7500

Motor Shield mounted on the WIZwiki-W7500.
Step 8: Hardware connection:Servo + DC motor

DC Motor maounted on the Servo.
Step 9: Hardware connection:Arduino Motor Shield + Easy Shield

Easy Shield mounted on the Arduino Motor Shield.
Step 10: Hardware connection:Easy Shield + Servo

Servo cable connect to easy shield (GND,VCC,SDA(change function to PWM using software))
Step 11: Hardware connection:Easy Shield + JMOD-BT-1

JMOD cable connect to easy shield pin (GND,VCC,TX,RX).
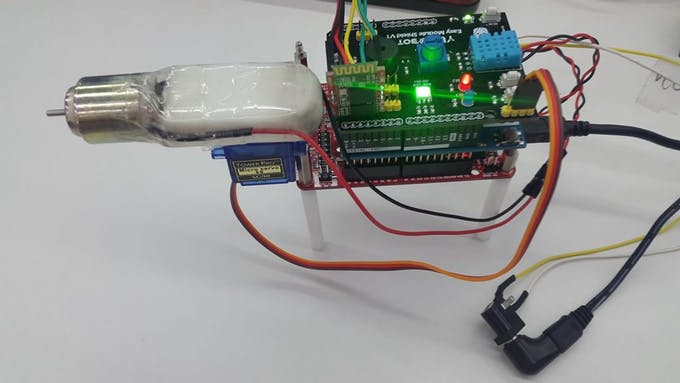
Step 12: Hardware connection:Connect power supply

DC jack and USB cable connection.
Step 13: Prepare development environment
I prepared mbed development environment by the following site.https://developer.mbed.org/
You not installed Tool, Just use the Internet.
To get started with mbed.org go on side https://developer.mbed.org/ and create a free account.
If you are ready to open compiler and create the first project.
Step 14: Reference Software: mbed
The source code is https://developer.mbed.org/users/justinkim/code/BTSmartFan_WIZwiki-W7500/
You import this program and compile using mbed internet compiler.
You can get bin file.
Step 15: Reference Software: Smartphone

download smartphone application.
blueterm is Bluetooth serial terminal.
Step 16: How to run: Test result
Source:
COMMENTS