Learning Arduino Ethernet Shield
The Arduino ethernet shield gives us the ability to connect an Arduino to an ethernet network. It is the physical part that implements the TCP / IP protocol stack.
It is based on the Wiznet W5100 ethernet chip. The Wiznet W5100 provides an IP network stack capable of supporting TCP and UDP. Supports up to four simultaneous sockets. It uses the Ethernet library to read and write data streams that pass through the ethernet port. It will allow me to write sketches that connect to the internet using the shield.

W5100 Datasheet:https://www.sparkfun.com/datasheets/DevTools/Arduino/W5100_Datasheet_v1_1_6.pdf
Ethernet library: http://arduino.cc/en/Reference/Ethernet
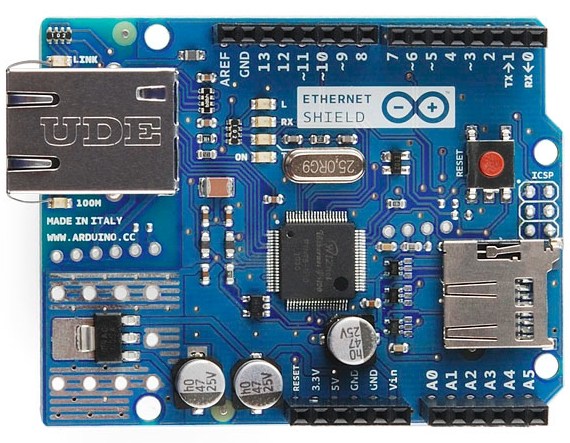
The shield provides a standard RJ45 ethernet connector. The ethernet shield has connectors that allow you to connect other boards on top and stack them on the Arduino board.
Arduino uses the 10, 11, 12, and 13 (SPI) digital pins to communicate with the W5100 on the ethernet shield. These pins can not be used for generic I / O.
The reset button on the shield resets both the W5100 and the Arduino board.
The shield contains several LEDs for information:
- ON: indicates that the plate and shield are powered
- LINK: indicates the presence of a network link and flashes when the shield sends or receives data
- 100M: indicates the presence of a 100 Mb / s network connection (as opposed to a 10Mb / s network)
- RX: flashes when the shield receives data
- TX: Flashes when shield sends data
The welding jumper marked “INT” can be connected to allow the Arduino board to receive interrupt event notifications from the W5100, but this is not supported by the Ethernet library.The jumper connects the W5100’s INT pin to the Arduino digital pin 2.
The SD slot in the shield uses the library http://arduino.cc/en/Reference/SD to handle it . The W5100 chip itself includes the handling of SD cards.
To use the Ethernet Shield, simply mount it on the Arduino board. To load the sketches to the plate with the shield, connect it to the computer using the USB cable as usual. Then connect the Ethernet to a computer, switch or router using a standard ethernet cable (CAT5 or CAT6 with RJ45 connectors). The connection to the computer may require the use of a crossover cable (although many current computers may do the crossover internally).
A simple tutorial to start with the ethernet shield: http://www.artinteractivo.com/arduino-ethernet
For any questions about the Ethernet Shield see: http://arduino.cc/en/Main/ArduinoEthernetShield
Ethernet Shield Points to Remember:
- Operates at 5V supplied from the Arduino board
- The Ethernet controller is the W5100 with 16K internal buffer. It does not consume memory.
- The shield is connected to the microcontroller via the SPI bus, therefore for use must always include SPI.h library: http://arduino.cc/en/Reference/SPI
- Supports up to 4 simultaneous connections
- Use the Ethernet library to manage the shield: http://arduino.cc/en/Reference/Ethernet
- The shield has a micro-SD card reader that can be used to store files and serve them over the network. For this , the SD library is required: http://arduino.cc/en/Reference/SD
- When working with the SD, pin 4 is used as SS.
Arduino UNO communicates with W5100 and the SD card using the SPI bus through the ICSP connector. For this reason the pins 10, 11, 12 and 13 in the UNO and the 50, 51, 52 and 53 in the Mega can not be used. On both boards, pins 10 and 4 are used to select the W5100 and SD card. Ethernet and SD can not work simultaneously and we must be careful when using both together.
To connect the shield, follow these instructions: http://arduino.cc/en/Guide/ArduinoEthernetShield
The schematic you can find it at: http://arduino.cc/en/uploads/Main/arduino-ethernet-shield-06-schematic.pdf
Arduino Ethernet Shield 2
Arduino Ethernet Shield is a board that appears on the website of arduino.cc as retired, but is still available as clones or derived versions.
Moreover arduino.org to Etherner taken out the Arduino Shield 2 with the new Wiznet 5500 http://www.arduino.org/products/shields/arduino-ethernet-shield-2
This Shield uses the library ethernet2: http://www.arduino.org/learning/reference/Ethernet-two-Library
Data sheet of W5500: https://www.sos.sk/productdata/15/26/12/152612/W5500_datasheet_v1.0.2_1.pdf
Improvements W5500: https://feilipu.me/2014/11/16/wiznet-w5500-ioshield-a/
Power over Ethernet
The Ethernet shield is compatible with PoE thanks to an additional module that extracts the electrical energy from the ethernet cable, previously injected from the switch.
The characteristics of the PoE module:
- IEEE802.3af compliant
- Low output ripple and noise (100mVpp)
- Input voltage range 36V to 57V
- Overload and short-circuit protection
- 9V Output
- High efficiency DC / DC converter: typ 75% @ 50% load
- 1500V isolation (input to output)
Data sheet: http://arduino.cc/en/uploads/Main/PoE-datasheet.pdf
More information about Power Over Ethernet:

How PoE Works:
Http://www.bb-elec.com/Learning-Center/All-White-Papers/Ethernet/Power-over-Ethernet-PoE.aspx
Phantom Feeding:

Power over free cables:

WIZnet W5100
The integrated W5100 connects to the arduino via SPI.


To know everything about the W5100 review: http://www.ermicro.com/blog/?p=1773
Basically the Wiznet W5100 implements a TCP stack with all the functions of the IEEE 802.3 standard (physical layer and data link Ethernet) inside the chip; This makes the Wiznet W5100 chip a good choice for integrating the embedded system into the internet. Programming the Wiznet W5100 chip is also easy since we only have to write and read to and from the W5100 internal registers in order to use the build functions of the TCP / IP protocols.
The Wiznet W5100 will act as an SPI slave device controlled by ATMega328 microcontroller as the SPI Maestro. SPI protocol requires at least four signals, MOSI (Master Out Serial In), MISO (Master In Serial Out), SCK (reloh signal provided by the master) and CS (the SPI slave chip select). The W5100 chip also provides the interrupt pin.
Specifications:
- Http://www.wiznet.co.kr/Sub_Modules/en/product/Product_Detail.asp?cate1=5&cate2=7&cate3=26&pid=1011
- Http://www.wiznet.co.kr/UpLoad_Files/ReferenceFiles/W5100_Datasheet_v1.2.2.pdf
Is it possible to pings with arduino?
Yes, but of course with a library: http://playground.arduino.cc/Code/ICMPPing
COMMENTS