I am going to show you how to control an Arduino Uno + Ethernet Shield with Twitter using ThingSpeak.
ThingSpeak is an open source Internet of Things (IoT) application and API to store and retrieve data from things using the HTTP protocol over the Internet or via a Local Area Network. ThingSpeak enables the creation of sensor logging applications, location tracking applications, and a social network of things with status updates.
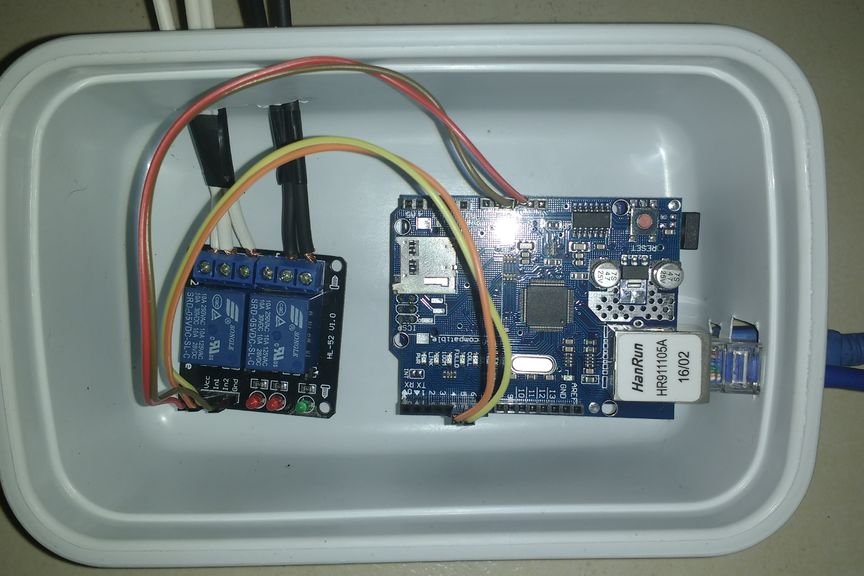
The materials I used were:
– 1x Arduino Uno
– 1x Ethernet Shield (w5100)
– 1x Dual Channel Relay (5v)
– 1x Ethernet Cabble
– Jumpercables
I stored my circuit within an topware, since it is going to be in my bedroom and I don’t want to take any risks. =)
Step 1: Create a Twitter and Thingspeak Account


1. Create or use an existing twitter account. You might want to create a fake one to run some tests, I created a twitter account named @luaduo, the account name might be of any size you like.
2. Create an thingspeak account (https://thingspeak.com), you will also need to create an MathWorks account, since the ThingSpeak is operated by the MathWorks Inc (image 1).
Note: If you also want to send tweets from your Arduino, I suggest you connect your twitter account with thingspeak, click on: Apps > ThingTweet > Link Twitter Account, authorize ThingTweet to use your account (image 2).
Step 2: Create a Channel in ThingSpeak


Channels are used to collect data in ThingSpeak from a device, from another channel, or from the web. You can also analyse the collected data within it.
1. On your thingspeak page click on: Channels > My Channels > New Channel
Note: You will see a lot of inputs to create your first channel, don’t be intimidated (image 1). I will stick with the basics for now.
2. Name your channel, select the number of fields you want it to have and name the fieldsindividually. Just that. If you want anyone to see your channel data, check the public channel checkbox (I won’t talk about that now).
I selected only two fields because I wish to control a dual channel relay (a lamp and my room lights).
Note: depending on what you are planning to do, you might use just one field, you will figure it out later on.
3. Click on Save Channel
Once your channel is created, you will need to save 3 things (image 2):
a) click on Channel Settings, look for your channel ID (it is going to be a number), save it. Mine is 204654.
b) click on API Keys, look for Write API Keys, save it. Mine is FT7W458L96H813V1.
c) click on API Keys, look for Read API Keys, save it. Mine is VYFSX1O5YONMURUG.
Step 3: Create a ThingHTTP in Thingspeak

The ThingHTTP is what is going to register the sent data via twitter into our channel. Later on that data is going to be read by the Arduino and then it will react. To create an HTTP request in thingspeak:
1. Click on: Apps > ThingHTTP > New ThingHTTP
2. chose a name for your request
3. in URL write: http://api.thingspeak.com/update
4. in method select POST
5. remove headers
6. in body write: key=FT7W458L96H813V1&field1=%%message%%
Note: once this HTTP request is made, the request will write the message into field one of my recently created channel. Be sure to to replace my channel Write API Key with yours from Step 2.
7. Click on Save ThingHTTP
Repeat each step to create another ThingHTTP, this time change the body to “field2”, in my case it will be key=FT7W458L96H813V1&field2=%%message%%
NOTE: it is possible to run your ThingHTTP by sending an HTTP request to ThingSpeak, this means you can send an command using an web page or an local server, please refer to this page.
Step 4: Create a TweetControl in ThingSpeak

A TweetControl is used to respond to tweets with a specified trigger word and send an HTTP request using the ThingHTTP app. The action specified in your ThingHTTP code is executed when the trigger word appears in a tweet.
1. Click on: Apps > TweetControl > New TweetControl
2. If you want anyone on twitter to be able to control your Arduino check the Anonymous TweetControl checkbox, if not leave it unchecked.
3. Input the twitter account which shall control your Arduino (if anonymous checkbox is left blank). I am going to use my @luaduo twitter account.
4. Input a trigger for activating the control. I chose #lamp because I am going to control a lamp in my room. It can be whatever you like.
5. Input what action will the TweetControl trigger, in this case we will be triggering the first ThingHTTP created in Step 3.
Repeat the steps above to create another TweetControl, choose the second ThingHTTP created in Step 3.
Step 5: Programming the Arduino

So far, in this instructable, every time the twitter account @luaduo post something with “#thingspeak #lamp”, the TweeterControl will be activated, which will activate the ThingHTTP to write the message in our channel. Now we need the Arduino to read our channel.
You will find the sketch I used attached, it uses an Ethernet Shild (w5100) but you may be able to change the coding to whatever communication your Arduino might have with the internet. Plus, you can download the ThingSpeak library here.
Now you will need the Channel ID and the Channel’s Read API Key we saved in Step 2.
You will notice that the sketch has 2 commands from the library, which are:
a) ThingSpeak.begin(client); //this connects our client with the ThingSpeak
b) ThingSpeak.readStringField(Channel_ID, Field, Channel_Read_API_Key); // this reads a singular field in the identified it’s ID. Also you need to write your channel Read API Key, since the channel is set as a private channel in the line 23 of the sketch. For me it is:
– ThingSpeak.readStringField(204654, 1, VYFSX1O5YONMURUG) for field 1 and;
– ThingSpeak.readStringField(204654, 2, VYFSX1O5YONMURUG) for field 2.
NOTE: you can find others ways to read your channels in this page. Also, if you want to post on twitter or write data in your channel, please refer to this page.
Step 6: Playing Around

Now you just need to login into your twitter account and tweet your commands. In this instructable to activate my TweetControl I must write “#thingspeak #lamp” following the desired message. For example, I can tweet “#thingspeak #lamp #turn_on” an my Arduino will turn my lamp on.
Hope you like and enjoy controlling your things with twitter.
FINAL NOTES
1. Sadly twitter will block repeated tweets, so you can’t have of a control capability. I will try to send HTTP requests from my web page to see if I can control my Arduino remotely.
2. If you tried using the channel or the APIs presented in this instructable it will not work, since I have deleted the channel and the apps created in this ThingSpeak account.
3. ThingSpeak has some others Actions (or functions) that might be interesting, like ThingTweet (to make an tweet), TimeControl (to perform actions at predetermined times), React (to react when a channel meets certain conditions), and TalkBack (to queue up commands for your device).
COMMENTS