
Hi guys.
Today I am going to teach you how to use Arduino and the Internet of Things platform Blynk to control RGB (Ethernet wired connection) on the Internet.
For this, we need the following materials:
- RGB led common cathode
- 4 jumpers male-male
- Breadboard
- Ethernet Shield W5100
- Arduino Uno
- Ethernet cable
- USB to Type B cable
- USB adapter to power Arduino
- Android or iOs phone
- Blynk App
- For Android: http://play.google.com/store/apps/details? id = cc ….
- For iOs: http://itunes.apple.com/us/app/blynk-iot-for-ard…
- Arduino IDE. Download: http://www.arduino.cc/en/main/software
- You can find the Blynk documentation here: http://www.blynk.cc/
Once you have mastered all the materials, you can start the first step.
supply:
Step 1: Physical wiring

The wiring is simple.
Attached you will find the wiring diagram of the RGB Led montage
The RGB led is connected to the 3, 5 and 9 PWM digital pins of the Arduino Ethernet Shield.
Now it’s time to connect the Arduino to our PC via USB Type-B, and connect the Ethernet shield to the internet modem using an Ethernet cable.
Now we are ready to code.
Step 2: Create a dashboard in the Blynk application

To create a project/dashboard in Blynk App, you just need to press the “New Project” button and follow the instructions in the app.
Attached are some screenshots that can help you create an empty dashboard.
When the dashboard is ready, Blynk will automatically send you an email with an authentication token. Save, we will need it soon.
Step 3: Set up the ZeRGBa widget in the application

Next, click the “+” button on the dashboard and select the zeRGBa widget.
When finished, the widget will be displayed in the dashboard, click it to access the widget settings.
Set the digital pins according to the pins previously used in the breadboard.
Looking back now, the widget is ready to use.
It’s time for coding.
Step 4: Programming the Arduino

For this step, you only need to use the Blynk Sketch Code Builder link: http://examples.blynk.cc/
Set up the board, connection type and authentication token (email I said before) and select the Blynk Blink example.
Now click “Copy Example” and paste it into the arduino IDE.
Upload the sketch in Arduino and complete it.
Now go to the Blynk app, click the play button and test.
Tip: The Blynk app will tell you when the device is online or offline. If you see a red signal in the icon next to the play button when you click it, it is because the Ethernet is not connected to the modem.
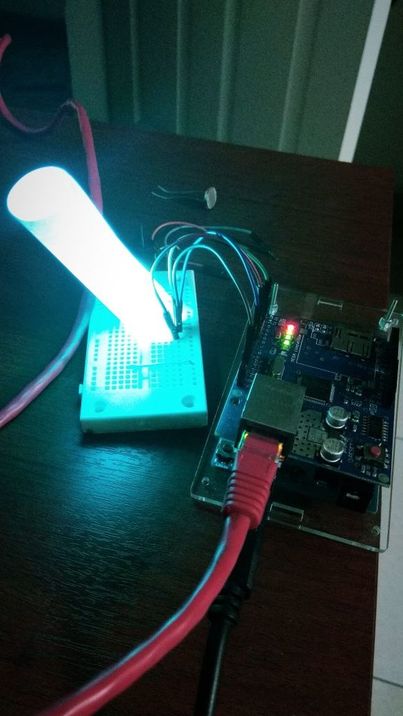
Let me show you some photos of Lamp’s work. I put a cone of paper together for better lighting
Code used in this guide:
/************************************************* ************
Download the latest Blynk library here: http://github.com/blynkkk/blynk-library/releases…
Blynk is a platform that supports iOS and Android applications, and can control Arduino, Raspberry Pi, etc. via the Internet. Just drag and drop widgets, you can easily build a graphical interface for all projects.
Download, documentation, tutorial: http://www.blynk.cc Sketch Generator: http://www.blynk.cc Blynk Community: http://www.blynk.cc Follow us: http://www.blynk . cc http://www.blynk.cc
The Blynk library licenses this sample code in the public domain under the MIT license.
************************************************** ***********
You need:-Blynk App (download from AppStore or Google Play)-Arduino Uno board-Decide how to connect to Blynk (USB, Ethernet, Wi-Fi, Bluetooth…)
Here are some good example sketches to show you how to get started. Think of them as Lego blocks and combine them as needed. For example, take the Ethernet shield sketch and combine it with the Servo example, or select the USB sketch and add the code from the SendData example. ************************************************** ***********
*Comment this to disable printing and save space*/ #define BLYNK_PRINT Serial
#include #include #include
//You should get Auth Token in Blynk App. //Go to project settings (nut icon). char auth = “YourAuthToken”;
#define W5100_CS 10 #define SDCARD_CS 4
void setup(){//Debug console Serial.begin(9600);
pinMode (SDCARD_CS, OUTPUT); digitalWrite (SDCARD_CS, HIGH); //deselect SD card
Blynk.begin(AUTH); //You can also specify server: //Blynk.begin(auth, “blynk-cloud.com”, 8442); //Blynk.begin(auth, IPAddress(192,168,1,100), 8442 );}
void loop(){Blynk.run(); //You can inject your own code or combine it with other sketches. //Check out other examples on how to communicate with Blynk. Remember // to avoid the delay() function! }
Step 5: Finally
Finally, I hope you can have a good time.
It takes a few minutes, but gives you a beautiful light in your room.
If there are some grammatical errors or spelling errors, I apologize, I am Colombian and English is not my native language.
If you have any questions or comments, please leave them and I will answer them as soon as possible.
This is my first coach, so please, kind XD.
Greetings and my guests, see you another Instructable soon. <3
COMMENTS