How to Use the Blynk App on IoT Board(Nucleo)

Implemented a firmware of Nucleo board by Ethernet SW modification
ORIGINAL POST
By bingdo72
components
Hardware Components
Nucleo board
X 1
W5500 Ethernet shield
X 1
Easy Module shield
X 1
LAN cable
X 1
USB cable
X 1
Software Apps and online services
GNU Toolchain
details

FD0XKZPIUOI5TD4.jpg

I know STMicroelectronics Nucleo platform for IoT. Recently W5500 Ethernet shield will be announced by WIZnet.

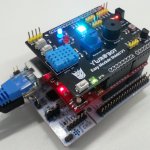
So I implemented a firmware of Nucleo board by Ethernet SW modification because I can handle a source code easily. You can know the status of equipment even if it is so far. Please refer to the following step.

Step 1: Prepare Materials

Prepare Materials
Prepare Materials
Prepare Materials

2 More Images

Please refer to the following.

1. Nucleo board

2. W5500 Ethernet shield

3. Easy Module shield

4. LAN cable

5. USB cable

Step 2: Hardware Connection

Hardware Connection
Hardware Connection
Hardware Connection

Please connect an LAN cable and USB cable

You can get more HW info by the following site.

https://developer.mbed.org/platforms/ST-Nucleo-F411RE/

http://wizwiki.net/wiki/doku.php?id=osh:w5500_ethernet_shield:start

Step 3: Prepare Development Environment

Prepare Development Environment

Step 4: Introduction of W5500 Chip

Introduction of W5500 Chip

Step 5: Introduction of Blynk Platform

Introduction of Blynk Platform

Step 6: Software

Software

I uploaded CoIDE project.

You can download this project file. And then import project into CoIDE. After compile, you can run control operation through Blynk platform.

https://github.com/bingdo/Blynk_STM32F411_CoIDE

Step 7: How to Run : Test Result

How to Run : Test Result

21 More Images

You cannot control D10, D11, D12, D13 pins because those are used for Ethernet SPI.

1. To unzip Blynk_STM32F411_CoIDE project

2. To open Blynk_STM32F411_CoIDE project

3. To downaload the Blynk App into Smartphone.

4. To login Blynk App.

5. To create a new progject on App.

6. To check “Auth Token” by Email.

7. To modify “Auth Token”, Server IP, MAC address, IP address.

8. To build/rebuild and download to a target.

9. To add Widget Box and modify an example project.

10. To check the result of device control.
COMMENTS

Please Login to comment
  Subscribe  
Notify of
POSTED BY
Reusable S/W