I used a NodeMCU board, via Wi-Fi connection to the network, now I will use an Arduino Uno board connected to the local network via W5100 shield.


In order to easily identify the channel, because there are some inactive ones, I change its name, what I am going to do:

and I will already see the channel with the name changed

Because I’m not very familiar with this site, I did what I thought was ok, choosing a longer path, but one that I know works.
I choose to make an indication feast (WIDGET) and as I did not find for the DHT22 sensor (AM2302), I chose a general sensor, after which I will change the parameters to be fine.

and press ADD SENSOR, an indication area appears on the channel


After I realized that it is not the same as what I presented in the previous article on the NodeMCU board, I added a sensor included with the server, to see how information is put, so I chose to put an analog temperature sensor TMP36

I chose to see the sketch

and I completed in my sketch what was not. and I saw what I need to use the information for the DHT22 sensor (AM2302), so I loaded the modified sketch 1a.ino , which is the basic one with my sensor data.
I pressed the button to display the indication window

Then I added another sensor,

on the page also putting the indication of humidity:

I go to the settings window to change their name:


and delete the TMP36 window

and so I have a clean channel

Because to make a thermostat I need a relay, I add something like that


and I also put the button part in the sketch, which becomes 1b.ino

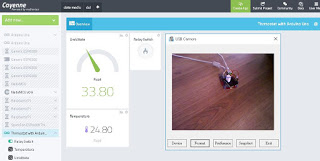
On the screen I now have the indications of temperature and humidity plus the relay control button (led).

The control part of the relay (LED) is configured like this

Now the bridge gives LED on and off commands


I also made a video in which the channel is presented and how the indications can be modified if the program (sketch) Cayenne_Uno_W5100_DHT22_button.ino is loaded .
Demo: https://youtu.be/K-LrdjhaSWI
COMMENTS