For this Instructable, I used the following parts:
1 Arduino Nano (or compatible)
1 WIZ550io module (available directly from WIZnet)
1 breadboard (I used 30 rows, just barely big enough)
5 mm jumper
4 fm jumper wires
Step 2: Establish a connection

Note: Before connecting all the lines, it is best to load the WebServer example onto the Arduino to ensure that there is no existing firmware on it that may cause problems with the WIZ550io.
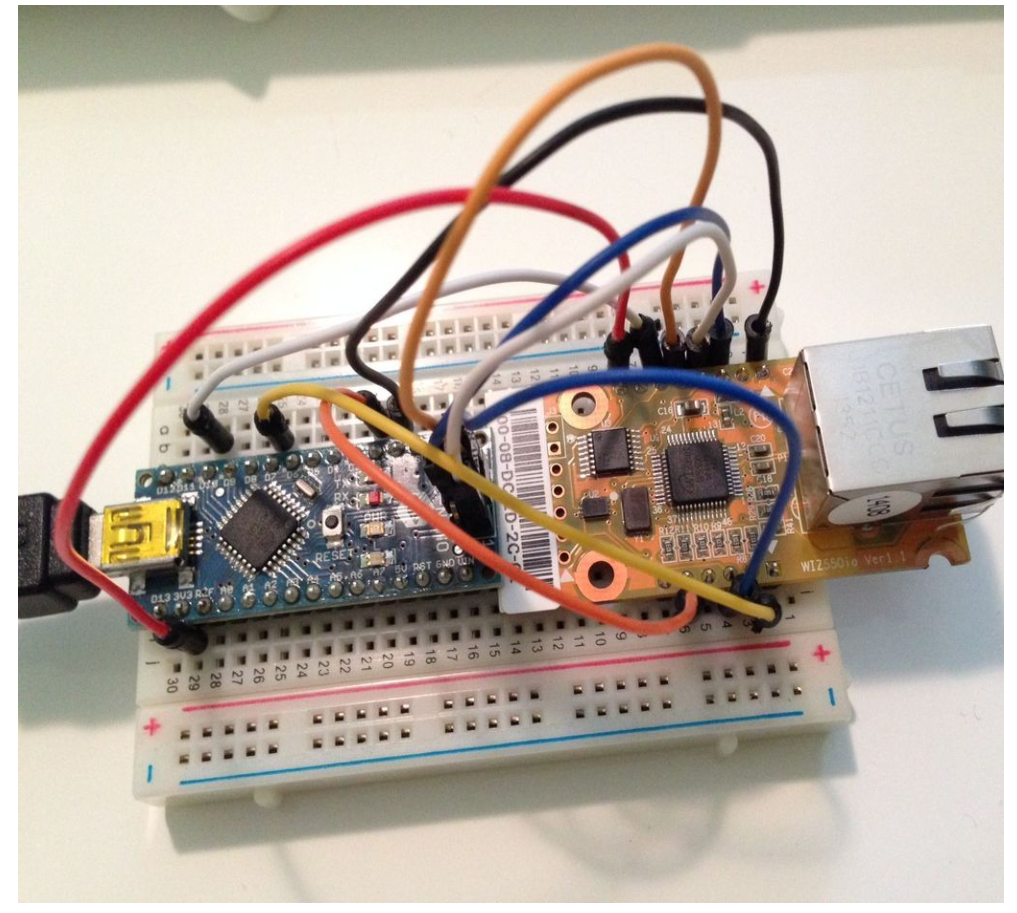
1. Put the Arduino Nano and WIZ550io module on the breadboard. I put them back to back (see picture) so that the USB power cord and Ethernet cable can be easily connected. As you can see in the picture, my breadboard is ideally 1 line long!
2. Connect 9-pin:
Arduino-WIZ550io
(5 MM jumpers)
3v3-J1.8
GND-J1.1
D2-J2.5 (INT)
D7-J2.2 (RDY)
D10-J1.6 (SCS)
(SPI requires 4 FM jumpers)
spi.1-J1.4 (MISO)
spi.3-J1.5 (SCK is also called SCLK)
spi.5-J2.3 (RST)
spi.4-J1.3 (MOSI)
Note: spi.2 (VDD)-do not connect! This is 5v, WIZ board needs 3.3v
Please refer to the SPI picture above to understand the order of the pins on the Arduino Nano. In addition, the number 1 on the circuit board itself should be the number 1. This should be the outermost pin on the VIN pin side.
Step 3: Update the Ethernet library

The WIZnet module uses a newer chip and requires an updated library to work. Don’t worry, your old Ethernet board can still use it.
1. Download the WIZnet Ethernet library: http://github.com/Wiznet/WIZ_Ethernet_Library There is a button labeled “Download ZIP” in the lower right corner, you can download all the content into a neat small file.
2. Copy the Ethernet folder into the Arduino Libraries folder (On Mac it is Documents/Arduino/Libraries) This will overwrite the built-in Ethernet library that is part of the Arduino application. If you need to use other Ethernet shields and modules, please refer to note (a) in the Notes step. Please note that there are 2 versions of the Ethernet folder, depending on the version of the Arduino IDE. I am using Arduino IDE version 1.0.6, so I copied the Ethernet folder from the WIZnet folder labeled 1.0.x.
3. In the Libraries/Ethernet/utility folder, open w5100.h and verify that only 1 correct #define line is uncommented (full score is 3 lines). For my WIZ550io, it looks like this:
// #define W5100_ETHERNET_SHIELD // Arduino Ethernet shield and compatibility… //define W5200_ETHERNET_SHIELD // WIZ820io, W5200 Ethernet shield#define W5500_ETHERNET_SHIELD // WIZ550io, ioShield series WIZnet
4. In the same file, (optional) also uncomment the line that allows the circuit board to use the pre-allocated hardware MAC address:
#define WIZ550io_WITH_MACADDRESS //Use the specified WIZ550io MAC address
The picture shows what my settings look like (I use XCode to edit the file, so the format and colors are great!)
Step 4: Run the web server for testing!
Now that everything is set up, it is a good idea to test it to make sure everything is done correctly. Fortunately, the Ethernet library contains a set of very good examples. We will use a simple WebServer example.
1. Open the Arduino IDE and open the included example from the file/examples/ethernet named WebServer
2. If you are using an Apple network (via Apple’s Airport wireless hub), you need to change the IP address that other computers on the network will notice. I have used this:
IPAddress ip(10,0,1,177); //On the Apple wifi network
Please note that for most networks, this may not be necessary, as long as the first 3 digits match your own IP address.
3. Save and give it a new name
4. Use a network cable to connect WIZ550io to the network
5. Connect the Arduino to the computer and run the WebServer example.
6. Open a browser window and load the URL that matches the IP address you set in the WebServer example. In my case it was http://10.0.1.177
The browser window should only display a list of numbers, corresponding to each analog input. Please note that since we have not connected any analog inputs, these numbers will be somewhat random. You can of course start adding a bunch of sensors to them for more fun 🙂
Step 5: Notes and references
notes:
(A) If you have other Ethernet shields, you need to select the correct line in w5100.h when using that particular shield (and then change it back when you use WIZ550io again). For example, for my other Wiz5100-based Ethernet shields, I uncomment the top line:
#define W5100_ETHERNET_SHIELD // Arduino Ethernet shielding and compatibility… // #define W5200_ETHERNET_SHIELD // WIZ820io, W5200 Ethernet shielding // #define W5500_ETHERNET_SHIELD // WIZ550io, ioShield series WIZnet
COMMENTS