Hands on a W5100S-EVB-Pico board. Let’s discover this microcontroller and its main features
In this tutorial, I’m going to show you what is the W5100S-EVB-Pico microcontroller board and how to use it.
I’ll explain the main features of this IoT board, then show a few usage examples with the basic Ping example and a Mosquitto (MTTQ) example to interface an MTTQ broker like Thingsboard.
W5100S-EVB-Pico features
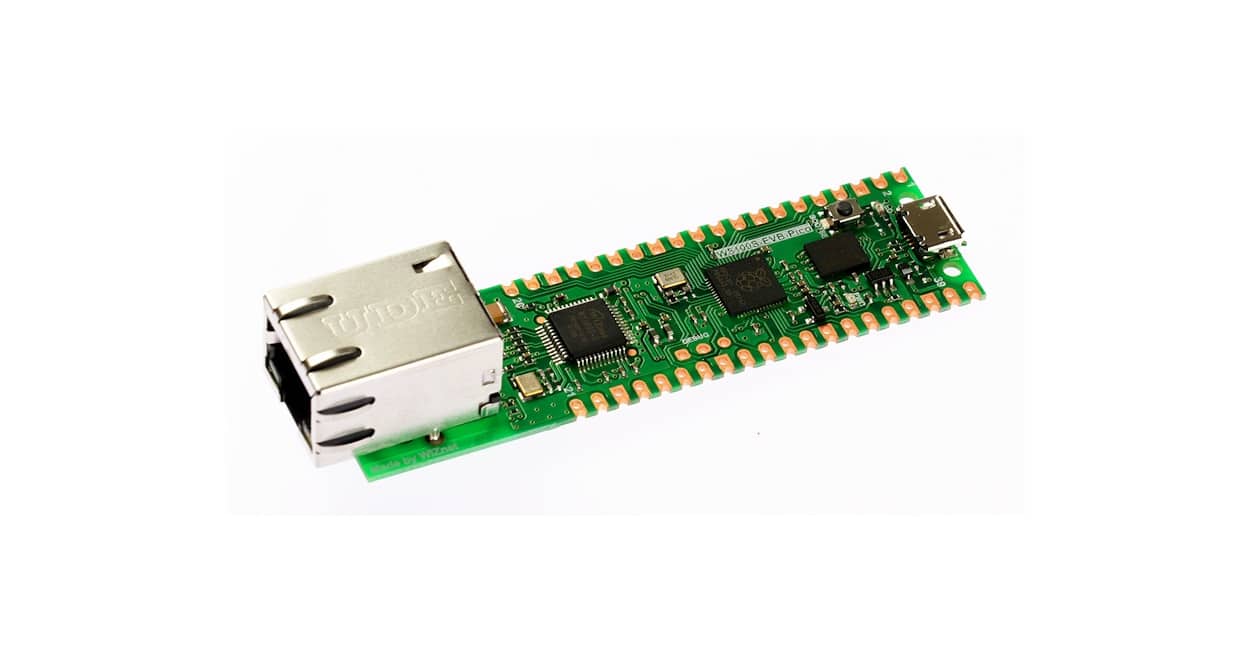
The WIZnet W5100S-EVB-Pico Evaluation Board is a compact Microcontroller Raspberry Pi Pico, from which takes the RP2040 microcontroller and more. It’s designed to fit IoT needs to manage applications in a wide range of DIY fields like building automation, data logging, education, home automation, lighting, remote monitoring, robotics, and so on. It is also a great opportunity for Industry in many sectors like agriculture, consumer goods, energy/utilities, retail, smart city, smart home.
From Raspberry PI Pico, you can consider the same hardware datasheet. On the other side, the WIZnet W5100S adds ethernet capabilities with the following features:
- Supports Hardwired Internet Protocols: TCP, UDP, WOL over UDP, ICMP, IGMPv1/v2, IPv4, ARP, PPPoE
- Supports 4 Independent Hardware SOCKETs simultaneously
- Internal 16 Kbytes Memory for TX/ RX Buffers
- SPI Interface
- 10 / 100 Ethernet PHY embedded
- Supports Auto Negotiation
- Full / Half Duplex
- 10 / 100 Based
- Built-in RJ45(RB1-125BAG1A)
- Built-in LDO (LM8805SF5-33V)
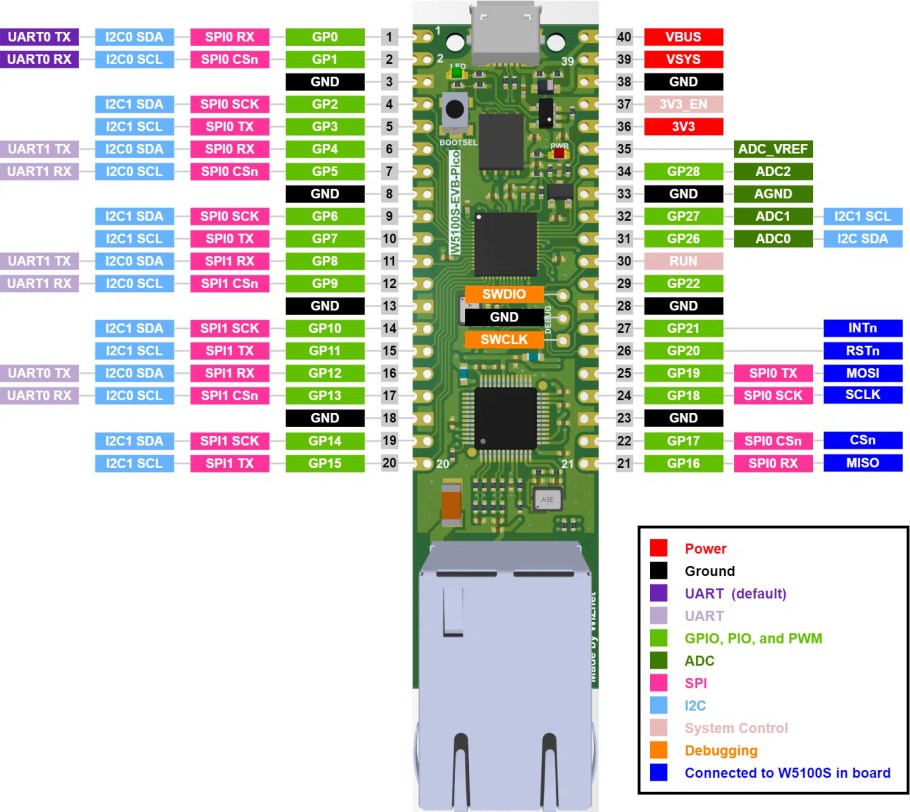
Pinout
You can think of the W5100S-EVB-Pico board like a Raspberry PI Pico with the WIZnet Ethernet HAT attached. The GPIO16, GPIO17, GPIO18, GPIO19, GPIO20, GPIO21 are hardwired to W5100S inside the board. These pins enable SPI communication with W5100S to use the Ethernet function. The other connectors are the same as the Raspberry PI Pico pinout.
It is important to note that if you are using the Ethernet function, these pins cannot be used for any other purpose.
What We Need
As usual, I suggest adding from now to your favorite e-commerce shopping cart all needed hardware, so that at the end you will be able to evaluate overall costs and decide if continue with the project or remove them from the shopping cart. So, hardware will be only:
- A common computer (maybe with Windows, Linux, or Mac). It can also be a Raspberry PI Computer board
- a W5100S-EVB-Pico (you can check it from Mouser or from Digikey)
Step-by-Step Procedure
Before starting, you are free to solder the PIN headers available from package, so that it will be easier to use the board with sensors in labs by using breadboards. A good guide to correctly solder these pins is available from MagPI How to solder GPIO pin headers to Raspberry Pi Pico tutorial.
This step is not strictly required and following steps will work even if without the soldered headers.
On the other side, you need to have a PC (maybe Windows, Linux, or a Raspberry PI computer board like the RPI 4 model B) with Thonny installed.
Install Firmware
At the time of this tutorial, the official Raspberry PI Pico Micropython firmware, that you can install with my First steps with Raspberry PI Pico for Beginners tutorial, works on W5100S-EVB-Pico but only if you don’t need the Ethernet capabilities. This is because the official firmware doesn’t seem to include the usocket libraries.
So, to get the best from this microcontroller you need to use the WIZnet firmware available from their Github page (https://github.com/Wiznet/RP2040-HAT-MicroPython/), or you can download it by following the direct link -> firmware.uf2.
Installing this firmware on W5100S-EVB-Pico is really simple.
Press (and keep pressed) the BOOTSEL button on board:

With this button pressed, please plug-in the USB cable to W5100S-EVB-Pico and to your computer. It will see the board as removable storage (the following screenshot comes from Raspberry PI OS Desktop):

If this doesn’t happen, please try changing USB cable.
You can now release the BOOTSEL button. The new storage will include only a few files:

Paste the downloaded uf2 file (firmware) into this storage. Once copied the W5100S-EVB-Pico board will reboot. Open Thonny and it will automatically detect a new “MicroPython (Raspberry PI Pico)” board. You may have to set the Thonny interpreter from Tools -> Options -> Intepreter tab if not automatically detected and set port to “Try to detect port automatically”.
Import Networking Libraries
To get networking services, we need to add WIZnet libraries. Get the two files from Wiznet libraries page on GitHub. You will need the following 2 files:
- umqttsimple.py
- urequest.py
Open these files in Thonny and save them in your W5100S-EVB-Pico board by selecting “Raspberry PI Pico” when asked.
You can save these 2 files bot in the root folder or you can place them into a new folder named “lib” (as explained in my Adding external modules to MicroPython with Raspberry PI Pico.
You are now ready to execute the following test.
Example 1: Ping Test
The main ping test can be performed by setting up the Ethernet interface with a specific, static IP address compatible with your home network.
Please download the MicroPython code for ping test from WZINnet GitHub w5x00_Ping_Test.py or download it from my download area with the following link:
Save this file by renaming it to “main.py” in your Raspberry PI Pico root folder. This way, it will contain the following files:

Please mind setting your IP address according to your router network. For example, if in your home you have IP addresses like 192.160.1.x, you should find a free IP address for final byte (the “X”) and set it in the ping code at the following row:

Here, the second IP is the subnet mask (usually “255.255.255.0” for classic home routers), the third IP is the default gateway (usually your router IP address) and the last value is the DNS (“8.8.8.8” tells to use Google DNS, when name resolution is required).
You can run this ping test from your Thonny IDE, once the Ethernet cable is plugged in, or you can now disconnect the W5100S-EVB-Pico from your computer and connect it to Ethernet port of your router, from one side, and a micro USB power supply (from the other side). As the ping code has been saved renamed in “main.py”, it will run on W5100S-EVB-Pico once powered on.
From your computer, check that everything works with a remote ping command

Example 2: MTTQ Connection to Thingsboard
In this example, we’ll connect the W5100S-EVB-Pico to a running instance of Thingsboard. This can be installed on a Raspberry PI computer board following my ThingsBoard and Raspberry PI (part 1) tutorial, while the W5100S-EVB-Pico will be configured by paying attention to use “MTTQ Basic” authentication (Client ID, User Name and Password can be whatever you prefer):

For this, you can refer to my ThingsBoard and Raspberry PI (part 2) tutorial.
To get the MTTQ working with Thingsboard, you can download my MTTQ_thingsboard.py code with the following link:
As in the previous pint test, please set IP address parameters.
The mttq_server variable must match your ThingsBoard server IP address:

Authentication is configured differently from WIZnet standard MTTQ example code, as ThingsBoard needs stronger authentication. What defined in ThingsBoard when creating the new device has to be set in following variables:

The topic_pub has to remain what set in the following lines to publish on telemetry. We’ll publish a constant “Temp” telemetry key to ThingsBoard, with a constant value of 25, with the topic_msg set as below:

Of course, you’ll be able to manage telemetry keys and values with MicroPython code to get different telemetry data.
Plug the Ethernet cable and run the code from Thonny or plug a power supply to W5100S-EVB-Pico and check that telemetry data should start arriving at your ThingsBoard device page.
Getting More W5100S-EVB-Pico examples
More MicroPython code examples can be found on Wiznet RP2040-HAT-MicroPython page.
What’s Next
Now you can use my Raspberry PI Pico tutorials to add MicroPython code to W5100S-EVB-Pico for useful and funny projects!
Enjoy!
COMMENTS