components
Hardware Components
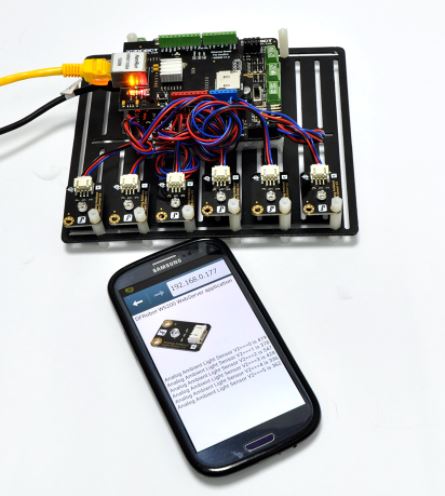
Analog input sensor
X 5
Arduino Uno
X 1
Arduino ethernet shield w5200
X 1
details
- Analog inputs attached to pins A0 through A5
nstalling the library requires patching the current Ethernet library to add support for this chip:
1. Install W5200 library Download W5200 library,and find the Arduino library folder “(Arduino sketchbook folder)libraries”.If there is old version Ethernet library(W5100), please delete it. And unzip the new library to the folder, then restart your Arduino IDE.
2. Using the W5200 library and evaluate existing Ethernet example. In the Arduino IDE, go to Files->Examples->Ethernet and open any example, compile and upload the file to Arduino board.
3. Note: libraries/Ethernet/Ethernet.h needs the following at line 10 instead of #define MAX_SOCK_NUM 4, since it doesn’t #include “w5100.h” anymore.
- Source Code
/*
  Web Server

 A simple web server that shows the value of the analog input pins.
 using an Arduino Wiznet Ethernet shield.

 Circuit:
 * Ethernet shield attached to pins 10, 11, 12, 13
 * Analog inputs attached to pins A0 through A5 (optional)

 created 18 Dec 2009
 by David A. Mellis
 modified 9 Apr 2012
 by Tom Igoe

 */

#include <SPI.h>
#include <Ethernet.h>

//Attention: Official SPI port use "D10" as SS interface.You need to define SS pin acording to the actual SS wire connection

////define the interface: Dreamer MEGA  X1 PORT
//#define SS  53   //Gadgeteer PIN 6
//#define nRST  46  //Gadgeteer PIN 4
//#define nPWDN 45  //Gadgeteer PIN 5
//#define nINT 2  //Gadgeteer PIN 3

//define the interface: Dreamer MEGA X2 PORT
#define SS    10   //Gadgeteer PIN 6
#define nRST  8  //Gadgeteer PIN 4
#define nPWDN 9  //Gadgeteer PIN 5
#define nINT 3  //Gadgeteer PIN 3

// Enter a MAC address and IP address for your controller below.
// The IP address will be dependent on your local network:
byte mac[] = {
  0xDE, 0xAD, 0xBE, 0xEF, 0xFE, 0xED };
IPAddress ip(192,168,0,217);

// Initialize the Ethernet server library
// with the IP address and port you want to use
// (port 80 is default for HTTP):
EthernetServer server(80);

void setup() {
 //Next setting parameter is very important!!!! If you don't have reliable reset setting, W5200 maybe will not work!!!!! //

  pinMode(SS,OUTPUT);  //Define the interfave :Dreamer MEGA X2 PORT Gadgeteer PIN 6 use SS
  pinMode(nRST,OUTPUT);
  pinMode(nPWDN,OUTPUT);
  pinMode(nINT,INPUT);
  digitalWrite(nPWDN,LOW);  //enable power

  digitalWrite(nRST,LOW);  //Reset W5200
  delay(10);
  digitalWrite(nRST,HIGH);
 delay(200);       // wait W5200 work
 /////////////////////////////////////////////////////////////
 // Open serial communications and wait for port to open:
  Serial.begin(9600);
   while (!Serial) {
    ; // wait for serial port to connect. Needed for Leonardo only
  }


  // start the Ethernet connection and the server:
  Ethernet.begin(mac, ip);
  server.begin();
  Serial.print("server is at ");
  Serial.println(Ethernet.localIP());
}


void loop() {
  // listen for incoming clients
  EthernetClient client = server.available();
  if (client) {
    Serial.println("new client");
    // an http request ends with a blank line
    boolean currentLineIsBlank = true;
    while (client.connected()) {
      if (client.available()) {
        char c = client.read();
        Serial.write(c);
        // if you've gotten to the end of the line (received a newline
        // character) and the line is blank, the http request has ended,
        // so you can send a reply
        if (c == 'n' && currentLineIsBlank) {
          // send a standard http response header
          client.println("HTTP/1.1 200 OK");
          client.println("Content-Type: text/html");
          client.println("Connnection: close");
          client.println();
          client.println("<!DOCTYPE HTML>");
          client.println("<html>");
                    // add a meta refresh tag, so the browser pulls again every 5 seconds:
          client.println("<meta http-equiv="refresh" content="5">");
          // output the value of each analog input pin
          for (int analogChannel = 0; analogChannel < 6; analogChannel++) {
            int sensorReading = analogRead(analogChannel);
            client.print("analog input ");
            client.print(analogChannel);
            client.print(" is ");
            client.print(sensorReading);
            client.println("<br />");
          }
          client.println("</html>");
          break;
        }
        if (c == 'n') {
          // you're starting a new line
          currentLineIsBlank = true;
        }
        else if (c != 'r') {
          // you've gotten a character on the current line
          currentLineIsBlank = false;
        }
      }
    }
    // give the web browser time to receive the data
    delay(1);
    // close the connection:
    client.stop();
    Serial.println("client disonnected");
  }
}
COMMENTS