
![]()
Build your own IOT service! Collect sensor data and send it to a WebServer.
In this article, we are going to create a webserver using the Arduino and the Ethernet shield. The Arduino Ethernet makes everything so easy that it looks like magic. The Arduino Ethernet Shield allows you to easily connect Arduino to the internet. This shield enables Arduino to send and receive data from anywhere in the world with an internet connection. This shield opens up endless amounts of possibility by allowing you to connect your project to the internet in no-time flat.
Components Required
- Arduino
- Ethernet shield
- DHT22
- Connecting wires
- Breadboard
Hardware
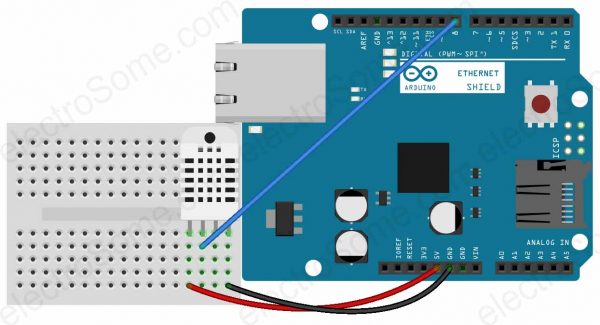
Circuit Diagram
Firstly place the Ethernet shield on the Arduino and enter the Ethernet cable in the Ethernet shield. Then make the connections for the DHT22 with the Arduino as follows
- First pin of DHT22 with the 5V of Arduino.
- Second pin of DHT22 to the pin 8 of Arduino.
- Last pin of the DHT22 to the GND of Arduino.
Ethernet shield
The Ethernet shield connects the Arduino to the Internet. The Ethernet Shield is based upon the W51000 chip, which has an internal 16K buffer. It has a connection speed of up to 10/100Mb. The setup is very simple: just plug the header pins of the shield into your Arduino, then connect an Ethernet cable to the shield.
DHT22
The DHT22 is a basic, low-cost digital temperature and humidity sensor. It uses a capacitive humidity sensor and a thermistor to measure the surrounding air, and spits out a digital signal on the data pin. The sensor use a proper protocol, using one wire transmission, modulating the value in time, first it will get the temperature, then the humidity value. The others used pins are Vdd and Gnd.
Specifications
- power supply: 3.3V – 6V DC
- output signal: single-bus
- sensing element: polymer humidity capacitor & DS18B20
- measuring range: humidity 0-100% RH / temperature -40°C – 125°C
- accuracy: humidity ±2% / temperature ±0.2°C
- sensing period: ~2s
Software
Arduino Uno Program
#include "DHT.h"
#include <SPI.h>
#include <Ethernet.h>
#define DHTPIN 8
#define DHTTYPE DHT22

DHT sensor(DHTPIN, DHTTYPE);
byte mac[] = {
               0xDE, 0xAD, 0xBE, 0xEF, 0xFE, 0xED
             };

IPAddress ip(192, 168, 1, 177);
EthernetServer server(80);

void setup()
{
  Serial.begin (9600);
  sensor.begin( );
  Ethernet.begin(mac, ip);
  server.begin( );
  Serial.print("Your IP Adress is ");
  Serial.println(Ethernet.localIP( ) );
}

void loop( )
{
  float humidity = sensor.readHumidity( );
  float temperature_C = sensor.readTemperature( );
  float temperature_F = sensor.readTemperature (true);
  if (isnan(humidity) || isnan(temperature_C) || isnan(temperature_F))
  {
    Serial.println("Failed to read from DHT sensor!");
    return;
  }
  float heat_indexF = sensor.computeHeatIndex(temperature_F, humidity);
  float heat_indexC = sensor.convertFtoC(heat_indexF);

  EthernetClient webpage = server.available();
  if (webpage)
    {
      Serial.println("new webpage");
      boolean currentLineIsBlank = true;
      while (webpage.connected ( ) )
        {
          if (webpage.available ( ) )
            {
              char character = webpage.read ( );
              Serial.write(character);
              if (character == 'n' && currentLineIsBlank)
                {
                  webpage.println ("HTTP/1.1 200 OK");
                  webpage.println ("Content-Type: text/html");
                  webpage.println ("Connection: close");
                  webpage.println ("Refresh: 5");
                  webpage.println ( );
                  webpage.println ("<!DOCTYPE HTML>");
                  webpage.println ("<html>");
                  webpage.print ("<Title>Arduino Ethernet Webserver </Title>");
                  webpage.print ("<h1>Arduino Ethernet Shield Webserver </h1>");
                  webpage.print ("<h3><a href='http://electrosome.com'>Visit us for Amazing
                                  Projects</a> </h3>");
                  webpage.print ("<h4>Temperature in C: ");
                  webpage.print (temperature_C);
                  webpage.print ("</h4><h4>Temperature in Fah: ");
                  webpage.print (temperature_F);
                  webpage.print ("</h4><h4>Humidity: ");
                  webpage.print (humidity);
                  webpage.print ("</h4><h4>Heat Index in F: ");
                  webpage.println (heat_indexF);
                  webpage.println ("</h4><h4>Heat Index in C: ");
                  webpage.println (heat_indexC);
                  webpage.println ("<br />");
                  webpage.println ("</html>");
                  break;
                }

                if ( character == 'n')
                  {
                    currentLineIsBlank = true;
                  }
                else if (character != 'r')
                  {
                    currentLineIsBlank = false;
            }
        }
    }
    delay(1);
    webpage.stop();
    Serial.println("webpage disconnected");
  }
}
Code Explanation
First of all, we included the libraries for the DHT22 temperature and humidity sensor and for the Arduino Ethernet shield. Then we defined the pin where we have to connect the data pin of DHT22 sensor and then we defined the type of DHT22 sensor. There are different types of DHT sensors available so we have to define the type that we are going to use.
#include "DHT.h"
#include <SPI.h>
#include <Ethernet.h>
#define DHTPIN 8
#define DHTTYPE DHT22
DHT sensor(DHTPIN, DHTTYPE);
Then we defined the mac address of Ethernet shield, this is the default mac address of Ethernet shield and leave it as it is. After that we give the IP and port where it will send the data.
byte mac[] = {
               0xDE, 0xAD, 0xBE, 0xEF, 0xFE, 0xED
             };
IPAddress ip(192, 168, 1, 177);
EthernetServer server(80);
Then in the loop function, we read the humidity and the temperature from the DHT22 sensor and checked that if the sensor is reading or not. If the sensor won’t be reading, then an error will be printed on the serial monitor. Then using the humidity and temperature values we calculated the heat index.
float humidity = sensor.readHumidity ( );
float temperature_C = sensor.readTemperature ( );
float temperature_F = sensor.readTemperature (true);
if ( isnan( humidity ) || isnan( temperature_C ) || isnan( temperature_F ) )
  {
    Serial.println( "Failed to read from DHT sensor!" );
    return;
  }
float heat_indexF = sensor.computeHeatIndex (temperature_F, humidity);
float heat_indexC = sensor.convertFtoC (heat_indexF);
Then we set the server using the internet router on the IP and port that we give in the start. If the connection between the Ethernet shield and the router will be successful, then a webpage will be created and we can send the data of the sensors on the webpage.
EthernetClient webpage = server.available ( );
if (webpage)
{
Serial.println( "new webpage" );
boolean currentLineIsBlank = true;
while (webpage.connected ( ) )
  {
    if ( webpage.available ( ) )
      {
        char character = webpage.read ( );
        Serial.write (character);
        if ( character == 'n' && currentLineIsBlank )
          {
            webpage.println (" HTTP/1.1 200 OK ");
            webpage.println("Content-Type: text/html");
            webpage.println("Connection: close");
Then we used the HTML commands to write the data on the webpage. First we write the title and then we write the sensors data using different headings.
          webpage.println (" <!DOCTYPE HTML> ");
          webpage.println  (" <html> ");
          webpage.print (" <Title>Arduino Ethernet Webserver </Title> ");
          webpage.print (" <h1>Arduino Ethernet Shield Webserver </h1> ");
          webpage.print (" <h3><a href='http://electrosome.com'>Visit us for Amazing Projects</a>
                           </h3>");
          webpage.print ("  <h4>Temperature in C:  ");
          webpage.print (temperature_C);
          webpage.print ( " </h4><h4>Temperature in Fah:  ");
Ethernet configuration
To control the Ethernet shield, we have to use Ethernet.h library.
The shield must be assigned a MAC and IP address using the Ethernet.begin() function. For a particular device, a MAC address is a globally unique identifier. Validity of IP addresses depends on the configuration of one’s network. If DHCP is used, it may dynamically assign an IP to the shield.
IP ADDRESS
IP address (Internet Protocol address) is a numerical label assigned to each device participating in a computer network that uses the Internet Protocol for communication.
MAC ADDRESS
MAC address (media access control address) is a unique identifier assigned to each device participating in a physical network. Each piece of networking equipment has a unique serial number to identify itself over a network and this is normal hard-programmed into the equipment’s firmware. However, with Arduino, we can define the MAC address ourself.
Practical Implementation of Circuit
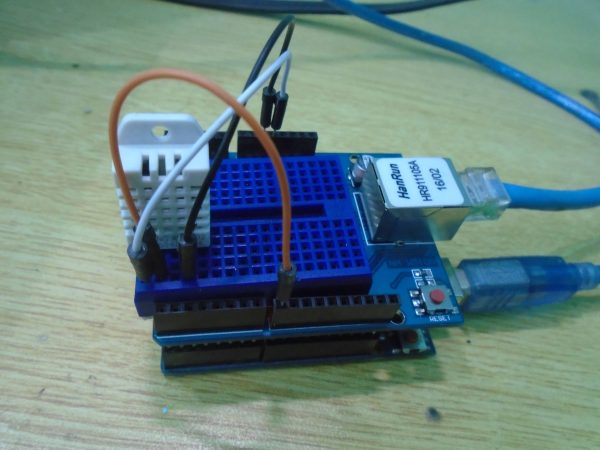
Working
This module is designed to monitor the temperature and humidity of the environment where it is located by using DHT22 sensor and updates that to WebServer by using Ethernet Shield.
The DHT22 sensor monitors and measures the temperature and humidity. Heat Index can be calculated by using the measured temperature and humidity values.
We have to use the Ethernet shield to create a WebServer. The Ethernet shield communicates with the internet router to create a WebServer at an IP address and a port. Then the sensor sensed data will be send to WebServer and displayed it on WebServer using the HTML commands. This WebServer will be automatically refreshed after every 5 seconds. WebServer data can easily be accessible from anywhere on the internet.
COMMENTS