senseBox:edu + LCD
We have developed a senseBox that only uses the sensors contained in the senseBox:edu, but also has an LCD for reading the measurement data immediately.
target
Our senseBox can measure the “basic data” of weather observation: temperature, humidity and air pressure. In addition, UV radiation and brightness are recorded.
The special thing about this senseBox is that the measurement data can be read directly from the display – without the “detour” via the OpenSenseMap.
This allows you to observe the weather conditions at your own place of residence, which is very attractive for the interested layperson. Through the OpenSenseMap, our senseBox can help collect more open data. The measurement of UV radiation is particularly interesting due to the few official measuring points. “The Loss of Night” is addressed with the brightness sensor.
materials
From the senseBox:edu
- Genuine ONE
- Temperature and humidity sensor
- Barometer (with additional temperature sensor)
- UV-Sensor
- brightness sensor
- Ethernet-Shield
- Various cables, resistors etc.
Additional hardware
- LCD von Displaytech, Modell 162A
- Breadboards
- Power over Ethernet cables and adapters
- Potentiometer
- senseBox case from Farnell (17x8cm)
- Sensor housing from ebelin/dm (10x4cm)
Setup Description
Hardwarekonfiguration
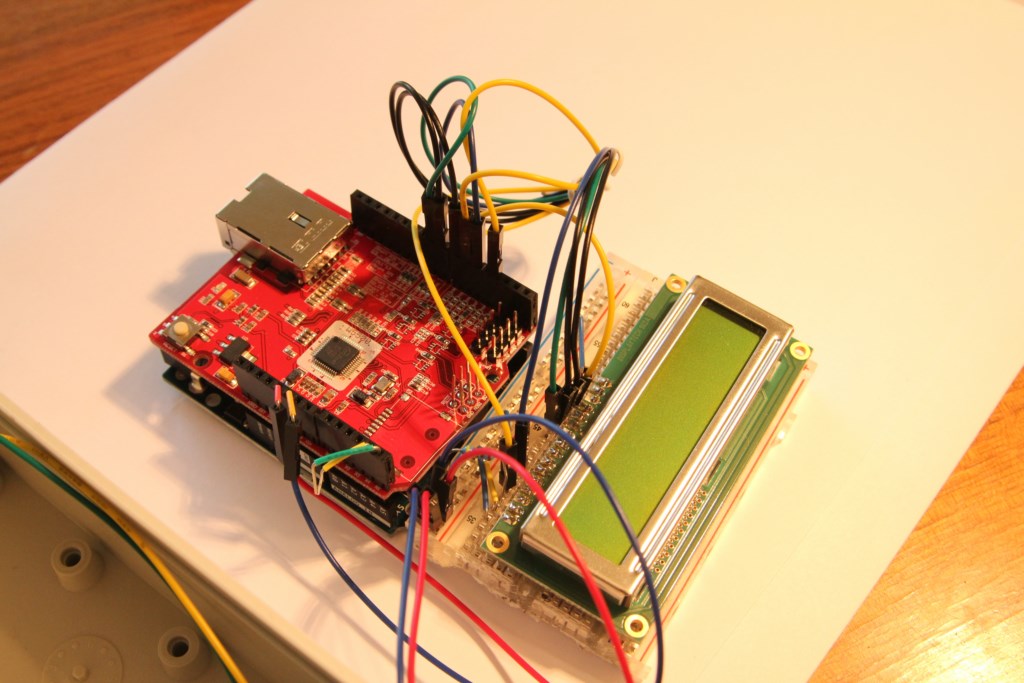
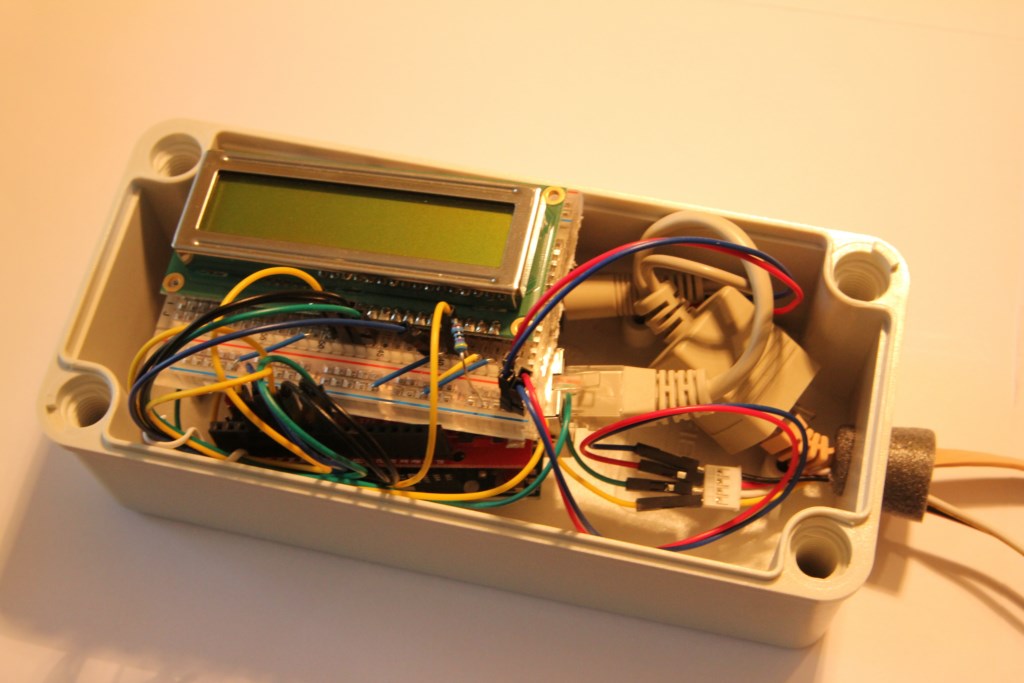
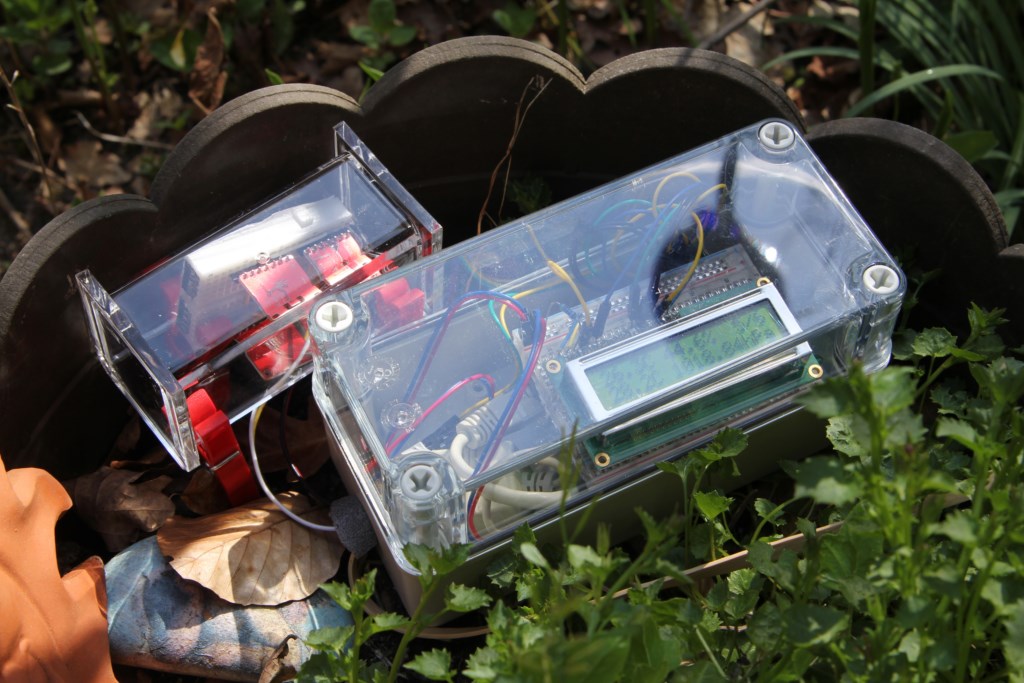
The sensors are on their own custom breadboard. This is housed in its own “sensor house” and connected to the main housing with a four-wire cable. This is where the Genuino Uno and the display are located. Power and internet are supplied via a Power-over-Ethernet ribbon cable, which can also be routed through a closed window.


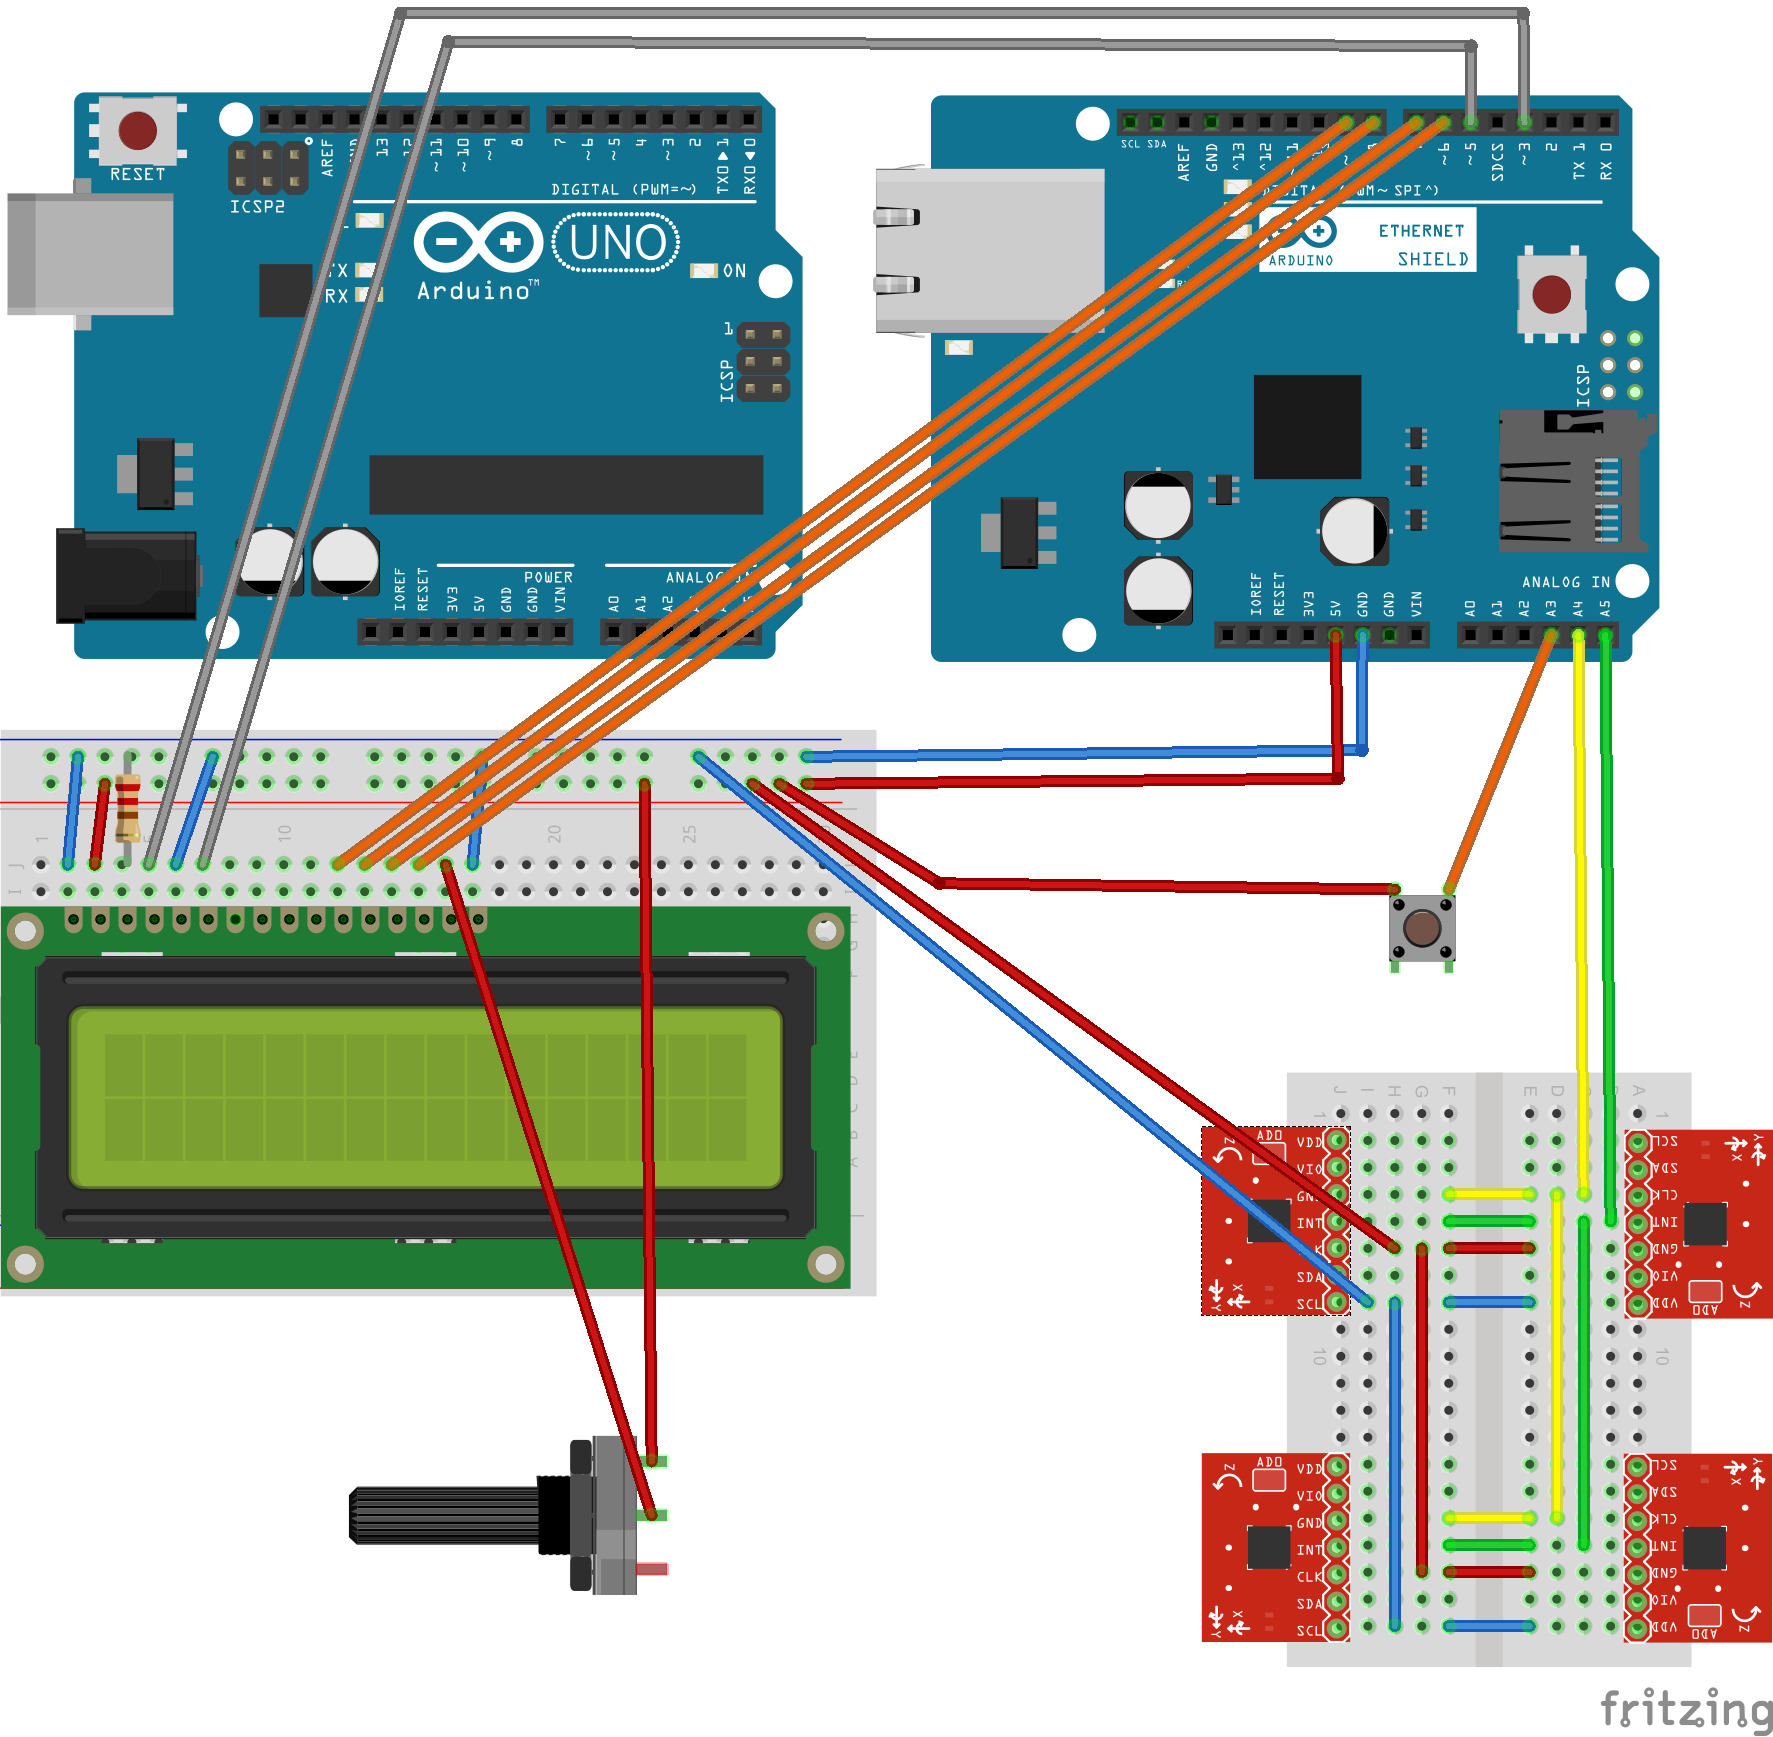
Wiring the display to the Genuino proved difficult. At least six digital ports are required to control the display. However, the unavoidable Ethernet shield already uses many of the ports available on the Genuino internally, so that only certain ones remain free for further use. This has to be considered when wiring.

Cabling:

Softwaresketch
The sensors are controlled via the libraries linked on the Watterot manufacturer website, or in the case of the UV sensor via a self-programmed method using the wire library.
Links to the additional libraries:
Since the display uses a chipset compatible with the Hitachi HD44780, the LiquidCrystal library supplied with the Arduino IDE can be used for control. It is important to specify the correct wiring in the constructor.
Since the display used only has two lines with 16 columns each, not all measurement data can be output at once. This was solved by a switch, which, when activated, shows the otherwise invisible data. Due to the problems described above with the few available digital ports, this was connected to the Genuino via an analog port .
Code:
Initialization of the sensor objects
// Temp & Humidity sensor
#include <HDC100X.h>
HDC100X temphumisensor = HDC100X(0x43);

// Light sensor
#include <Makerblog_TSL45315.h>
Makerblog_TSL45315 luxsensor = Makerblog_TSL45315(TSL45315_TIME_M4);

// Barometer sensor
// Using Adafruit library because mahfuz195's Arduino library doesn't work for some reason
#include <Adafruit_Sensor.h>
#include <Adafruit_BMP280.h>
#include <Wire.h>
#include <SPI.h>
#define BMP_SCK 13
#define BMP_MISO 12
#define BMP_MOSI 11
#define BMP_CS 10
Adafruit_BMP280 bme;

// UV sensor
#define I2C_ADDR 0x38
#define IT_1_2 0x0 //1/2T
#define IT_1   0x1 //1T
#define IT_2   0x2 //2T
#define IT_4   0x3 //4T
LCD and network:
// LCD
#include <LiquidCrystal.h>
// Using display in 4-bit mode
// The constructor takes the ports the LCD is wired to, in the following order: RS, Enable, Data Ports 4 to 7
LiquidCrystal lcd(3, 5, 9, 8, 7, 6);

// Custom characters for display
byte smiley[8] = {
  B00000,
  B10001,
  B00000,
  B00000,
  B10001,
  B01110,
  B00000,
};
byte degree[8] = {
  B00111,
  B00101,
  B00111,
  B00000,
  B00000,
  B00000,
  B00000,
};

// remember if in offline mode
boolean online = true;

// The following comes directly from the SenseBox script

// Ethernet
#include <SPI.h>
#include <Ethernet.h>

//SenseBox ID
#define SENSEBOX_ID "xxxxxxxxxxxxxxxxxxxxxxxx"

//Sensor IDs
#define TEMPSENSOR_ID "xxxxxxxxxxxxxxxxxxxxxxxx"
#define HUMISENSOR_ID "xxxxxxxxxxxxxxxxxxxxxxxx"
#define PRESSURESENSOR_ID "xxxxxxxxxxxxxxxxxxxxxxxx"
#define TEMPSENSOR2_ID "xxxxxxxxxxxxxxxxxxxxxxxx"
#define UVSENSOR_ID "xxxxxxxxxxxxxxxxxxxxxxxx"
#define LIGHTSENSOR_ID "xxxxxxxxxxxxxxxxxxxxxxxx"

//Ethernet-Parameter
char server[] = "www.opensensemap.org";
byte mac[] = { 0xDE, 0xAD, 0xBE, 0xEF, 0xFE, 0xED };
// Diese IP Adresse nutzen falls DHCP nicht möglich
IPAddress myIP(192, 168, 0, 42);
EthernetClient client;

//Messparameter
int postInterval = 10000; //Uploadintervall in Millisekunden
long oldTime = 0;
Own methods:
// Own method for reading data from UV sensor using Wire library
float readUV()
{
  byte msb=0, lsb=0;
  float uv;

  Wire.requestFrom(I2C_ADDR+1, 1); //MSB
  delay(1);
  if(Wire.available()) msb = Wire.read();

  Wire.requestFrom(I2C_ADDR+0, 1); //LSB
  delay(1);
  if(Wire.available()) lsb = Wire.read();

  uv = (msb<<8) | lsb;
  uv = uv * 5.625;
  return uv;
}

// Helper method to output a quick info message on the LCD during setup
void shortLCDmessage(String message)
{
  lcd.setCursor(0,1);
  lcd.print("                ");
  lcd.setCursor(0,1);
  lcd.print(message);
  delay(1000);
}
Setup:
void setup() {
  Serial.begin(9600);

  // LCD setup
  lcd.createChar(0, smiley);
  lcd.createChar(1, degree);
  lcd.begin(16, 2);

  // WELCOME MESSAGE
  lcd.print("Welcome to your");
  lcd.setCursor(0,1);
  lcd.print("sensebox:edu+LCD");
  delay(2000);

  lcd.clear();
  delay(1000);

  // SENSOR INITIALIZATION
  lcd.clear();
  lcd.print("Starting sensors");

  // Temp & Humidity Sensor setup
  shortLCDmessage("Temp sensor");
  temphumisensor.begin(HDC100X_TEMP_HUMI,HDC100X_14BIT,HDC100X_14BIT,DISABLE);

  // Light sensor setup
  shortLCDmessage("Light sensor");
  luxsensor.begin();

  // Barometer setup
  shortLCDmessage("Barometer");
  if (!bme.begin()) {
    Serial.println(F("Could not find a valid BMP280 sensor, check wiring!"));
    while (1);
  }

  // UV sensor setup
  shortLCDmessage("UV sensor");
  Wire.begin();
  Wire.beginTransmission(I2C_ADDR);
  Wire.write((IT_1<<2) | 0x02);
  Wire.endTransmission();

  // Setup button
  pinMode(A3, INPUT);

  lcd.clear();
  delay(1000);

  // ETHERNET INITIALIZATION
  lcd.print("Starting network");
  shortLCDmessage("Trying DHCP");

  // Ethernet
  Serial.print("Starting network...");
  //Ethernet Verbindung mit DHCP ausführen..
  if (Ethernet.begin(mac) == 0)
  {
    Serial.println("DHCP failed!");
    shortLCDmessage("DHCP failed");
    shortLCDmessage("Trying static IP");
    //Falls DHCP fehlschlägt, mit manueller IP versuchen
    Ethernet.begin(mac, myIP);
  }

  client.connect(server, 8000);
  if(!client.connected())
  {
    online = false;
    shortLCDmessage("Static IP failed");
    lcd.clear();
    delay(1000);
    lcd.print("Switching to");
    shortLCDmessage("LCD output only");
  }
  else
  {
    client.stop();
    online = true;
    shortLCDmessage("Connected");
  }

  Serial.println("done!");
  Serial.println("Starting loop.");

  lcd.clear();
  delay(1000);
  lcd.print("Ready! Waiting");
  lcd.setCursor(0,1);
  lcd.print("for 1st data set");
  delay(1000);
}
Loop:
void loop() {
  if (millis() - oldTime >= postInterval)
  {
    oldTime = millis();

    // Read measurements from sensors and convert to String
    String temp = String(temphumisensor.getTemp(), 1);
    String humi = String(temphumisensor.getHumi(), 1);
    String lux = String(luxsensor.readLux());
    String temp2 = String(bme.readTemperature(), 1);
    String pres = String(bme.readPressure()/100);
    String alti = String(bme.readAltitude(1013.25));
    String uv = String(readUV(), 1);

    // Output measurements to LCD
    lcd.clear();
    lcd.print(temp + "C " + humi + "%");
    lcd.setCursor(0, 1);
    // Output light sensor or barometer data depending on whether button is pressed or not
    if(analogRead(A3) < 1000) lcd.print(temp2 + "C " + pres + "hPa"); else lcd.print(lux + "lux " + uv + "uW/cm2");

    // Output measurements to Serial Monitor
    String daten = temp + "," + humi + "," + lux + ',' + temp2 + ',' + pres + ',' + alti + ',' + uv;
    Serial.println(daten);

    // Post measurements to OpenSenseMap if network available
    if(online)
    {
      // Inform user on LCD about upload progress
      lcd.setCursor(13,0); lcd.print("1/6"); postStringValue(temp, 1, TEMPSENSOR_ID);
      lcd.setCursor(13,0); lcd.print("2/6"); postStringValue(humi, 1, HUMISENSOR_ID);
      lcd.setCursor(13,0); lcd.print("3/6"); postStringValue(pres, 1, PRESSURESENSOR_ID);
      lcd.setCursor(13,0); lcd.print("4/6"); postStringValue(temp2, 1, TEMPSENSOR2_ID);
      lcd.setCursor(13,0); lcd.print("5/6"); postStringValue(uv, 1, UVSENSOR_ID);
      lcd.setCursor(13,0); lcd.print("6/6"); postStringValue(lux, 1, LIGHTSENSOR_ID);
      lcd.setCursor(13,0); lcd.print("  ");  lcd.write(byte(0)); // smiley when done :)
    }
  }
}
Methods for uploading the measurement data:
// Re-write of sensebox script's postFloatValue method (conversion to String is already done in loop so no need to do that here)
void postStringValue(String measurement, int digits, String sensorId)
{
  //Json erstellen
  String jsonValue = "{\"value\":";
  jsonValue += measurement;
  jsonValue += "}";
  //Mit OSeM Server verbinden und POST Operation durchführen
  Serial.println("-------------------------------------");
  Serial.print("Connectingto OSeM Server...");
  if (client.connect(server, 8000))
  {
    Serial.println("connected!");
    Serial.println("-------------------------------------");
    //HTTP Header aufbauen
    client.print("POST /boxes/");client.print(SENSEBOX_ID);client.print("/");client.print(sensorId);client.println(" HTTP/1.1");
    client.println("Host: www.opensensemap.org");
    client.println("Content-Type: application/json");
    client.println("Connection: close");
    client.print("Content-Length: ");client.println(jsonValue.length());
    client.println();
    //Daten senden
    client.println(jsonValue);
  }else
  {
    Serial.println("failed!");
    Serial.println("-------------------------------------");
  }
  //Antwort von Server im seriellen Monitor anzeigen
  waitForServerResponse();
}

void waitForServerResponse()
{
  //Ankommende Bytes ausgeben
  boolean repeat = true;
  do{
    if (client.available())
    {
      char c = client.read();
      Serial.print(c);
    }
    //Verbindung beenden
    if (!client.connected())
    {
      Serial.println();
      Serial.println("--------------");
      Serial.println("Disconnecting.");
      Serial.println("--------------");
      client.stop();
      repeat = false;
    }
  }while (repeat);
}
OpenSenseMap registration
To register our senseBox, we have created an account on OpenSenseMap.org. After you have entered your name, e-mail address, name and location, you have to enter the sensors of the senseBox using “manual configuration”. The name of the sensor is listed under “Type”.
After submitting the form, you will receive an email with an Arduino sketch that you can use to upload the data. We have entered its methods into our existing sensor readout sketch.
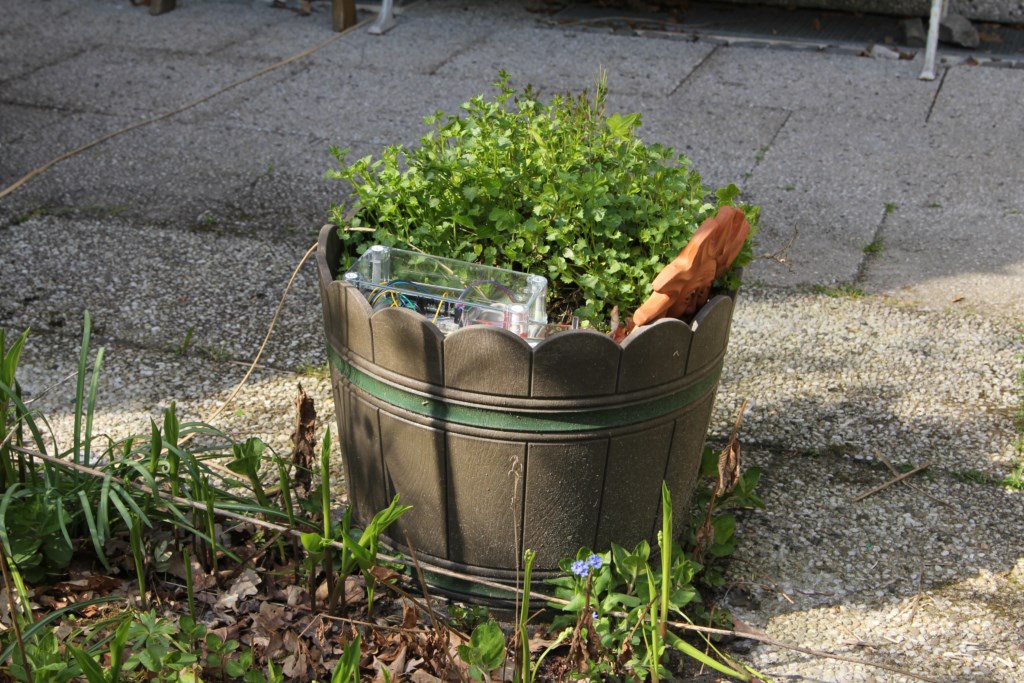
station setup
The station was set up on the terrace of a house in Münster-Kinderhaus. The location faces south, is quite sunny, but very sheltered from the wind.
Munster, April 2016
COMMENTS