On startup the software connects to the Ethernet network using the pre-supplied connection details above.
Once connected to a LAN the IoT device will publish its details to the following MQTT topics;
- /EthernetDevice/SwVerConfirm : This contains a concatenated string, comma separated, formed by the generic device name, unique MAC address of device and the name of the Arduino file used to program the device. in this case ‘WIZNet5100,de:ad:be:ef:fe:ed,MQTTEthernetAll6_5.ino’.
- /EthernetDevice/Temp1Status : On initial connection to the network this topic publishes a ‘Connected’ message to the broker. Subsequently it is used to publish the local temperature in Degree Celsius accurate to 2 decimal places. Updates are only issued if there is a change in temperature to prevent this IoT from ‘clogging’ up the network.
- /EthernetDevice/Humd1Status : Similar to Temp1Status, but is a representation of the local humidity levels scaled as a percentage.
- /EthernetDevice/HeatInd1Status : Similar to both Temp1Status and Humd1Status, though in this instant the software computes the new heat index from the temperature and humidity readings.
- /EthernetDevice/Barometric1Status : Similar to Temp1Status, Humd1Status and HeatInd1Status, but is a representation of the local barometric pressure level measured in hPa or mBar.
It then subscribes to the following MQTT topics;
- /EthernetDevice/SwVerCommand : When notification is received on this topic the device will respond with a /EthernetDevice/SwVerConfirm publication. This is a broadcast response. ie. all devices could respond.
- /EthernetDevice/de:ad:be:ef:fe:ed/SwVerCommand : When notification is received of this topic the device will respond with a /EthernetDevice/SwVerConfirm publication. This is a targeted response. ie. only this device will respond.
- /EthernetDevice/Led1Command : When notification is received of this topic the device led output is set accordingly. Payload ‘1’ = Led on, Payload ‘0’ = Led off. Once a command has been actioned the device will respond by publishing the Led status via the /EthernetDevice/Led1Confirm topic ‘On’ or ‘Off’
- /EthernetDevice/Button1Status : When notification of publication is received on this topic the device will respond by publishing the current button status via a /EthernetDeviceButton1Command topic ‘Pressed’ or ‘Released’. In this way the status of the button can be checked at any given time. Note also if the button state changes independently, via a button press then the device will automatically publish a /EthernetDevice/Button1Command topic.
- /EthernetDevice/SetTime : When notification of a publication is received on this topic the device will update the system clock (DS1307Z+) with this time value. Payload must be of the form ‘HH:MM’ (24HR clock).
- /EthernetDevice/SetDate : When notification of a publication is received on this topic the device will update the system clock (DS1307Z+) with this date value. Payload must be of the form ‘DD/MM/YY’, UK format but can be easily changed.
- /EthernetDevice/SetLoggingCommand : When notification of a publication is received on this topic the device will update the logging state machine. A Payload of 0 = Close current logfile, 1 = Open/Start new logfile. A new logfile name is formed by concatenating DD/MM with HH:MM to form ‘DDMMHHMM.csv’. In this way a unique filename is formed on each opening. As the Arduino SD card library has the old DOS 8.3 filename convention limitation, this means that a period of at least one minute before new file openings must elapse. Otherwise it is possible to overwrite an earlier opened file (within the same minute). Not a major issue but one worth pointing out.
- /EthernetDevice/SetLoggingPeriodCommand : When notification of a publication is received on this topic the device will update the system variable iLoggingPeriodInMinutes, which is used to govern the period at which current Local Temp/Humidity/BarometricPressure, Remote Temp/Humidity is logged to SD card. Payload must be of the form ‘HH:MM’ (24HR clock).
- /EthernetDevice/GetLoggingStatus : When notification of a publication is received on this topic the device will respond by publishing the current status of logging control variable currentLoggingStatus via /EthernetDevice/GetLoggingStatusConfirm topic. A value of ‘0’ = Logging Inactive (eLoggingInactive) and ‘1’ = Logging Activated (eLoggingActive). As this enumerated type has specifically weighted values of 0 and 1 for eLoggingInactive and eLoggingActive respectively, by simply adding the numeric offset of Ascii ‘0’ the returned value will be a ‘0’ or ‘1’.
- /EthernetDevice/GetLoggingPeriodStatus : When notification of a publication is received on this topic the device will respond by publishing the current logging period in ‘HH:MM’ (24HR clock) format via a /EthernetDevice/GetLogginPeriodConfirm topic.
- /WiFiDevice/Temp1Status : Similar to /EthernetDevice/Temp1Status but contains the remote IoT WiFi device Temperature
- /WiFiDevice/Humd1Status : As above in /EthernetDevice/Humd1Status but for Humidity levels at remote IoT WiFi device.
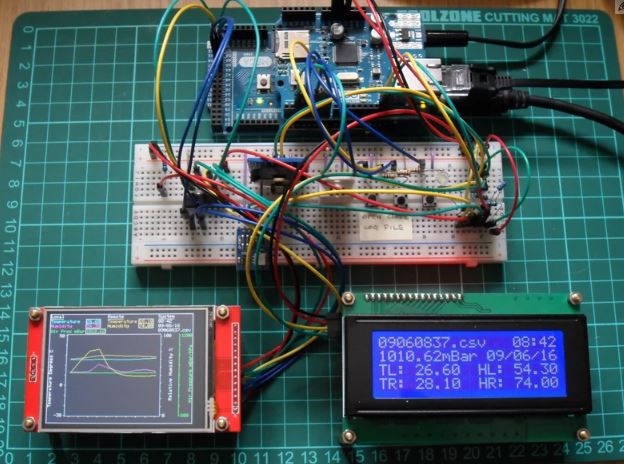
Once completed the software now drops into a loop monitoring the Broker connections along with any changes in button status, logfile status, logging period changes, logging status updates (via MQTT topic publications or via a local button press to close or open the logging file), local temperature or humidity levels or new publications of remote temperature and humidity. A summary of local barometric pressure, temperature and humidity changes both local and remote, along with current .csv filename, date and time are displayed on the system LCD in real time and repeated along with plotted trends on the system TFT.
COMMENTS