![]()
Internet of Things with Android and Arduino: Arduino IoT Project Overview
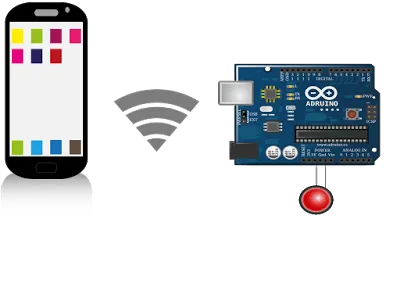
The picture below shows the main objects involved in the Arduino IoT project:

What we need is:
- Arduino Uno
- Ethernet shield
- Smartphone with Android
How to build an Arduino IoT project

#include <spi.h>
#include <ethernet.h>
byte mac[] = { 0xDE, 0xAD, 0xBE, 0xEF, 0xFE, 0xED };
IPAddress ip(192, 168, 1, 130); // Arduino IP Add
EthernetServer server(80); // Web server
// Http data
String reqData; // Request from Smartphone
String header;
int contentSize = -1;
String CONTENT_LENGTH_TXT = "Content-Length: ";
void setup() {
  // put your setup code here, to run once:
  Serial.begin(9600);
  pinMode(3, OUTPUT); // Set Pin 3 to OUTPUT Mode
  Serial.print("Ready...");
  //
  Ethernet.begin(mac, ip);
  server.begin();
}
void loop() {
  // Is there a client (Our Android smartphone)
  EthernetClient client = server.available();
  if (client) {
    // Let's start reading
    boolean isLastLine = true;
    boolean isBody = false;
    header = "";
    reqData = "";
    int contentLen = 0;
    Serial.print("Client connected!");
    while (client.connected()) {
     if (client.available()) {
       // Read data
      char c = client.read();
     if (contentSize == contentLen) {
       int idx = reqData.indexOf(":");
       String status = reqData.substring(idx + 1, idx + 2);
       Serial.println("Status : " + status);
       if (status.equals("1")) {
         digitalWrite(3, HIGH);
       }
       else {
         digitalWrite(3, LOW);
      }
     client.println("HTTP/1.1 200 OK");
     client.println("Content-Type: text/html");
     client.println("Connection: close");
     client.println();
     // send web page
     client.println("");
     client.println("");
     delay(1);
     break;
   }
  if (c == 'n' && isLastLine) {
   isBody = true;
   int pos = header.indexOf(CONTENT_LENGTH_TXT);
   String tmp = header.substring(pos, header.length());
   int pos1 = tmp.indexOf("rn");
   String size = tmp.substring(CONTENT_LENGTH_TXT.length(), pos1);
   Serial.println("Size ["+size+"]");
   contentSize = size.toInt();
  }
  if (isBody) {
   reqData += c;
   contentLen++;
  }
  else {
   header += c;
  }
  if (c == 'n' ) {
   isLastLine = true;
  }
  else if (c != 'r' ) {
    isLastLine = false;
  }
 }
}
// Close connection
Serial.println("Stop..");
client.stop();
}
}
Almost all the arduino source code is used to handle HTTP connections. Notice that at line 4 we set the MAC Address of the ethernet shield while at line 5 we set the IP address. The server runs on port 80, you can change this port if you want. Once we have created this server Arduino can exchange JSON requests with the external application including an app that runs on a smartphone.
In this first part of Internet of things with Android and Arduino project, you gained the knowledge on how to handle HTTP requests in Arduino. If you like to build a more complex project, you can explore how to build a smart plant monitoring system.
You can read these other tutorials:
How to control LEDs connected to Arduino using an Android app
How to build an Android IoT app using Android Things tutorial: Step by step tutorial
Android app client: Send HTTP request
To complete our Internet of things with Android and Arduino scenario, it is necessary to implement an Android app that sends JSON requests.
On the Android code side, the things are much simpler; the Android UI is shown below:

There is one simple button. When the user clicks on it, the app sends an HTTP request to Arduino, that runs the web server.
If you want to know more about HTTP look at making HTTP requests in Android.
The app layout is very simple and it is not covered here, the core of the app is where the button click is handled:
ledView = (ImageView) findViewById(R.id.ledImg);
// Set default image
ledView.setImageResource(R.drawable.white_circle);
// Init HTTP client
client = new HttpClient();
ledView.setOnClickListener(new View.OnClickListener() {
  @Override
  public void onClick(View v) {
   client.doRrequest(status ? "1" : "0");
   status = !status;
   if (status)
    ledView.setImageResource(R.drawable.white_circle);
  else
   ledView.setImageResource(R.drawable.red_circle);
  }
});
When the user touches the button, the app sends an HTTP request using HTTP client. In this case, this project uses OkHttp. The HTTP client is very simple:
public void doRrequest(String status) {
  initClient();
  Log.d("AA", "Making request..["+status+"]");
  Request req = new Request.Builder()
    .url(URL)
    .post(RequestBody.
        create(JSON, createJSON(status)))
     .build();
   client.newCall(req).enqueue(new Callback() {
    @Override
     public void onFailure(Request request,
                           IOException e) { }
     @Override
     public void onResponse(Response response) throws IOException {
        Log.d("AA", "resp [" + response.body().string() + "]");
      }
  });
}
Below some images of my work showing Arduino in IoT environment :


This Internet of things project with Android and Arduino showed how to integrate two different ecosystems and make them work together. In this post, you gained a basic understanding of how to create Arduino webserver example and how to connect it to the android app. This project can be extended and could be used as a base for arduino home automation. It is possible to make even more complex project that uses Android app and Arduino to control an RGB led.
COMMENTS