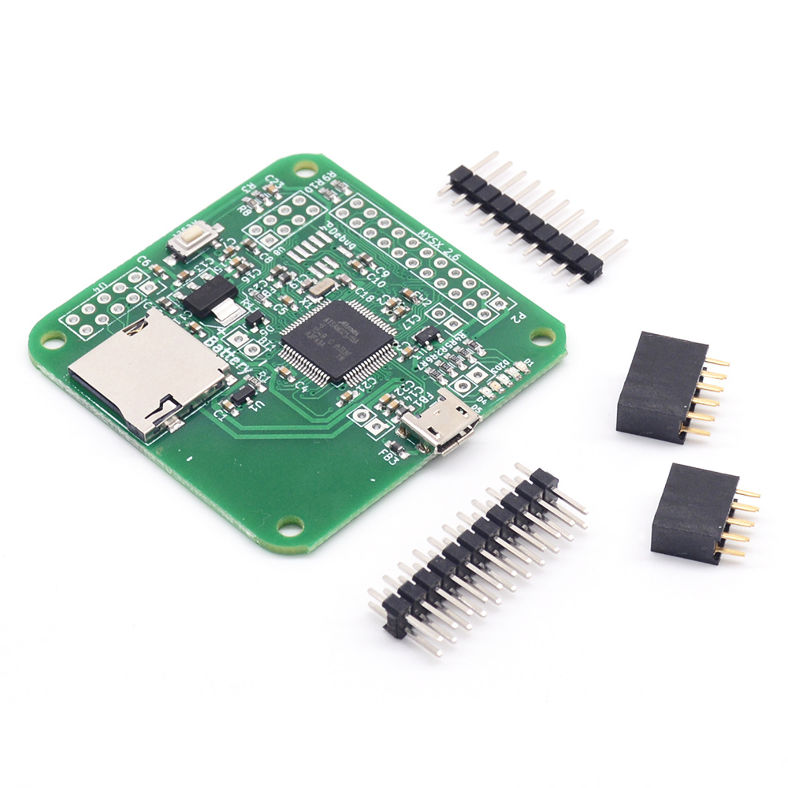
Sensebender Gateway

The MySensors Sensebender Gateway is a compact Arduino Zero compatible board that is purpose-built by the MySensors team to serve as a fully-functional, high-performance MySensors gateway.
introduction
The MySensors Sensebender Gateway is a compact Arduino Zero compatible board that is purpose-built by the MySensors team to serve as a fully-functional, high-performance MySensors gateway.The MySensors gateway is the first device you will need for your MySensors network and this one is designed from the ground up for both novices and experts. The gateway supports the nRF24L01+ or RFM69 radios and can interface with a wide array of HA controllers via USB or Ethernet.If you want to get up and running quickly with a no-compromise and flexible gateway designed and supported by the MySensors Team, then this is the gateway for you.
features
High Performance MCUAt it’s core, the Gateway is equipped with a high-performance Atmel SAMD21 MCU running at 48MHz offering plenty of headroom for advanced gateway-specific features as the MySensors ecosystem expands. The SAMD21 MCU product line is Atmel’s ARM Cortex offering equipped with 32Kb of RAM and 256Kb for flash providing ample working and persistent storage for current and future gateway tasks.Broad Home Automation Controller SupportThe Gateway is compatible with more than 20 of the most common home automation controllers on the market using either USB or Ethernet. Literally all requested automation controllers are currently supported and the list continues to expand… Don’t see yours, it is easy to write an adapter and we are here to help you.Secure IoT Radio NetworkThe Gateway includes footprints/pads for two very common radios supported by MySensors; the Nordic nRF24L01+ radio or the Hope RF RFM69HW radio offering users different options for their locale/home construction and IoT projects. Each Gateway includes an ATSHA204 CryptoAuthentication chip that can be used for hardware-based message signing for secure radio communications, after personalisation.Expandability The Gateway also includes an MYSX 2.6 connector that breaks out plenty of IO pins for DIY shields that can be used to add sensors and actuators to the gateway or to use the gateway board as a compact, high-performance node for more demanding IoT projects and applications. In addition, the Gateway includes a micro-sd card reader for IoT applications where additional local non-volatile storage is required (e.g. configuration files, storing time-series sensor readings for offline analysis, etc.).
technical details
Technical Specifications
  • Board size 5x5cm
  • Atmel ATSAMD21 (Arm cortex m0+ cpu core) with
    • 256Kb flash
    • 32Kb RAM
    • 48Mhz clock
    • RTC module
  • Micro sd card reader
  • Socket for nRF24L01+ module (module not included)
  • Pads for RFM69 module (module not included)
  • Socket for W5100 ethernet module (module not included)
  • Native USB port
  • ATSHA204A for signing
  • Onboard i2c eeprom
  • 5 LED's (Red, Green, Yellow, Blue and Orange)
  • MYSx 2.6 with
    • Dedicated UART
    • Dedicated SPI
    • Dedicated Interrupts
    • I2C bus (shared with onboard eeprom)
how to use

mysensorgw_01.jpg

Original : https://www.openhardware.io/view/12/Sensebender-Gateway#tabs-instructions

Setup and use

You need to add your own radio, either NRF24L01+ or RFM69(H)W radio modules, which you can find in our shop under the radio section, Also if you want to use it as an ethernet gateway, you need to purchase a W5100 ethernet module, the small breakout edition is the one to choose.

Windows drivers

You will need to install the SenseBender GW driver if you are running a version of Windows older than Windows 10. See Appendix A below for driver install instructions.

Default sketch

The factory default sketch is a serial gateway using NRF24L01 radio and no signing. If you want to use it in this configuration, then it’s just adding the box header for the NRF24L01 module, plug the radio in, and connect the gateway with a USB cable to your computer. The default sketch can be found in the Mysensors examples collection, as “SensebenderGatewaySerial”.

Other configurations

If you want to use any other configuration, like RFM69(H)W radio, ethernet, or hardware signing with ATSHA204, then you need to reprogram the board with your own firmware. This is easily done with the Arduino software suite (we recommend using the latest version of the Arduino IDE), where you can add our board definitions that matches the gateway board. For details on how to add these board definitions, you should go here. In addition you need to install Arduino SAMD board files which are installed from the Arduino Boards Manager. After installing the board definitions, choose Sensebender Gateway as your target platform, this will probably be the last board in the list shown by Arduino IDE. Also, you will want to make sure you are using the MySensors libraries v2.2.0 or newer.

Please note that if you want to use the ethernet module, you need to raise the socket as much as possible above the board while soldering it, as the ethernet jack on board the ethernet module is slightly higher than the pinheaders on the board.

documents
Code
SensebenderGatewaySerial.ino

COMMENTS

Please Login to comment
  Subscribe  
Notify of